Adding More Actions
So far we’ve implemented the basic requirements of a chat room. It can display messages, show particpants, and it allows users to send new messages. Now let’s go a step further and add some more actions. CodeRAD views like ChatRoomView allow for customization in a variety of ways, but the two primary methods are:
-
Actions
-
View properties
We’ve already used one action to implement the “send” function. As a reminder, we defined the action in our controller, then we passed it as an attribute to the ViewNode when creating the view:
public static final ActionNode send = action( (1)
    enabledCondition(entity-> {
        return !entity.isEmpty(ChatRoom.inputBuffer);
    }),
    icon(FontImage.MATERIAL_SEND)
);
....
ViewNode viewNode = new ViewNode(
    actions(ChatRoomView.SEND_ACTION, send) (2)
);
....
ChatRoomView view = new ChatRoomView(createViewModel(), viewNode, f); (3)| 1 | >Defining the “send” action. |
| 2 | Adding the “send” action to the view node, under the ChatRoomView.SEND_ACTION category. The category is a hint to the view about where and how the action should be incorporated into the View. |
| 3 | Creating new ChatRoomView, passing our ViewNode as a parameter |
A ViewNode is a user interface descriptor that can be used to customize the behaviour of a View. It provides a declarative way to define complex user interfaces in a simple way. For the purpose of this tutorial, we will only use the node as a means to pass actions to the ChatRoomView.
|
The “Send” action was added to the ChatRoomView.SEND_ACTION category, but the ChatRoomView also supports some other categories:
-
ChatBubbleView.CHAT_BUBBLE_CLICKED– An action that will be “fired” when the user clicks a chat bubble. -
ChatBubbleView.CHAT_BUBBLE_LONG_PRESS– An action that will be “fired” when the user long presses a chat bubble. -
ChatBubbleView.CHAT_BUBBLE_CLICKED_MENU– Actions that will be displayed in a popup-menu when the user clicks on a chat bubble. This category many include more than one action, and all of supplied actions will be included as menu items in the menu. -
ChatBubbleView.CHAT_BUBBLE_CLICKED_MENU– Actions that will be displayed in a popup-menu when the user long presses on a chat bubble. -
ChatBubbleView.CHAT_BUBBLE_LONG_PRESS_MENU– Actions that will be displayed in a popup-menu when the chat bubble is long pressed. -
ChatBubbleView.CHAT_BUBBLE_BADGES– Actions in this category will be rendered as “badge” icons next to the chat bubble. This is useful, for example, for displaying a “Like/Heart” badge on a chat bubble. -
ProfileAvatarView.PROFILE_AVATAR_CLICKED– An action that will be “fired” when the user clicks on one of the profile avatars next to a chat bubble, or in the title component. -
ProfileAvatarView.PROFILE_AVATAR_LONG_PRESS– An action that will be “fired” when the user long presses on one of the profile avatars. -
ProfileAvatarView.PROFILE_AVATAR_CLICKED_MENU– Actions in this category will be rendered in a popup menu when the user clicks on an avatar. -
ProfileAvatarView.PROFILE_AVATAR_LONG_PRESS_MENU– Actions in this category will be rendered in a popup menu when the user long presses on an avatar. -
ChatRoomView.TEXT_ACTIONS– Actions in this category will be rendered as buttons next to the text input field. This is an appropriate place to add “Photo” or “Video” capture capabilities.
Adding Phone and Video Conferencing
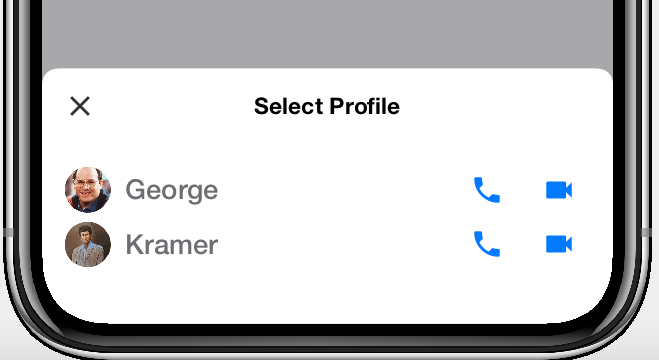
To get our feet wet with actions, let’s add some options to initiate a phone-call or video conference with one of the participants. When the user taps on a profile’s avatar, we’ll present the user with a menu to start a call or video conference.
In the ChatFormController, we’ll add a couple of new actions.
public static final ActionNode phone = action(
    icon(FontImage.MATERIAL_PHONE)
);

public static final ActionNode videoConference = action(
    icon(FontImage.MATERIAL_VIDEOCAM)
);

...

ViewNode viewNode = new ViewNode(
    actions(ChatRoomView.SEND_ACTION, send),
    actions(ProfileAvatarView.PROFILE_AVATAR_CLICKED_MENU, phone, videoConference) (1)
);| 1 | We add the phone and videoConference actions to the ViewNode in the ProfileAvatarView.PROFILE_AVATAR_CLICKED_MENU category so that they’ll be rendered in a popup-menu when the user presses on an avatar. |
Now run the app and click on the title component:
Or tap on an avatar next to one of the chat bubbles:
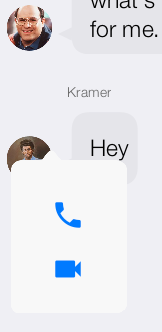
Currently, clicking on the “phone” or “camera” icon doesn’t do anything because we haven’t defined a handler. Let’s do that now:
addActionListener(phone, evt->{
    evt.consume();
    if (!CN.canDial()) {
        Dialog.show("Not supported", "Phone calls not supported on this device", "OK", null);
        return;
    }
    if (evt.getEntity().isEmpty(Person.telephone)) {
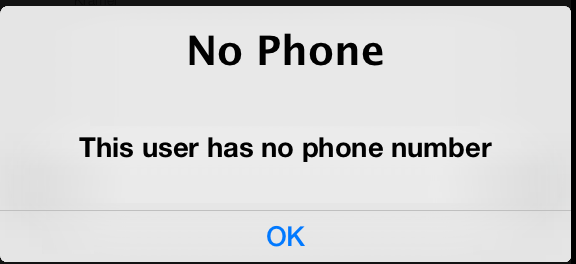
        Dialog.show("No Phone", "This user has no phone number", "OK", null);
        return;
    }

    String phoneNumber = evt.getEntity().getText(Person.telephone);
    CN.dial(phoneNumber);

});
In this handler we first check to see if the platform supports phone calls, and fail with a dialog if it doesn’t. Then we check if the entity in question has a phone number. This code makes use of loose-coupling as we using the Person.telephone tag to check for a phone number rather than a particular property. This will allow this code to work with any entity that has such a property. We also make use of the handy Entity.isEmpty(Tag) method, which will return true if this entity doesn’t have a matching property, or if the entity has the property, but has an “empty” value for it.
If you try the app out and attempt to phone any of the users, you’ll receive this dialog:
Let’s remedy this situation by adding a property to the ChatAccount entity type.
package com.codename1.cn1chat;
import com.codename1.rad.models.Entity;
import com.codename1.rad.models.EntityType;
import static com.codename1.rad.models.EntityType.tags;
import com.codename1.rad.models.StringProperty;
import com.codename1.rad.schemas.Person;
import com.codename1.rad.schemas.Thing;

/**
 * View model for an account profile.
 * @author shannah
 */
public class ChatAccount extends Entity {
    // The name property
    public static StringProperty name, thumbnailUrl, phone;

    private static final EntityType TYPE = new EntityType() {{
        name = string(tags(Thing.name));
        thumbnailUrl = string(tags(Thing.thumbnailUrl));
        phone = string(tags(Person.telephone)); (1)
    }};
    {
        setEntityType(TYPE);
    }

    public ChatAccount(String nm, String thumb, String phoneNum) {
        set(name, nm);
        set(thumbnailUrl, thumb);
        set(phone, phoneNum);
    }
}| 1 | Creating the phone property as a string property with the Person.telephone tag. |
And we’ll update the code in our ChatFormController that creates our participants to add a phone number.
Adding a phone number to the George account in the view controller. We leave Kramer’s phone number null:
room.addParticipants(
    new ChatAccount("George", georgeThumb, "712-555-1234"),
    new ChatAccount("Kramer", kramerThumb, null)
);
Let’s start up the app again. There are a few things to notice here:
-
If you press on either George or Kramer’s avatar next to one of their chat bubbles, and try to phone them, they’ll both give you the “This user has no phone number” message. Thats because the avatar that appears next to the chat bubble is actually the ChatMessage.ViewModel entity, and not our ChatAccount entity. The ChatMessage.ViewModel entity doesn’t include a telephone field. The ChatAccount entities are only used to render the title component of the form.
-
If you try to phone Kramer via the title component, you’ll get the same “This user has no phone number” message. This is correct, because we didn’t give Kramer a phone number.
-
If you try to phone George via the title component, it will dial the number that we registered with the George account. (If you’re running in the simulator, it won’t dial… it will just display a message in the console indicating that it is dialing the number).
This is progress, but why don’t we save the user the agony of having to click “phone” to find out if the app can actually make a phone call to that user. We have two options for this, we can either “disable” the phone action conditionally, like we did for the “send” action when the input field is empty. This will still show the phone button in the menu, but it will be greyed out and disabled. Alternatively we could actually remove the phone action in such cases so that it isn’t displayed at all for entities that don’t support it.
Let’s try it both ways:
public static final ActionNode phone = action(
    icon(FontImage.MATERIAL_PHONE),
    enabledCondition(entity->{
        return CN.canDial() && !entity.isEmpty(Person.telephone);
    })
);
Result:
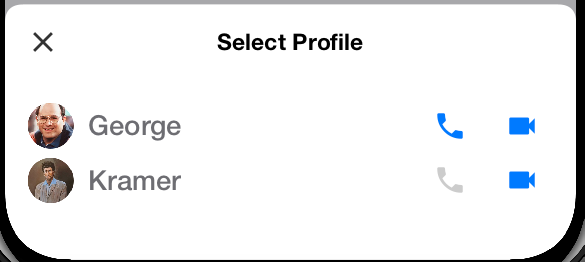
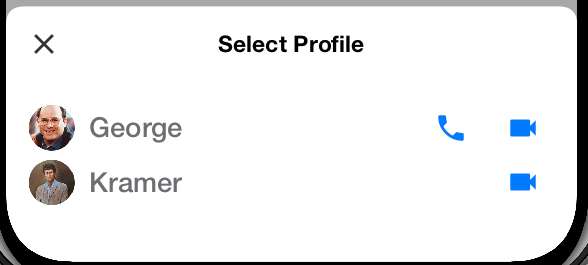
If we want to remove the action from menus where it isn’t supported, then we simply change enabledCondition() to condition().
Removing the phone action for entities that don’t have a phone number:
public static final ActionNode phone = action(
    icon(FontImage.MATERIAL_PHONE),
    condition(entity->{ (1)
        return CN.canDial() && !entity.isEmpty(Person.telephone);
    })
);| 1 | We use the condition(…) attribute instead of enabledCondition(…) to disable/hide the action |
And the result:
Adding a “Like” Badge
Most messaging apps provide a way to “like” a chat message. Let’s add this functionality to our app by using the ChatBubbleView.CHAT_BUBBLE_BADGES category to display the “liked” badge. We’ll use the ChatBubbleView.CHAT_BUBBLE_LONG_PRESS_MENU category to display the toggle button for the user to “like” and “unlike” the message.
public static final ActionNode likedBadge = UI.action(
    UI.uiid("ChatBubbleLikedBadge"), (1)
    icon(FontImage.MATERIAL_FAVORITE),
    condition(entity->{ (2)
        return !entity.isFalsey(ChatMessage.isFavorite); (3)
    })
);

public static final ActionNode likeAction = UI.action(
    icon(FontImage.MATERIAL_FAVORITE_OUTLINE),
    uiid("LikeButton"), (4)
    selected(icon(FontImage.MATERIAL_FAVORITE)), (5)
    selectedCondition(entity->{
        return !entity.isFalsey(ChatMessage.isFavorite); (6)
    })

);

...

ViewNode viewNode = new ViewNode(
    actions(ChatRoomView.SEND_ACTION, send),
    actions(ProfileAvatarView.PROFILE_AVATAR_CLICKED_MENU, phone, videoConference),
    actions(ChatBubbleView.CHAT_BUBBLE_LONG_PRESS_MENU, likeAction), (7)
    actions(ChatBubbleView.CHAT_BUBBLE_BADGES, likedBadge) (8)
);| 1 | We set the UIID of the badge to “ChatBubbleLikedBadge” which is a style defined in the RADChatRoom cn1lib’s stylesheet. It will make the badge small and red. |
| 2 | Use the condition() attribute to ensure that the “liked” badge only shows up if the message has been liked. |
| 3 | We are using the convenience method Entity.isFalsey(Tag) to determine if the chat message has been liked. This returns “true” if the value of this field is anything “falsey”, like null, or “”, or 0, or false. This allows for flexibility about how the view model wants to store whether the message is a favourite or not. |
| 4 | We define a UIID for the “Like” action so that we can make the button look how we like. |
| 5 | We use the selected(…) attribute on the likeAction to define a different icon for the action when the action is “selected”. |
| 6 | We use selectedCondition() on the like action to cause the action to be selected conditionally on whether the message is “liked”. This works similar to the condition() and enabledCondition() attributes, except this will affect the selected state of the action’s button. The presence of this attribute causes the button to be rendered as a toggle button instead of a regular button. |
| 7 | We add the like action to the CHAT_BUBBLE_LONG_PRESS_MENU category. |
| 8 | We add the liked action to the CHAT_BUBBLE_BADGES category. |
And, of course, we need to handle the “like” action to toggle the property on and off in the view model.
addActionListener(likeAction, evt->{
    evt.consume(); (1)
    Entity chatMessage = evt.getEntity();
    chatMessage.setBoolean( (2)
            ChatMessage.isFavorite, (3)
            chatMessage.isFalsey(ChatMessage.isFavorite) (4)
    );
});| 1 | We consume the event so that the view knows that we handled it. This prevents any default behaviour from conflicting. |
| 2 | We use the Entity.setBoolean(…) method to signify that we are setting the value as a boolean. This will ensure that the value is converted to the correct type for the underlying property. |
| 3 | We use the ChatMessage.isFavorite tag to target the field for loose coupling. The ChatBubbleView.ViewModel class that we’re using does implement a property with this tag, but we are writing code in such a way that we don’t need to care about which property it is. |
| 4 | Again using isFalsey() to get the current value of the flag, and we toggle it to be opposite. |
Finally, our “Like” button will be a heart icon. When selected it will be a filled heart icon. When unselected, it will be contour of a heart. We specified a UIID of “LikeButton” for this action in its definition. We just need to add this style to our stylesheet. Open the project’s stylesheet (at css/theme.css) and add the following:
LikeButton {
    background-color:transparent;
    cn1-border-type: none;
    color: red;
}
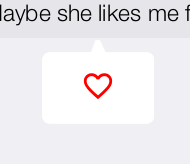
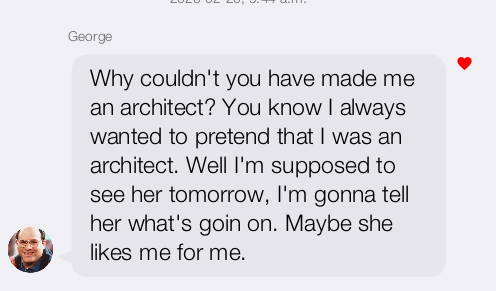
And the test drive… Open up the app again, long press on a chat message, and click the “Like” action. Then it should display a red heart badge next to the chat bubble.
Next Week
For our final part we’ll cover adding a photo capture feature.


