We got a
request from one of our pro-subscribers
to support push notification on Blackberry devices. Normally we just implement the feature pro-developers ask for. However, in this case we were cautious… Building anything for/on top of a Blackberry device is often an exercise in futility.
The gist of it though is that we were able to get it working despite the huge hassles. The main issue here isn’t the lack of documentation, it’s the over abundance of irrelevant, conflicting and misleading documents about a multitude of separate features of push related functionality on Blackberry devices.
So we decided to use this chance to go over the whole process of creating a push application for iOS, Android & RIM.
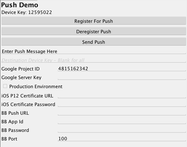
First there are several prerequisites you will need in order to get started with push:
Android – you can find the full instructions from Google
here
. You will need a project id that looks something like this:
4815162342.
You will also need the server key which looks something like this: AIzaSyATSw_rGeKnzKWULMGEk7MDfEjRxJ1ybqo.
- iOS – You will need to create a provisioning profile that doesn’t have the * element within it. For that provisioning profile you will need to enable push and download a push certificate. Notice that this push certificate should be converted to a P12 file in the same manner we used in the signing tutorials. You will need the password for that P12 file as well. You will need a distribution P12 and a testing P12. Warning! The P12 for push is completely different from the one used to build your application, don’t confuse them!
You will need to place the certificate on the web so our push server can access them, we often use dropbox to store our certificates for push.
- Blackberry – you need to register with Blackberry for credentials to use their push servers
here
. Notice that initially you need to register for evaluation and later on move your app to production. This registration will trigger an email which you will receive that will contain all the information you will need later on. Such as your app ID, push URL (which during development is composed from your app ID), special password and client port number.
To start using push (on any platform) you will need to implement the PushCallback interface within your main class. The methods in that interface will be invoked when a push message arrives.:
You will then need to register to receive push notifications (it’s OK to call register every time the app loads) by invoking this code below (notice that the google project id needs to be passed to registration):
Sending the push is a more elaborate affair, we need to pass the elements to the push that are necessary for the various device types depending on the target device. If we send null as the destination device our message will be sent to all devices running our app. However, if we use the device key which you can get via Push.getDeviceKey() you can target the device directly. Notice that the device key is not the argument passed to the registration confirmation callback!
Other than that we need to send various arguments whether this is a production push (valid for iOS where there is a strict separation between the debug and the production push builds) as well as the variables discussed above.
Unfortunately we aren’t done yet!
We must define the following build arguments in the project
properties:
ios.includePush=true
rim.includePush=true
rim.ignor_legacy=true
rim.pushPort=…
rim.pushAppId=…
rim.pushBpsURL=…
Once you define
all of these, push should work for all platforms.
We hope this small guide has made the development of a push enabled application a bit simpler.
Notice: This post was automatically converted using a script from an older blogging system. Some elements might not have come out as intended…. If that is the case please let us know via the comments section below.
Archived Comments
This post was automatically migrated from the legacy Codename One blog. The original comments are preserved below for historical context. New discussion happens in the Discussion section.
Anonymous — July 29, 2013 at 11:12 am (permalink)
Anonymous says:
Is this for premium subscribers only?
Anonymous — July 29, 2013 at 1:52 pm (permalink)
Anonymous says:
Yes, I neglected to mention in the article that push is for pro users only.
Anonymous — August 20, 2013 at 3:45 pm (permalink)
Anonymous says:
It was mentioned earlier that CN1 uses/used Urban Airship for push. Urban Airship supports tags to send to a subset of users. Will CN1 support tags in the future?
Anonymous — August 21, 2013 at 3:23 am (permalink)
Anonymous says:
We do not use Urban Airship at this time. We allow you to send a push to a specific device but we don’t have their level of refined targeting.
We don’t currently have any plans on supporting this or Urban Airship however, our plans are fluid and depend on the requirements of our pro/enterprise account subscribers.
Anonymous — August 28, 2013 at 5:27 pm (permalink)
Anonymous says:
At first I had trouble adding the build arguments properly (ie. ios.includePush=true)
Anyone following the instructions above might find this helpful to get them added in the proper way:
Discussion
Join the conversation via GitHub Discussions.