One of the cool things about Maven is Maven Central - the repository that contains every version of every Java library (that has been published on Maven central at least). Once your library is published, it can be used by other projects by copying and pasting an XML snippet into their pom.xml file. In this article, I describe how to publish your Codename One libraries to Maven central so that app developers can use them in their projects.
The Old Way
Up until now, Codename One library projects were distributed as .cn1lib files, which app developers could add to their projects either manually (by copying the .cn1lib file into their project’s lib directory), or via Codename One Settings, which would automate the download of the cnl1ibs off of GitHub.
If you had developed a .cn1lib and wanted to add it to the Extensions directory of Codename One Settings, you would fork the CodenameOneLibs repository, add your cn1lib to the cn1libs directory, add a corresponding entry into the CN1Libs.xml file, and then submit a pull request.
This process works fine, but has some limitations. Publishing your library to Maven central, won’t replace this process, but it will provide a robust alternative method of deployment that may be preferable to some users.
The New Way
Using the Codename One Library project archetype, you can deploy your library to Maven central and build a .cn1lib file which can be deployed manually. The process for adding your library to Codename One Settings is unchanged, except that you can now include a Maven dependency snippet in your entry in the CN1Libs.xml file. See the entry for the GoogleMaps library as an example:
        Codename One Google Native Maps Support
        Allows Codename One developers to embed native Google Maps on iOS, Android, and Javascript.  Uses Google maps in BrowserComponent on simulator and falls back to Codename One\n MapComponent on UWP.
        https://github.com/codenameone/codenameone-google-maps
        44
        Apache 2.0
        utilities,maps
        iOS, Android, Javascript

        CodenameOne


              com.codenameone
              googlemaps-lib
              1.0.1
              pom
Notice the <maven> tag which contains the XML dependency snippet that can be added to a project’s pom.xml file. If a user chooses to install the GoogleMaps lib from inside Codename One Settings in a Maven project, it will add the library using this Maven dependency. If the project is an Ant project, it will, instead fall back to the old way (downloading the cn1lib to the project’s lib directory).
Currently there are still many libraries that aren’t on Maven central. These libraries can still be used by Maven projects. If you are using Codename One Settings to install the library, then the process is seamless. If you want to install the cn1lib “manually”, you can use the install-cn1lib Maven goal.
Getting Started
Getting started building Codename One libraries is quite easy. You can start a new library project using the cn1lib-archetype as described in in the Codename One Maven Developer’s guide chapter on Creating a Library Project.
Preparing the Project for Maven Central
Maven Central is quite strict about the content of your project’s pom.xml file. It must contain , , and sections. These sections may not be part of your project initially. You’ll need to add them. Use the pom.xml file for the GoogleMaps cn1lib project as a reference to see how and where these tags should be added.
These are the values as they appear in that file:
The <licenses>, <developers>, and <scm> sections of your pom.xml file are required. This is a sample adapted from the GoogleMaps lib.
            GPL v2 With Classpath Exception
            https://openjdk.java.net/legal/gplv2+ce.html
            repo
            A business-friendly OSS license


            jsmith
            John Smith
            [email protected]
            +4


        https://github.com/codenameone/codenameone-google-maps
        scm:git:[email protected]:codenameone/codenameone-google-maps.git
In addition, Maven central requires that your project deploys javadoc and source jars. You’ll need to add the maven-javadoc-plugin and maven-source-plugin to the section of the pom.xml file.
Here is a snippet from the GoogleMaps lib that can be more-or-less just copied and pasted into your pom.xml file.
Including the javadoc and sources plugins as required by Maven Central.
        org.apache.maven.plugins
        maven-javadoc-plugin
        3.0.1


                build-javadoc

                    jar

                post-integration-test

                    true


            1.8
            protected
            false


        org.apache.maven.plugins
        maven-source-plugin


                attach-sources

                    jar
Request Access to Maven Central
If this is your first time publishing on Maven Central, you’ll need to on create an account on Sonatype JIRA, then create a new issue.
You can check out the issue I filed to request access for Codename One as a sample here.
Signing Artifacts with GPG
Maven Central also requires that you sign all of your artifacts using GPG, so you’ll need to install GPG.
If this is your first Rodeo, you may need to create and publicize your GPG key.
Generating a GPG Key
The following is an example readout for generating a keypair with gpg.
					$ gpg --full-gen-key
gpg (GnuPG) 2.1.15; Copyright (C) 2016 Free Software Foundation, Inc.
This is free software: you are free to change and redistribute it.
There is NO WARRANTY, to the extent permitted by law.
gpg: keybox '/path/to/gnupg/pubring.kbx' created
Please select what kind of key you want:
(1) RSA and RSA (default)
(2) DSA and Elgamal
(3) DSA (sign only)
(4) RSA (sign only)
Your selection? 1
RSA keys may be between 1024 and 4096 bits long.
What keysize do you want? (2048)
Requested keysize is 2048 bits
Please specify how long the key should be valid.
0 = key does not expire
  = key expires in n days
w = key expires in n weeks
m = key expires in n months
y = key expires in n years
Key is valid for? (0)
Key does not expire at all
Is this correct? (y/N) y
GnuPG needs to construct a user ID to identify your key.
Real name: John Smith
Email address: [email protected]
Comment:
You selected this USER-ID:
"John Smith "
Change (N)ame, (C)omment, (E)mail or (O)kay/(Q)uit? o
We need to generate a lot of random bytes. It is a good idea to perform
some other action (type on the keyboard, move the mouse, utilize the
disks) during the prime generation; this gives the random number
generator a better chance to gain enough entropy.
We need to generate a lot of random bytes. It is a good idea to perform
some other action (type on the keyboard, move the mouse, utilize the
disks) during the prime generation; this gives the random number
generator a better chance to gain enough entropy.
gpg: /path/to/gnupg/trustdb.gpg: trustdb created
gpg: key 27835B3BD2A2061F marked as ultimately trusted
gpg: directory '/path/to/gnupg/openpgp-revocs.d' created
gpg: revocation certificate stored as '/path/to/gnupg/openpgp-revocs.d\5694AA563793429557F1727835B3BD2A223A.rev'
public and secret key created and signed.
pub   rsa2048 2016-08-29 [SC]
5694AA563793429557F1727835B3BD2A223A
uid                      John Smith
sub   rsa2048 2016-08-29 [E]
$
You may also need to manage the expiration dates of your keys.
You’ll also need to distribute your public key to a few keyservers.
This is a short list of key servers you should send your key to:
- hkp://pool.sks-keyservers.net
Important:
Remember your GPG Passphrase!
And now that you have GPG installed and set up, you should add a section to your pom.xml to enable the signing of artifacts.
A snippet from the GoogleMaps lib pom.xml file that enables signing artifacts using GPG.
            sign-artifacts


                        org.apache.maven.plugins
                        maven-gpg-plugin
                        1.4


                                sign-artifacts
                                verify

                                    sign


                                    ${gpg.passphrase}
This snippet defines a maven profile that will cause GPG to sign all artifacts in the project during the “verify” phase, which is run any time you execute the verify, package, install, or deploy goals. You can activate this profile by adding -Psign-artifacts to Maven’s command-line arguments. e.g. mvn deploy -Psign-artifacts.
But we’re not quite ready yet. There are still a couple more ducks we need to line up.
You’ll notice that the above XML snippet references the ${gpg.passphrase} property, which we haven’t yet defined. We don’t want to store the GPG passphrase inside the pom.xml file since this is a secret, and your pom.xml file should be considered public. This is where our maven settings.xml file comes in.
Open your settings.xml file (located at $HOME/.m2/settings.xml). If you don’t have one, then create it. The settings file should look like:
					xml version="1.0" encoding="UTF-8"?


...


          sign-artifacts
          true

              YOUR_PASSPHRASE
Make sure your file includes the <profiles> snippet shown above. This defines the gpg.passphrase property so that it will be present for your Maven builds.
Important:
Substitute your passphrase for the YOUR_PASSPHRASE text.
Adding Distribution Management Settings
There is one last thing we need to do before we can publish our project to Maven Central. We need to add a <distributionManagement> section to our pom.xml file with a <repository> entry pointing to the Sonatype staging repository.
This section should be as follows:
        nexus-staging
        Nexus Release Repository
        https://oss.sonatype.org/service/local/staging/deploy/maven2/
And finally we need to add a <server> tag to our settings.xml file that includes your sonatype username and password (that you obtained a few steps back when you created a Sonatype JIRA account).
e.g.
      nexus-staging
      YOUR_USERNAME
      YOUR_PASSWORD
Deploying a Release to Maven Central
Deploying a release requires a few steps.
- Update the project version to a release version.
- Deploy The Project
- Close the Staging Repository
- Release the Staging Repository
- Update the project version to a new Snapshot version.
Updating the Project Version to a Release Version
When you are developing a project, it will usually have a SNAPSHOT version, meaning that the <version> tag in the project ends with “-SNAPSHOT”. When you perform a release, you should change the version to a release version. Basically this means simply removing the “-SNAPSHOT” from the end of the version number.
Since this is a multi-module Maven project, the version is hard-coded into each module, so updating the version by hand is both tedious and error-prone. Luckily Maven can automate this process for us.
Enter the following at the command prompt:
mvn versions:set -DnewVersion=YOUR_NEW_VERSION
Where YOUR_NEW_VERSION is the new version you want to set in your app. e.g.
mvn versions:set -DnewVersion=1.0
Then you need to commit this version change by running:
mvn versions:commit
At this point, if you look at your pom.xml files, you’ll notice that the <version> tag has been changed to “1.0”.
Deploying the Project
To deploy the project to Maven central, now we run:
mvn deploy -Psign-artifacts
Note:
If this is your first time around, expect this to error out. You may need to add the -e or -X flags to add more verbose logging to Maven so you can track down the problems. If you do experience build errors, they will likely be related to the GPG signing step, and are probably caused by a typo in the password or configuration for GPG.
Closing the Repository
If the deployment completes successfully, you should log into the nexus repository manager. It will look something like the following image:
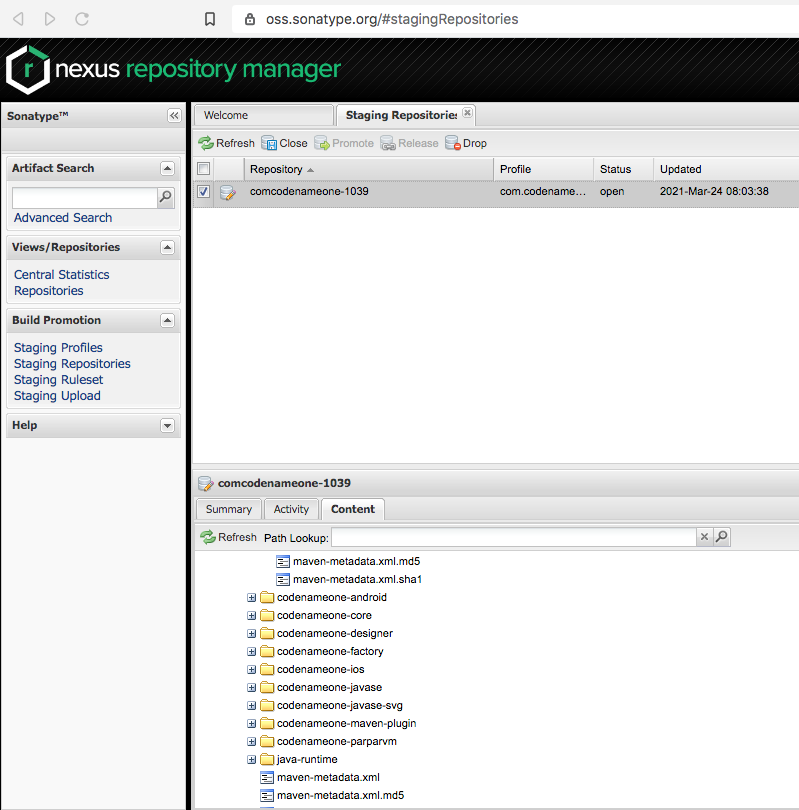
Your repository should be listed in the main frame. You should be able to browse the contents of it in the south frame. If it looks good, click on the “Close” button on the toolbar (with your repository selected). This will start a validation process on the server that will take a minute or so.
Releasing the Repository
Click refresh after a minute or two. If the “Close” action was successful, the “Release” button should be enabled.
Click “Release” to release your library.
It typically takes a few hours before your new version is available on Maven central. You can check on https://search.maven.org/ to see if it is listed.
Updating Project Version to Snapshot Version
One last thing remains before we can hang up our hat. We need to set the project version to a new snapshot version.
Usually, before I do that, I’ll commit and tag my “release” version in git.
					git commit -a -m "v1.0"
git tags -a "v1.0" -m "Version 1.0"
Then I’ll update the versions:
					mvn versions:set -DnewVersion=1.0.1-SNAPSHOT
mvn versions:commit
And then I’ll commit this change in git too.
git commit -a -m "Bumped version to 1.0.1-SNAPSHOT"
Adding Library to Codename One Libs
If you want other Codename One developers to find your library, I also recommend adding it to the CodenameOneLibs repository so that it will be listed in CodenameOne Settings when users are looking for available plugins. The process for this is quite simple.
- Fork the CodenameOneLibs repository.
- Add your .cn1lib file to the cn1libs directory. After running mvn deploy on your project, you’ll find that a .cn1lib has been built in your library project’s common/target directory. Copy this file into the cn1libs directory of the CodenameOneLibs project.
- Add a
<plugin>entry in theCN1Libs.xmlfile. Use the GoogleMaps entry as a reference.
- Add a
- Commit your change and send a pull request.
Summary
This may look like an over complicated process, but most of the heavy lifting is a one-time thing – setting up Sonatype access, generating certificates, etc… Subsequent releases will become much easier, and, the work will be worth it.
Discussion
Join the conversation via GitHub Discussions.