As you may know, we are moving to Maven for our build tool. As part of this transition, we are moving towards a single Maven project structure, and away from separate structures for each IDE. This will be easier to maintain, and will also make it easier to collaborate on projects with other developers who use a different IDE (or no IDE at all).
We have also introduced an online new tool for creating new app projects called Codename One initializr. Alternatively, you can create new projects using the cn1app-archetype (for App projects), and cn1lib-archetype for library projects.
That’s great for new projects. But what about my existing application project? Is there an easy way to convert my old Ant project into a new Maven project?
Yes there is! We have just released a new Maven migration tool that makes migrating your old projects to Maven as simple as clicking a couple of buttons.
The following 5-minute video shows you how to use this tool to convert your existing application projects (beginning at approx 1:37) and library projects (beginning at approx 3:48).
TLDW (Too Long Didn’t Watch)
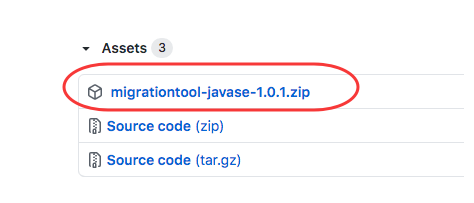
I begin the video by downloading the latest release of the Codename One Migration tool. At the time of writing, the latest release is 1.0.1, so I downloaded the file named “migrationtool-javase-1.0.1.zip” from the “Assets” for the release:
Note:
The Migration Tool should work on any computer with Java8 or higher installed. I have tested it on Windows, Mac, and Linux. Other than Java, it has no dependencies. It doesn’t require Maven to be installed, as it uses the Maven wrapper to download the correct version of Maven as required.
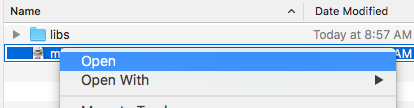
After downloading and extracting the Zip file, I open the “migrationtool-javase-1.0.1.jar” file contained inside.
If you have Java installed, you should be able to double-click this jar file to open the app.
Tip:
On newer versions of Mac OS, you will need to right click on the .jar file and select “Open” from the context menu.
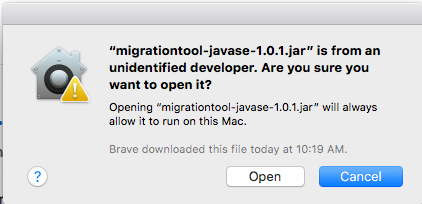
It will pop up a scary dialog saying that the app is from an unidentified developer.
Press the “Open” button, and it will open the app. You only need to do this the first time you open the app.
The app’s main window looks like the following:
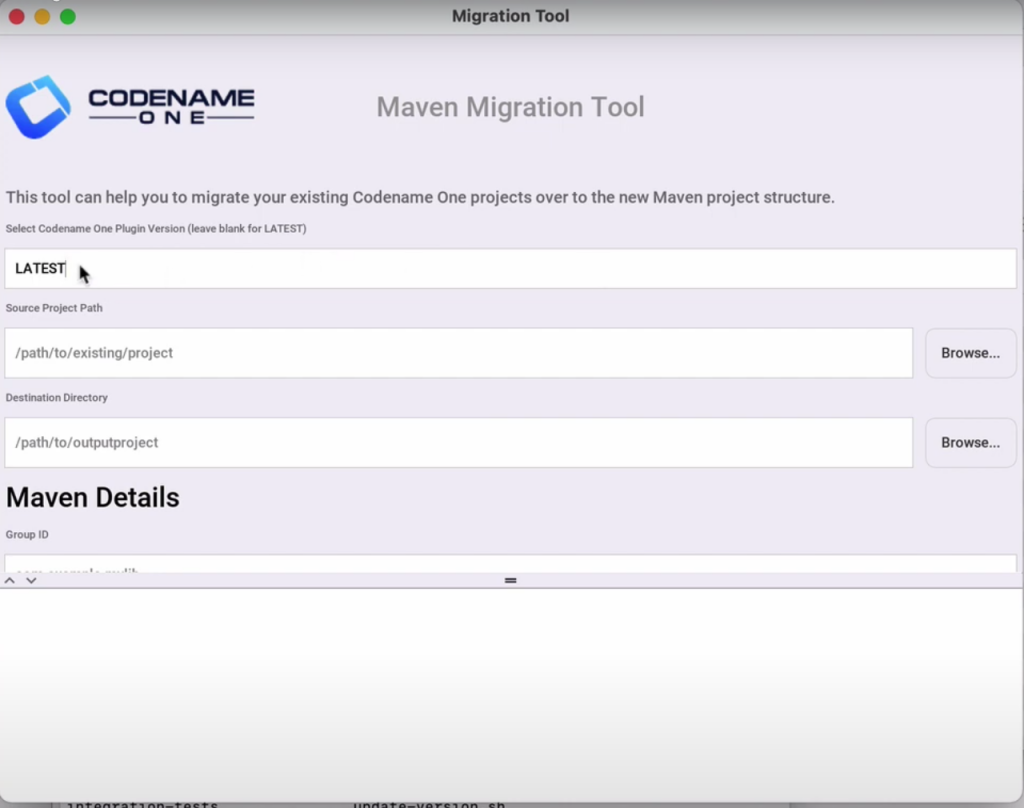
The first text field allows you to specify the version of the Codename One plugin that you wish to use to perform the migration. If you leave this field blank or with the special value “LATEST”, then it will automatically use the latest version from Maven central.
Tip:
You can use a snapshot version that you have built yourself also. Just enter the “SNAPSHOT” version into this field. This requires that you have build and installed the cn1-maven-archetypes and CodenameOne projects into your local Maven repository.
Migrating the Kitchen Sink App
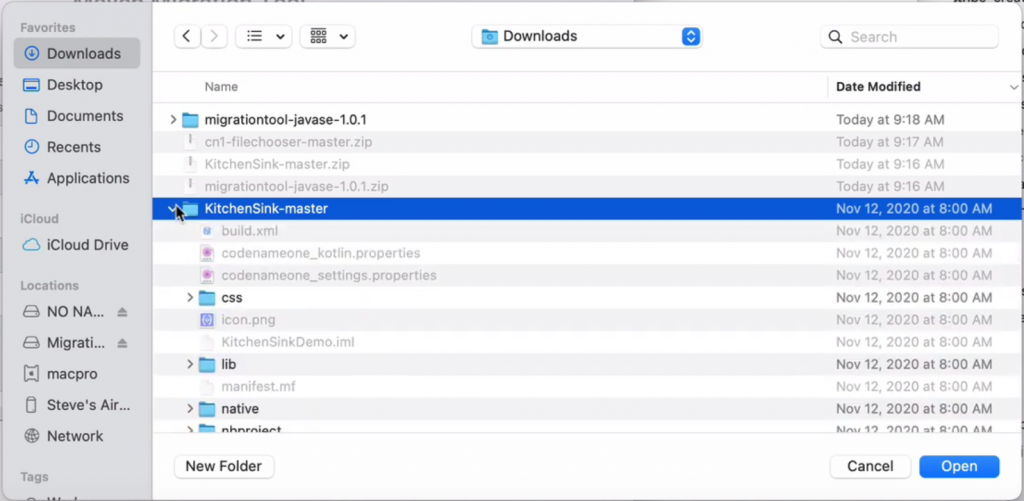
To demonstrate the process for migrating an application project, I download the KitchenSink project from Github.
I then (at approx 1:45) press the “Browse…” button next to the “Source Project” field.

And select the Kitchen Sink project folder in the file dialog.
Next, I select the destination directory by pressing the “Browse…” button next to the Destination Directory field.
I select the Downloads directory here for my destination.
Then I press the Create Project button, to start the migration.

Note:
For application projects you don’t need to enter a groupId or artifactId. It will use the project’s packageName as the groupId, and the mainName as the artifactId.
This triggers Maven to run the generate-app-project goal, and you can follow the process in the console at the bottom of the window:
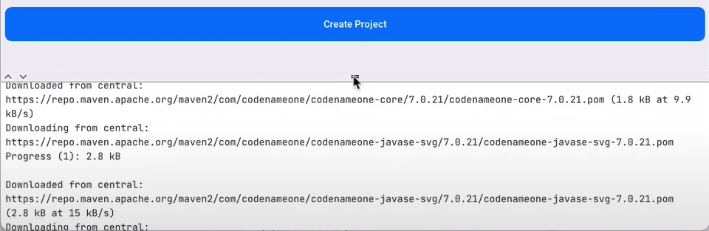
This takes a few seconds, and when it is done, it pops up a success dialog:

When you click “OK”, it will also open the new project directory in the Finder or equivalent.
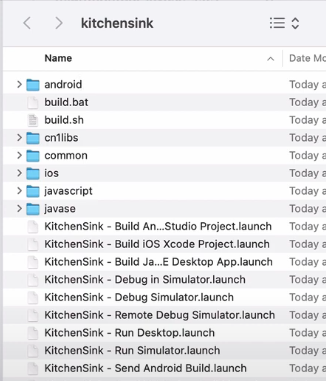
Working with the Project
You can open this project in any IDE that is compatible with Maven. I recommend IntelliJ, but Eclipse and NetBeans will work well also. You can also work with it from the command-line.
Find out more about the project structure, including running, building, and modifying it in this tutorial.
Migrating the Filechooser Library Project
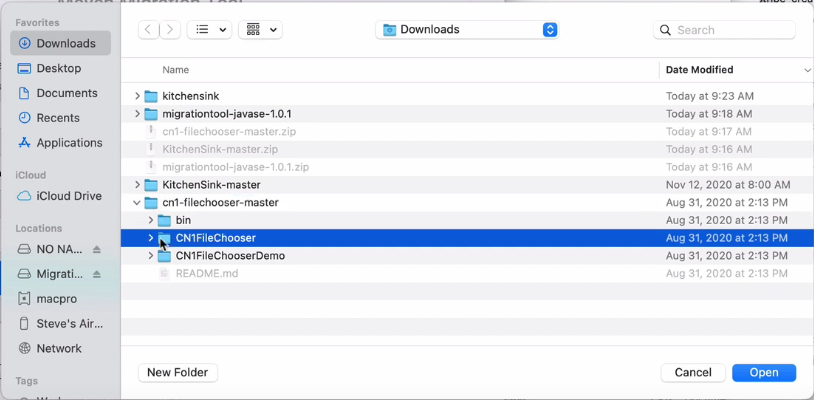
To demonstrate the process for migrating a library project, I download the CN1FileChooser library from Github and try to convert it, at approximately 3:45 of the video.
I select a new source project by pressing the “Browse…” button next to the Source Project field. Then I select the CN1FileChooser library in the dialog:
Notice, that as soon as we select this project, it reveals a new section on the form to enter maven details:
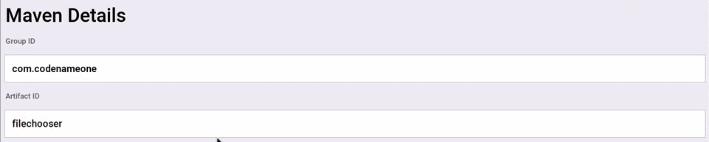
In this example, I entered “com.codenameone” for groupId and “filechooser” for artifactId. You would enter values appropriate for your project instead.
From there I press the Create Project button again, and watch the output in the console. When it is finished, it will open my project in the finder window, just as it did for the application project migration.
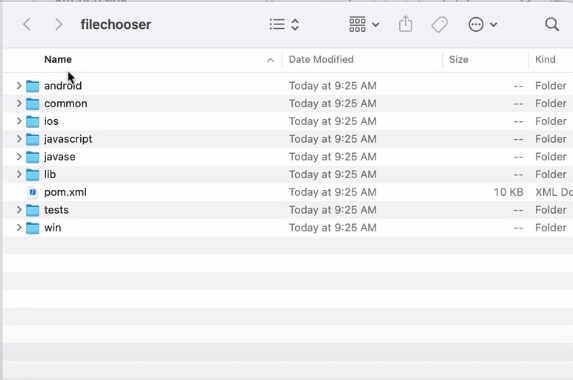
Similar to the application project, you can open this project in any IDE that supports maven. Or you can work with it directly from the command-line.
The Old-Fashioned Approach
Just in case you’re old-fashioned, and prefer to do things from the command-line, the following sections describe the same process, except using maven directly from the command-line.
Converting an existing App Project to Maven
The Codename One Maven plugin provides a Maven goal that will generate a new app project based on an existing Ant project. Allow me to demonstrate this on the Kitchen Sink app.
Note:
For the purposes of this post, I’m going to use a tag I created for the KitchenSink repository so that the examples here continue to work in the future, even if the KitchenSink app structure is changed.
Download the source code for the Kitchen Sink project and extract it. Once extracted you’ll have the project in a directory named “KitchenSink-1.0-cn17.0.11”
Now, open a command prompt in the directory containing the KitchenSink project. In the listing below, I’m going to use CN1_VERSION=7.0.19, but you should change this to be the latest version in Maven central.
					CN1_VERSION=7.0.22
mvn com.codenameone:codenameone-maven-plugin:${CN1_VERSION}:generate-app-project \
  -DarchetypeGroupId=com.codenameone \
  -DarchetypeArtifactId=cn1app-archetype \
  -DarchetypeVersion=${CN1_VERSION} \
  -DartifactId=kitchensink \
  -DgroupId=com.example \
  -Dversion=1.0-SNAPSHOT \
  -DinteractiveMode=false \
  -DsourceProject=KitchenSink-1.0-cn7.0.11
Note:
This command is formatted for the bash prompt (e.g. Linux or Mac). It will work on Windows also if you use bash. If you are on Windows and are using PowerShell or the regular command prompt, then you’ll need to modify the command slightly. In particular, the entire command would need to be on a single line. (Remove the ‘' at the end of each line, and merge lines together, with space between the command-line flags)
This will generate a new Maven project in a directory named “kitchensink”, because of the -DartifactId=kitchensink option.
Tip:
When converting your own projects, you’ll want to change the -DgroupId, and -DartifactId parameters to suit your needs.
That’s all there is to it. From now on, you can work with this new maven project, and ditch the old project.
For an introduction to this new project structure, you should start with this tutorial, as it walks you through all of the common tasks (e.g. running, debugging, building, etc..).
Converting an Existing Library Project to Maven
We used the “generate-app-project” Maven goal to migrate our app project. For a library project, we’ll use the “generate-cn1lib-project”
As an example, I’ll Migrate the CodeRAD library project to Maven.
Note:
For the purposes of this post, I’ll be using a tag of the CodeRAD repo to ensure that these examples continue to work after the master branch is changed.
Download the source code for the project and extract it. You should now have the project in a directory named CodeRAD-1.0.
Now, open a command prompt/terminal window and navigate to the directory containing the CodeRAD-1.0 directory. In the listing below, I’m going to use CN1_VERSION=7.0.19, but you should change this to be the latest version in Maven central.
					CN1_VERSION=7.0.22
mvn com.codenameone:codenameone-maven-plugin:${CN1_VERSION}:generate-cn1lib-project \
  -DartifactId=coderad \
  -DgroupId=com.example \
  -Dversion=1.0-SNAPSHOT \
  -DinteractiveMode=false \
  -Dcn1Version=${CN1_VERSION} \
  -DsourceProject=CodeRAD-1.0
If all went well, it should have created the project in a directory named “coderad” (because of the -DartifactId=coderad argument).
Tip:
When converting your own projects, you’ll want to change the -DgroupId, and -DartifactId parameters to suit your needs.
That’s all there is to it. You can start working with the new maven project and ditch the old Ant project. For details on working with this new project structure, see Creating a Library Project from the Codename One Maven Developers Guide.
Archived Comments
This post was automatically migrated from the legacy Codename One blog. The original comments are preserved here for historical context. New discussion happens in the Discussion section below.
Diamond Obama — April 14, 2021 at 4:43 pm (permalink)
Diamond Obama says:
Thanks Steve, for making us lazy developers lazier 😉
This is a really helpful tool.
Diamond Obama — April 14, 2021 at 4:58 pm (permalink)
Diamond Obama says:
I’m getting an error when I click the JavaSE jar file on Windows 10 with Java 6,7,8,9,11, and 14.
Java Virtual Machine Launcher
Could not find the main class:
com.codename1.maven.migrationtool.MigrationToolStub.
Program will exit.
Steve Hannah — April 14, 2021 at 5:01 pm (permalink)
Steve Hannah says:
Are you building from source? (you shouldn’t build from source).
Use the zip distribution. https://github.com/shannah/maven-migration-tool/releases/download/v1.0.3/migrationtool-javase-1.0.3.zip
Diamond Obama — April 14, 2021 at 5:41 pm (permalink)
Diamond Obama says:
Both building from Source and the zipped app produced the same error.
Steve Hannah — April 14, 2021 at 5:51 pm (permalink)
Steve Hannah says:
I’d like to better understand exactly what you’re doing. I’ve tested on 3 Windows machines now and can’t reproduce.
All I can think is that perhaps it is choosing an old version of Java (pre 8) when you open the jar.
So the process:
- Download the zip file.
- Extract the zip file (i.e. right click > Extract All)
- Open the directory that was extracted. It will have the jar file and a “libs” directory.
Do all of those steps correspond to your steps? What does the error look like?
If that fails, perhaps try running it from the command-line: java -jar migration-tool-javase-1.0.3.jar
Diamond Mubaarak — April 15, 2021 at 8:22 am (permalink)
Diamond Mubaarak says:
Running in command line works, thanks.
BTW, “Post Comment” on this WebPage is sometimes hidden and only shows when you hover.
Steve Hannah — April 15, 2021 at 12:07 pm (permalink)
Steve Hannah says:
Running in command line works.
Probably double-clicking was choosing Java6 or Java7 to run it then. If you right click the jar, and select “Open With”, it may allow you to select a specific version of Java to run it.
I guess this is why best practice is to distribute with bundled JRE. The first release of this tool I generated native apps for (on Mac and Windows) using the build server, but decided to forego that as the jar distribution seemed to work just as well. Perhaps I need to generate launch scripts for the jar executable to help choose an appropriate JRE.
ThomasH99 — September 19, 2021 at 2:08 pm (permalink)
ThomasH99 says:
I’m finally getting around to try out this migration, but when executing the migrationtool jar (on Mac Big Sur, and using the Open as recommended which by default is JavaLauncher.app)
I get an error “Java Application launch failed.” asking me to look in the Console for error messages but I can’t find any references to migrationtool. Any idea what might be wrong? (java –version says openjdk 15.0.1, but in System Preferences I see Oracle Java build 1.8.0_301-b09).
However, afterwards I tried with the command line ike Diamond and that works, but still it might indicate an issue you’d want to fix.
ThomasH99 — September 19, 2021 at 7:06 pm (permalink)
ThomasH99 says:
The source code of my app is not in the new source directory. Is that supposed to be copied over as well or does the script only create the project and you then bring in the source yourself? Maybe a stupid question (I’m not familiar with Maven at all), but I got the impression the migration tool handled everything 🙂
ThomasH99 — September 19, 2021 at 7:43 pm (permalink)
ThomasH99 says:
Small usability suggestion: if you indicate a Destination Directory that doesn’t exist you get an error message in red saying “Specified directory could not be found”. However, if you then enter a correct directory, the error message doesn’t go away, making you think the new value is also wrong.
ThomasH99 — September 19, 2021 at 8:43 pm (permalink)
ThomasH99 says:
Sorry, last comment today: I successfully generate a project, but when I open it in IntelliJ I don’t see any Configurations. If I click on e.g. Run/Run, I get a popup saying Run – Edit Configurations, but no scripts in the list. Maybe the migrationtool assumes a recent CN1 project (those I’ve tried with date back at least a few years)? Or do I need to do something specific in IntelliJ (I’m a newbie)?
Steve Hannah — September 21, 2021 at 11:54 am (permalink)
Steve Hannah says:
If the run configurations aren’t there, then something is wrong. It may not be recognizing it as a maven project. Make sure you’re opening the root project – not one of the submodules. Relevant documents:
https://shannah.github.io/codenameone-maven-manual/I suspect that it may be using the wrong JDK. You should be using JDK 11 or JDK 8 for now. For the migration tool, you can try running it in terminal using
java -jar migration-tool.jar, and that way have more control over which JDK it uses for the migration. If you find you need to copy source files to different places after the migration is complete, then there’s a problem.
ThomasH99 — September 22, 2021 at 7:04 pm (permalink)
ThomasH99 says:
Thanks Steve, after forcing java to use 1.8 and having the same issue, it turned out the problem was opening the wrong root directory, I opened the one I created for the migrated project and as you clarified, I needed to open the one inside that. I can also open the ones migrated the other day, so using jdk 15 seems to work fine. Thanks for your help!
ThomasH99 — September 22, 2021 at 8:16 pm (permalink)
ThomasH99 says:
One thing that would really help me with the migration from Netbeans to IntelliJ: when my project in Netbeans is in Git, how do I connect the migrated copies in IntelliJ to the same Git repos? Should I delete the source in the new migrated project and then connect and download from Git or may that disrupt something in the migrated project?
Adrian Ionescu — September 23, 2021 at 4:17 pm (permalink)
Adrian Ionescu says:
I have been using the cn1-mirah-json macros for json/pojo mapping. After converting the project to maven format, Netbeans (8.2) is complaingint that it can’t find the Mapper classes. Any help with this? Thanks.
Steve Hannah — September 23, 2021 at 4:50 pm (permalink)
Steve Hannah says:
Unfortunately the Mirah support depended on a few ant-specific things. I’ll need to look into porting it to Maven, but I don’t have an ETA.
Adrian Ionescu — September 23, 2021 at 6:54 pm (permalink)
Adrian Ionescu says:
Thank you. Then I’ll postpone porting to maven for a while.
Discussion
Join the conversation via GitHub Discussions.