If you have an existing Codename One app that uses the designer for its theme, then you may have been reluctant to try to migrate it to CSS. Codename One projects are assumed to be using either CSS or the designer for their themes. But not both at the same time. When an app has CSS enabled, it compiles the css/theme.css to src/theme.res when the app is built, and it is kept in sync when changes are made to the theme.css file. Changes that you make manually to the theme.res file, would be lost the next time it synchronizes with the theme.css file. This doesn’t jive with legacy projects where you have customized the theme.res using the designer.
I don’t blame you if you don’t feel like converting your theme.res file into CSS. After years of customization, a theme.res file may contain hundreds of images and styles. In addition, if your app is using the old GUI Builder, your theme.res file may include actual form designs, which can’t be migrated to CSS.
Fortunately, there is a way to add CSS support for your application without having to lose all of your work. Codename One allows you to “layer” themes over top of each other, thus allowing you to use multiple themes. It does this, for example, if you are using the native theme in your app. It uses the native theme for the platform as a base, but overrides it with the styles in your app’s theme.
Steps:
Before you begin, make sure that your theme.res is not currently opened in the designer.
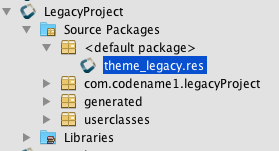
Rename your “theme.res” file to “theme_legacy.res” (This is found in the src directory)
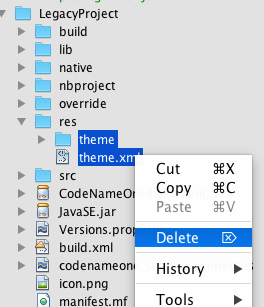
- Delete the
res/themedirectory, and theres/theme.xmlfile from your project.
Open the theme_legacy.res file in the designer.
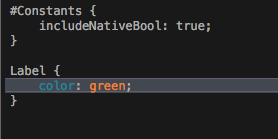
Under theme constants, add the constant “OverlayThemes”, with a value of “theme”.
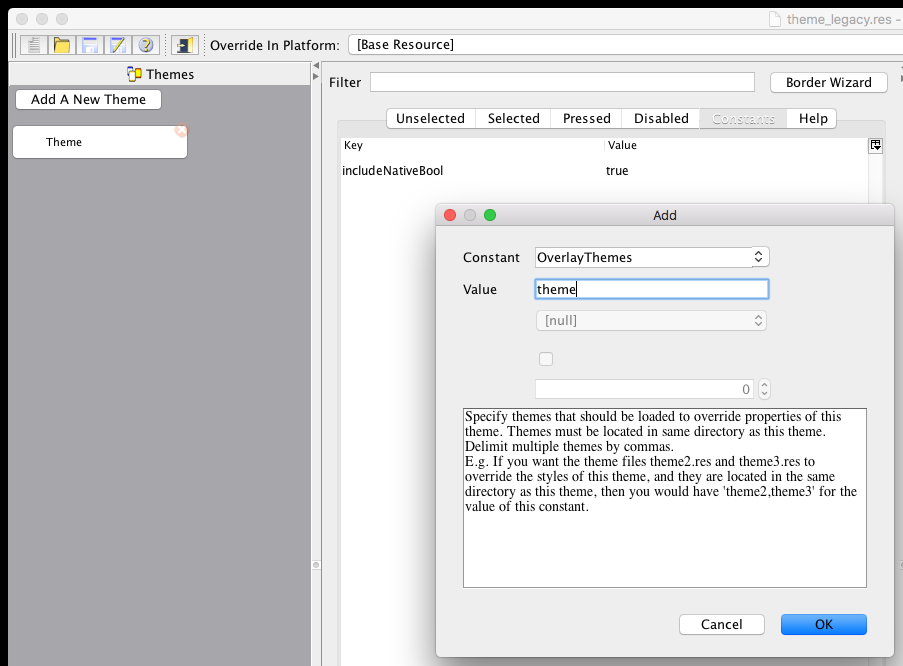
Then Save
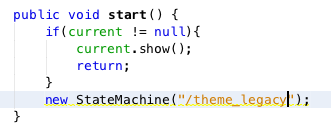
- Open your app’s main file, and find where the “theme.res” file is loaded. Look for a line like:
theme = UIManager.initFirstTheme("/theme");
And change it to
theme = UIManager.initFirstTheme("/theme_legacy");
If your app is an old GUI Builder app, then it might be new StateMachine("/theme") instead.
Save
- Open Codename One Preferences.
- Click on “CSS Support”
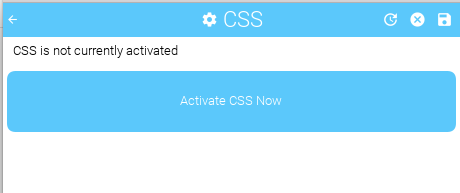
- Click “Activate CSS Now”
The screen should then change to a menu as shown here:
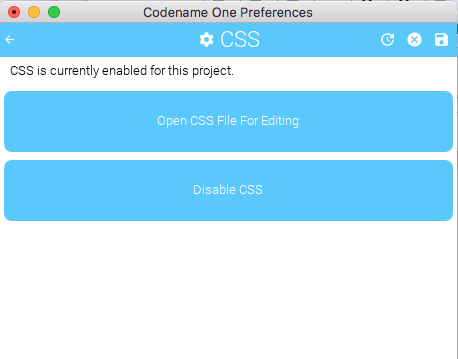
- Press “Open CSS File For Editing”
Open the CSS file for editing, and make a change that you’ll definitely notice, for testing. Here I’ll just change the color of labels to “Green”.
- Save the CSS file, and run your project.
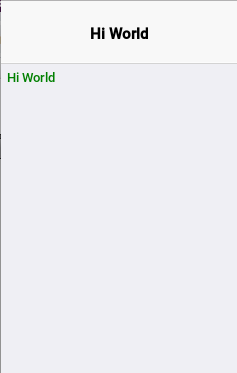
You should see the CSS take effect. In my example, my label is now green.
What did all this do?
This tells the app to load your theme_legacy.res file instead of theme.res. Because of the “OverlayThemes” constant in your theme_legacy.res, Your app will automatically load the theme.res file’s styles over top of your legacy theme. The theme.res file will then be generated from your css/theme.css file, and kept in sync.
Archived Comments
This post was automatically migrated from the legacy Codename One blog. The original comments are preserved below for historical context. New discussion happens in the Discussion section.
Francesco Galgani — February 14, 2020 at 11:06 am (permalink)
Another tip about CSS is the support for multiple CSS files in the same project, as explained here: https://stackoverflow.com/a/53488737. I have thousands of lines of CSS, and I feel convenient to use multiple CSS files. This also allows me to have a separate CSS files for Android, for iOS and Javascript, that are useful in the (very few) cases that it’s necessary. The downside is that, in this way, the support for recompiling CSS on saving and the updating of UI on the fly is lost. It could be interesting a native support for multiple CSS that doesn’t require to manually edit the build.xml and that can update the UI on the fly.
Javier Anton — February 16, 2020 at 7:22 am (permalink)
Nice post, thanks. Once we have CSS enabled, are we able to continue editing our designer theme, or is that no longer editable?
Shai Almog — February 17, 2020 at 2:10 am (permalink)
You can edit the non-CSS resource files using the designer. You can also open the CSS file in the designer but all changes will be overwritten so it’s mostly useful as a debugging tool to see what the CSS generated which is often interesting (e.g. it sometimes generates images to implement some UI settings).
Durank — February 18, 2020 at 3:02 pm (permalink)
this migration create all my styles, contants, containers, etc in the theme.css file from theme.res? when I migrated to css file I need to continue editting .css file ?
Shai Almog — February 19, 2020 at 3:12 am (permalink)
No. You will need to maintain both.
Durank — March 3, 2020 at 3:37 pm (permalink)
When I made the migration following the up steps recommended. If I compile and run my app in simulator it will continue working with out doing nothing?
Witch file I will edit in the future if In want make some change? theme_legacy.res or theme.css?
Durank — March 3, 2020 at 4:52 pm (permalink)
But could you tell me what is the purpose of this post? I need to migrate manually all my styles to the .css file?
Shai Almog — March 4, 2020 at 2:12 am (permalink)
Both would be editable. The idea is that you’d want to start moving stuff to the css but do it at your own pace
Shai Almog — March 4, 2020 at 2:15 am (permalink)
It looks like you created a recursive dependency between the CSS and the theme. Did you follow all the instructions?
Shai Almog — March 4, 2020 at 2:16 am (permalink)
Shai Almog says:
That you can do it at a slower pace by mixing css and your existing work.
Durank — March 5, 2020 at 5:27 pm (permalink)
Durank says:
I solve the issue. Other questiong to you. Can I write all my styles to css file from the theme_legacy.xml to modifie any uiid?
what is the representation in css code this style
Shai Almog — March 6, 2020 at 5:15 am (permalink)
Shai Almog says:
These map pretty closely to CSS. Which specifically is causing a problem?
We don’t support automatic CSS conversion from resources.
Discussion
Join the conversation via GitHub Discussions.