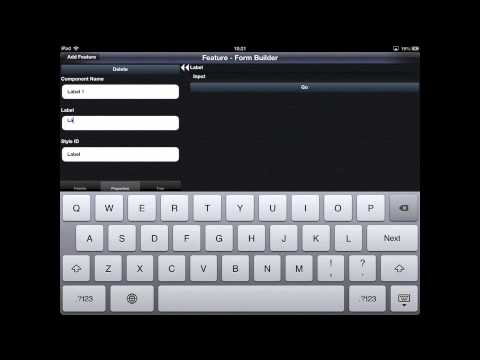
The PC isn’t going away tomorrow but I think we took a major step in reducing the need for it when building some applications in the upcoming version of Maker. We just launched a very preliminary preview of our new Drag & Drop form designer for Maker. This is pretty rough early on, but having built quite a few GUI builders I can tell you that its 90% there!
You can drag elements into place, yes they are all in a vertical layout (BoxLayout Y) and there is no container hierarchy (yet) but the infrastructure is there and its already looking better than our current GUI builder looked at that stage!
Stay tuned and as usual we really appreciate your feedback.
Arguably the more interesting story is the plugin suppor
t. As Codename One developers you can now build plugins for Maker using Codename One & NetBeans!
This effectively turns Maker into a tool that is limited only by your imagination and not by some arbitrary constraints we put forth.
One thing to keep in mind before proceeding:
A plugin can’t be previewed within Maker. The user will be able to pass arguments (settings) to the plugin and see it within the app but he won’t be able to launch it (we can’t dynamically download code according to store EULA’s and also some technical limitations).
So how does this work?
A Codename One Maker
plugin is really just 2 files an XML file and a CN1Lib file.
The XML file describes
the requirements of the plugin from the user and gives us basic details about the plugin, only the XML file is ever downloaded to the device.
When the user sends the build, the details are sent to the server. The server downloads and incorporates the CN1Lib file which can include native code or any other capabilities. Its compiled like any Codename One library in that regard. When the built application on the device the user can see the plugin
in action.
So how do we build a hello world plugin?
I created a simple Twitter feed plugin just to show the basic principals (see the full project at the bottom of this post). To start off we need to create a new Library Project in NetBeans (sorry currently Eclipse doesn’t support Library projects although its theoretically possible to work with it to build these projects).
We can remove the hello world code and create a new package with our company and name of the plugin, then we need to implement the plugin. The plugin is a class that derives from MakerPlugin here is the simple Twitter plugin from the code below.
Notice the overriden methods above are a part of the plugin interface, once we are in the plugin itself we can just write any Codename One code that we want although keep in mind that I try not to block the execution thread… Otherwise I might create an unpleasant experience when building a tabs based application.
Also notice that I enable scrollability since the parent form won’t be accessible we disabled scrolling there (to avoid nested scrolling issues), if you need scrolling you need to explicitly declare it.
Its probably obvious but bares stating that the plugin class must be public, have a no argument constructor (or no constructor which is the same thing) and mustn’t be abstract.
You will also need one more file which is the xml descriptor file, in my case its twitter.mplugin (in the root of the downloaded file) which you can see right here:
Notice several things:
We declare the maker version, this is crucial since if someone hasn’t updated Maker on the device and your plugin expects a specific version… It should fail to install.
The package name and the class name must match exactly your class since that is how we generate the plugin calls on the server!
The cn1lib entry MUST point at an absolute URL where the plugin can be downloaded from, the download only happens on the build server so the build will fail if the file isn’t accessible.
You can define as many arguments as you want but currently all of them must be strings, we are working on adding more options in the future.
I hope this has been educational for you and I hope we all start building Codename One plugins soon!
Notice: This post was automatically converted using a script from an older blogging system. Some elements might not have come out as intended…. If that is the case please let us know via the comments section below.
Archived Comments
This post was automatically migrated from the legacy Codename One blog. The original comments are preserved below for historical context. New discussion happens in the Discussion section.
Anonymous — June 3, 2013 at 4:19 am (permalink)
Anonymous says:
Hi, this looks really exciting! Is there also support for these plugins in the desktop Designer tool?
Anonymous — June 3, 2013 at 1:26 pm (permalink)
Anonymous says:
Thanks!
We have some plans to support custom components via the libraries support. There is already some code within the designer to allow that. However, playing around with Maker has made me realize how outdated the designer is and we are starting to seriously consider a total rewrite. Its not ideal but it will allow us to consolidate a lot of code and increase the stability (through dogfooding).
It would also allow us to run on the actual devices directly which is a huge bonus. Best of all, we can connect to the PC/Mac and transfer files directly to the device since we already have the plugin installed.
The only issue is rewriting all the logic but that’s not too bad since the current UI is horrible.
Discussion
Join the conversation via GitHub Discussions.