
This post was written by
Steve Hannah
, one of the newest additions to the Codename One team and a long time community contributor.
This is the first in a series of posts about drawing graphics in Codename One. In this tutorial, we will create a rudimentary drawing app to demonstrate how to use the Shape API.
Some Background
Codename One has included basic 2D graphics ability since its inception, but until recently, it was missing a few primitives that were required for drawing arbitrary graphics. Most notably, it did not include a general “Shape” API to draw arbitrary paths. This meant that most graphics were composed of images, a few common geometry primitives such as rectangles and circles, and clever use of tiling and clipping. If you wanted to draw an arbitrary shape composed of lines and bezier curves, you were generally out of luck.
I ported the
Pisces graphics library
to Codename One last year in order to provide this type of functionality inside Codename One apps. This provided a 2D drawing API, but it was quite slow. Fine for static drawings, but too slow to be used in most animations.
The new CN1 graphics API provides the same types of functionality as the Pisces library, but with drastically improved performance. Finally we can draw complex 2D graphics (and 3D graphics in some platforms) without clogging the rendering pipeline.
New Features
A Shape API for drawing generalized paths on a Graphics context.
A Transformation API to be able to perform transformations on graphics contexts and shapes. (E.g. rotate, scale, translate, etc…).
Support for 3D transformations. (Currently only available on Android and iOS).
Device Support
(As of writing, this may change in the future as there is demand to backport the functionality to older platforms).
| API | Simulator | Android | iOS | JME | Windows Phone | BlackBerry |
|---|---|---|---|---|---|---|
| Shapes | Yes | Yes | Yes | – | – | – |
| 2D Transforms | Yes | Yes | Yes | – | – | – |
| 3D Transforms | – | Yes | Yes | – | – | – |
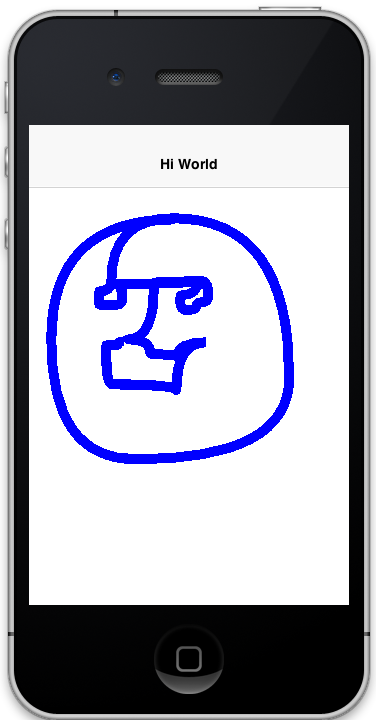
A 2D Drawing App
Let’s look at a simple example of a drawing app, that allows the user to tap the screen to draw a contour picture. The app will work by simply keeping a
GeneralPath
in memory, and continually add points as bezier curves. Whenever a point is added, the path is redrawn to the screen.
**
Step 1: Create a Project
**
We start by creating a standard “Hello World” project using the “Non-visual” template (i.e. built with code, not the GUI editor).
**
Step 2: Make the Canvas
**
The center of the app is the DrawingCanvas class, which extends
Component
.
Conceptually this is a very basic component. We will be overriding the
paintBackground()
method to draw the path. We keep a reference to a
GeneralPath
object (which is the concrete implementation of the Shape interface in Codename One) to store each successive point in the drawing. We also parametrize the stroke width and color.
The implementation of the paintBackground() method (shown above) should be fairly straight forward. It creates a stroke of the appropriate width, and sets the color on the graphics context. Then it calls drawShape() to render the path of points.
Implementing addPoint()
The addPoint method is designed to allow us to add points to the drawing. A simple implementation that uses straight lines rather than curves might look like this:
We introduced a couple of house-keeping member vars (lastX and lastY) to store the last point that was added so that we know whether this is the first tap or a subsequent tap. The first tap triggers a moveTo() call, whereas subsequent taps trigger lineTo() calls, which draw lines from the last point to the current point.
A drawing might look like this:

Using Bezier Curves
Our previous implementation of addPoint() used lines for each segment of the drawing. Let’s make an adjustment to allow for smoother edges by using quadratic curves instead of lines.
Codename One’s GeneralPath class includes two methods for drawing curves:
- [
- quadTo()
- ](/javadoc/com/codename1/ui/geom/GeneralPath.html#quadTo%28float,%20float,%20float,%20float%29)
- Appends a quadratic bezier curve. It takes 2 points: a control point, and an end point.
- [
- curveTo()
- ](/javadoc/com/codename1/ui/geom/GeneralPath.html#curveTo%28float,%20float,%20float,%20float,%20float,%20float%29)
- Appends a cubic bezier curve, taking 3 points: 2 control points, and an end point.
See the
General Path javadocs
for the full API.
We will make use of the
quadTo()
method to append curves to the drawing as follows:
This change should be fairly straight forward except, perhaps, the business with the odd variable. Since quadratic curves require two points (in addition to the implied starting point), we can’t simply take the last tap point and the current tap point. We need a point between them to act as a control point. This is where we get the curve from. The control point works by exerting a sort of “gravity” on the line segment, to pull the line towards it. This results in the line being curved. I use the odd marker to alternate the control point between positions above the line and below the line.
A drawing from the resulting app looks like:
Detecting Platform Support
The DrawingCanvas example is a bit naive in that it assumes that the device supports the shape API. If I were to run this code on a device that doesn’t support the Shape API, it would just draw a blank canvas where I expected my shape to be drawn. You can fall back gracefully if you make use of the
Graphics.isShapeSupported()
method. E.g.
Next Time
The next post in this series will cover 2D animations. Stay tuned for more…
Notice: This post was automatically converted using a script from an older blogging system. Some elements might not have come out as intended…. If that is the case please let us know via the comments section below.
Archived Comments
This post was automatically migrated from the legacy Codename One blog. The original comments are preserved below for historical context. New discussion happens in the Discussion section.
Anonymous — January 19, 2015 at 8:15 am (permalink)
Anonymous says:
Good work Steve + team! Looking forward to read more of this tutorial. Perhaps bring back some of the 3D transformations we used to since the LWUIT days? Also more ports for Windows and BB would be nice.
Anonymous — January 19, 2015 at 9:19 am (permalink)
Anonymous says:
Thanks Steve ! Good to know you are part of the cn1 team now, I always told the cn1 guys they are great but need more hands to do such a complex job. About the Shape API, I am eager to use it, but the absence of an Arc2D shape is a killer in many situations, I even wrote a nice whell-like progress component that was not accepted by Shai to be included because it relies on Graphics.drawArc, and the Bezier curves do not deliver an acceptable result in this case either. Also, I believe it should use floating point, it would deliver smoother Shapes, wouldn’t it ?
Anonymous — January 19, 2015 at 1:07 pm (permalink)
Anonymous says:
I wasn’t involved during the LWUIT days. What 3D transformations are you referring to? We do support full 3D transformations in this pipeline via the Transform class. I’ll be going through that in a later tutorial.
Anonymous — January 19, 2015 at 1:13 pm (permalink)
Anonymous says:
I agree that drawArc() would be nice. You can implement it currently using a a series of lines or bezier curves, but this wouldn’t be as performant as an actual drawArc() primitive. Please file and issue on this.
Changing to use floating point wouldn’t be terribly hard to do… It wouldn’t affect shapes drawn with GeneralPath (since that is already using floating point) but could potentially make things more flexible with aggregating multiple shapes and paths together. Please file an issue on this.
Anonymous — January 19, 2015 at 2:31 pm (permalink)
Anonymous says:
FYI the old Transition3D support: https://www.youtube.com/wat… its around the second minute. Keep in mind this was all running on feature phones with 2mb of RAM.
Anonymous — January 30, 2015 at 6:51 pm (permalink)
Anonymous says:
For Steve Hannah:
I’m teaching my grandsons Java by porting the Raspberry Pi Snake Game from Python to Java. Have it running in Java as an app, but they would really be pumped to get it on an iPad. Hence CN1. The core is some graphics and a game loop timer. Looking forward to your next post on animation. But having problems with your DrawingCanvas app post.
I made a manual CN1 app in Eclipse. Added DisplayCanvas from your post. Used the straight line version of addPoint(). It turns out lastY is never used and lastX=x; is assigning a float to an int. Fixed the compile by:
private int lastX=-1;
// private int lastY=-1;
public void addPoint(float x, float y){
if ( lastX == -1 ){
// this is the first point… don’t draw a line yet
p.moveTo(x, y);
} else {
p.lineTo(x, y);
}
lastX = (int) x;
// lastY = y;
repaint();
}
Inserted an addComponent(new DrawingCanvas()) right after adding the “Hello World” label component.
Form hi = new Form(“Hi World”);
hi.addComponent(new Label(“Hi World”));
hi.addComponent(new DrawingCanvas());
Ran it. The simulator opened. It looked just the same as before inserting the addComponent(new DrawingCanvas()). I clicked a couple of points on the screen. Nothing happened. No breakpoint I put in DrawCanvass gets called. QUESTION: Should this work in the simulator?
Switched from Drawing Canvas to something dead simple:
public class DrawLine extends Component {
public DrawLine() {
super();
setSize(new Dimension(200, 200));
}
public void paint(Graphics g) {
g.drawLine(30, 30, 150, 150);
}
}
Still nothing! HELP!!!
Anonymous — January 30, 2015 at 7:44 pm (permalink)
Anonymous says:
Thanks for pointing this out. There, in fact, were a couple of typos in the source. Check out the full sources here:
and here
Anonymous — January 31, 2015 at 3:45 pm (permalink)
Anonymous says:
Still nothing comes up in the simulator but the “Hi World” label. And clicking on the screen below the label has no effect. Nothing with either your DrawingCanvas or DrawingCanvasBezier. And breakpoints put at the start of the 3 DrawingCanvas methods are never triggered — nothing in DrawingCanvas is getting called (other than its default constructor).
public void start() {
if(current != null){
return;
}
Form hi = new Form(“Hi World”);
hi.addComponent(new Label(“Hi World”));
hi.addComponent(new DrawingCanvas());
}
And I updated the CN1 plugin into my Eclipse just a few days ago.
Anonymous — January 31, 2015 at 3:48 pm (permalink)
Anonymous says:
Strange. It works fine for me. Keep in mind, nothing should show up until your second click. The first click just marks the start of the line that will be produced by your second click.
Anonymous — January 31, 2015 at 4:23 pm (permalink)
Anonymous says:
Wait, I see the problem. You are using FlowLayout. The DrawingCanvas doesn’t have a preferred size set, it relies completely on the layout manager to size it. If you use a BorderLayout instead, then place the DrawingCanvas in the center, it will work.
Steve
Anonymous — January 31, 2015 at 6:16 pm (permalink)
Anonymous says:
That was it! Many thanks!
Discussion
Join the conversation via GitHub Discussions.