
Codename One provides a rich set of drawing primitives in its Graphics class. It allows you to draw text, shapes, and images to the screen. The position where these elements will be rendered is determined based on a combination of Graphics state information (e.g. the current translation, and transform) and coordinates that are passed to the drawing method. Understanding how these coordinates are calculated can be tricky when you first begin using the API.
Take, for example, the Graphics.drawRect(int x,int y, int width, int height) method. If you are coming to Codename One with fresh eyes, you can probably figure out that this method will draw a width x height rectangle at the coordinate (x,y). However you would probably also want to know exactly what the axes of the coordinate system are. E.g. where is (0,0), and in which directions do x and y get larger.
The Coordinate System
The Codename One coordinate system follows the example of Swing (and many other – but not all- graphics libraries) and places the origin in the upper left corner of the screen. X-values grow to the right, and Y-values grow downward as illustrated below:
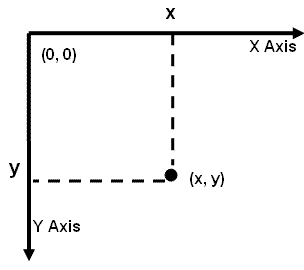
Therefore the screen origin is at the top left corner of the screen. Given this information, consider the method call on the Graphics context g:
g.drawRect(10,10, 100, 100);
Where would this rectangle be drawn on the screen?
If you answered something like “10 pixels from the top, and 10 pixels from the left of the screen”, you
might be right. It depends on whether the graphics has a translation or transform applied to it. If there is
currently a translation of (20,20) (i.e. 20 pixels to the right, and 20 pixels down), then the rectangle would be rendered at (30, 30).
You can always find out the current translation of the graphics context using the Graphics.getTranslateX() and Graphics.getTranslateY() methods:
// Find out the current translation
int currX = g.getTranslateX();
int currY = g.getTranslateY();

// Reset the translation to zeroes
g.translate(-currX, -currY);

// Now we are working in absolute screen coordinates
g.drawRect(10, 10, 100, 100);

// This rectangle should now be drawn at the exact screen
// coordinates (10,10).

//Restore the translation
g.translate(currX, currY);
Note: This example glosses over issues such as clipping and transforms which may cause it to not work as you expect. E.g. When painting a component inside its paint() method, there is a clip applied to the context so that only the content you draw within the bounds of the component will be seen.
If, in addition, there is a transform applied that rotates the context 45 degrees clockwise, then the rectangle will be drawn at a 45 degree angle with its top left corner somewhere on the left edge of the screen.
Luckily you usually don’t have to worry about the exact screen coordinates for the things you paint. Most of the time, you will only be concerned with relative coordinates.
Relative Coordinates
Usually, when you are drawing onto a Graphics context, you are doing so within the context of a Component’s paint() method (or one of its variants). In this case, you generally don’t care what the exact screen coordinates are of your drawing. You are only concerned with their relative location within the coordinate. You can leave the positioning (and even sizing) of the coordinate up to Codename One.
To demonstrate this, let’s create a simple component called Rectangle component, that simply draws a rectangle on the screen. We will use the component’s position and size to dictate the size of the rectangle to be drawn. And we will keep a 5 pixel padding between the edge of the component and the edge of our rectangle.
class RectangleComponent extends Component {
    public void paint(Graphics g){
        g.setColor(0x0000ff);
        g.drawRect(getX()+5, getY()+5, getWidth()-10, getHeight()-10);
    }
}
The result is as follows:
Note: The
xandycoordinates that are passed to thedrawRect(x,y,w,h)method are relative to the component’s parent’s origin — not the component itself .. its parent. This is why the x position isgetX()+5and not just 5.
Transforms and Rotations
Unlike the Graphics drawXXX primitives, methods for setting transformations, including scale(x,y) and rotate(angle), are always applied in terms of screen coordinates. This can be confusing at first, because you may be unsure whether to provide a relative coordinate or an absolute coordinate for a given method.
The general rule is:
- All coordinates passed to the drawXXX() and fillXXX() methods will be subject to the graphics context’s transform and translation settings.
- All coordinates passed to the context’s transformation settings are considered to be screen coordinates, and are not subject to current transform and translation settings.
Let’s take our RectangleComponent as an example. Suppose we want to rotate the rectangle by 45 degrees, our first attempt might look something like:
    class RectangleComponent extends Component {

        @Override
        protected Dimension calcPreferredSize() {
            return new Dimension(250,250);
        }

        public void paint(Graphics g) {
            g.setColor(0x0000ff);
            g.rotate((float) (Math.PI / 4.0));
            g.drawRect(getX() + 5, getY() + 5, getWidth() - 10, getHeight() - 10);
            g.rotate(-(float) (Math.PI / 4.0));
        }
    }(10,10, 100, 100);
Tip: When performing rotations and transformations inside a
paint()method, always remember to revert your transformations at the end of the method so that it doesn’t pollute the rendering pipeline for subsequent components.
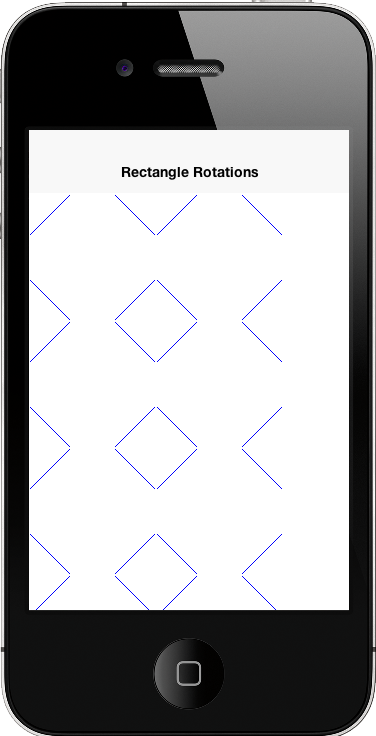
The behaviour of this rotation will vary based on where the component is rendered on the screen. To demonstrate this, let’s try to place five of these components on a form inside a BorderLayout and see how it looks:
    class MyForm extends Form {

        public MyForm() {
            super("Rectangle Rotations");
            for ( int i=0; i< 10; i++ ){
                this.addComponent(new RectangleComponent());
            }
        }
    }
The result is as follows:
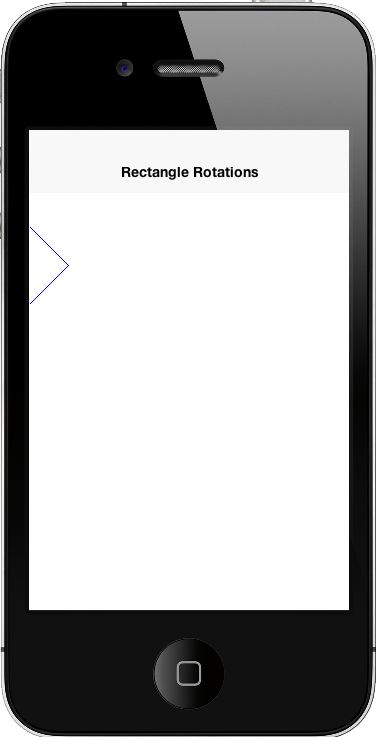
This may not be an intuitive outcome since we drew 10 rectangle components, but we only see a portion of one rectangle. The reason is that the rotate(angle) method uses the screen origin as the pivot point for the rotation. Components nearer to this pivot point will experience a less dramatic effect than components farther from it. In our case, the rotation has caused all rectangles except the first one to be rotated outside the bounds of their containing component - so they are being clipped. A more sensible solution for our component would be to place the rotation pivot point somewhere inside the component. That way all of the components would look the same. Some possibilities would be:
Top Left Corner:
        public void paint(Graphics g) {
            g.setColor(0x0000ff);
            g.rotate((float)(Math.PI/4.0), getAbsoluteX(), getAbsoluteY());
            g.drawRect(getX() + 5, getY() + 5, getWidth() - 10, getHeight() - 10);
            g.rotate(-(float) (Math.PI / 4.0), getAbsoluteX(), getAbsoluteY());
        }
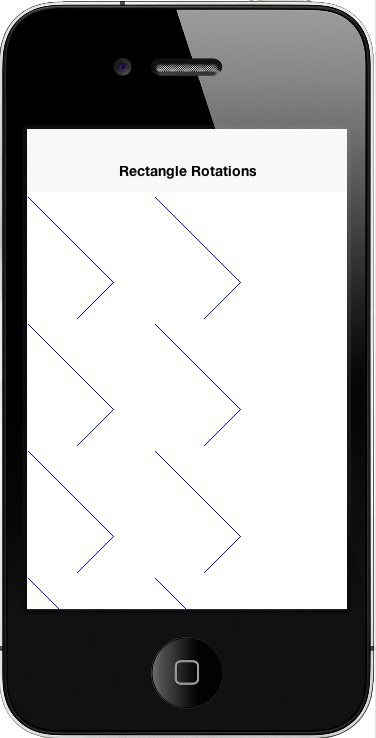
Center:
public void paint(Graphics g) {
    g.setColor(0x0000ff);
    g.rotate(
        (float)(Math.PI/4.0),
        getAbsoluteX()+getWidth()/2,
        getAbsoluteY()+getHeight()/2
    );
    g.drawRect(getX() + 5, getY() + 5, getWidth() - 10, getHeight() - 10);
    g.rotate(
        -(float)(Math.PI/4.0),
        getAbsoluteX()+getWidth()/2,
        getAbsoluteY()+getHeight()/2
    );
}
You could also use the Graphics.setTransform() class to apply rotations and other complex transformations (including 3D perspective transforms), but I’ll leave that for its own topic as it is a little bit more complex.
Event Coordinates
While we’re on the topic of coordinates I would be remiss if I didn’t mention how coordinates are passed in events (e.g. touch events). We saw in part one of this series that you can listen for touch events on a component by overriding the pointerPressed(x,y) method. The coordinates received in this method will be absolute screen coordinates , so you may need to do some conversions on these coordinates before using them in your drawXXX() methods.
Recall from part I, that our pointerPressed() method looked like:
public void pointerPressed(int x, int y) {
    addPoint(x-getParent().getAbsoluteX(), y-getParent().getAbsoluteY());
}
In this case we translated these points so that they would be relative to the origin of the parent component. This is because the drawXXX() methods for this component take coordinates relative to the parent component.
Summary
Understanding the coordinate system is crucial for obtaining predictable graphics results. When you first begin, you may be unsure of whether a method expects coordinates to be relative to the current component, the parent component, or the screen origin. This post provided a few tips to help navigate the API. In the worst case, you can also just use a bit of trial and error.
Discussion
Join the conversation via GitHub Discussions.