The chat UI is what we’ve been working at and in today’s post we are going to build exactly that!
Even better… We’ll integrate with Pubnub to make the app almost fully functional as a rudimentary chat app, which
is pretty spectacular. In this section we’ll cover UI, storage (externalization), Pubnub & its JSON API… We’ll
also use InteractionDialog to show notifications of incoming messages…
Before we get started you will need to login to pubnub.com and sign up for an account
where you will get two ID’s necessary when subscribing and pushing.
We also need to install the Pubnub cn1lib and its dependencies, place the following files in the lib directory
under the project hierarchy:
BouncyCastleCN1Lib.cn1lib,
Pubnub-CodeNameOne-3.7.4.cn1lib &
json.cn1lib.
Once you placed the files into the lib directory right click the project and select “Codename One→Refresh Libs”.
This will install the libraries into your classpath and allow you to use them while enjoying features such as code
completion etc.
You will also need images for the chat bubbles specifically this one:

And this one:

Theme Changes
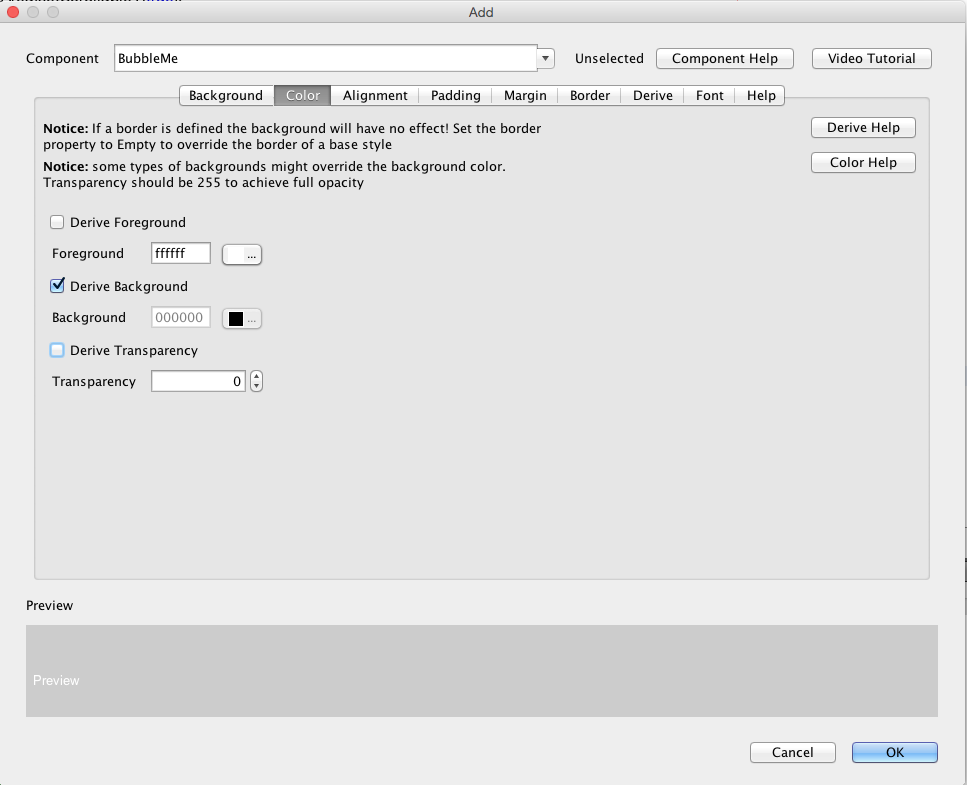
We need to start by setting up the theme elements that we will use later on for the bubble chat, we effectively need the
two speech bubbles mentioned above to map to the UIID’s BubbleMe & BubbleThem. So we start by adding the
theme element BubbleMe where we set transparency to 0 (since we will use an image border) and the foreground
color to white ffffff:
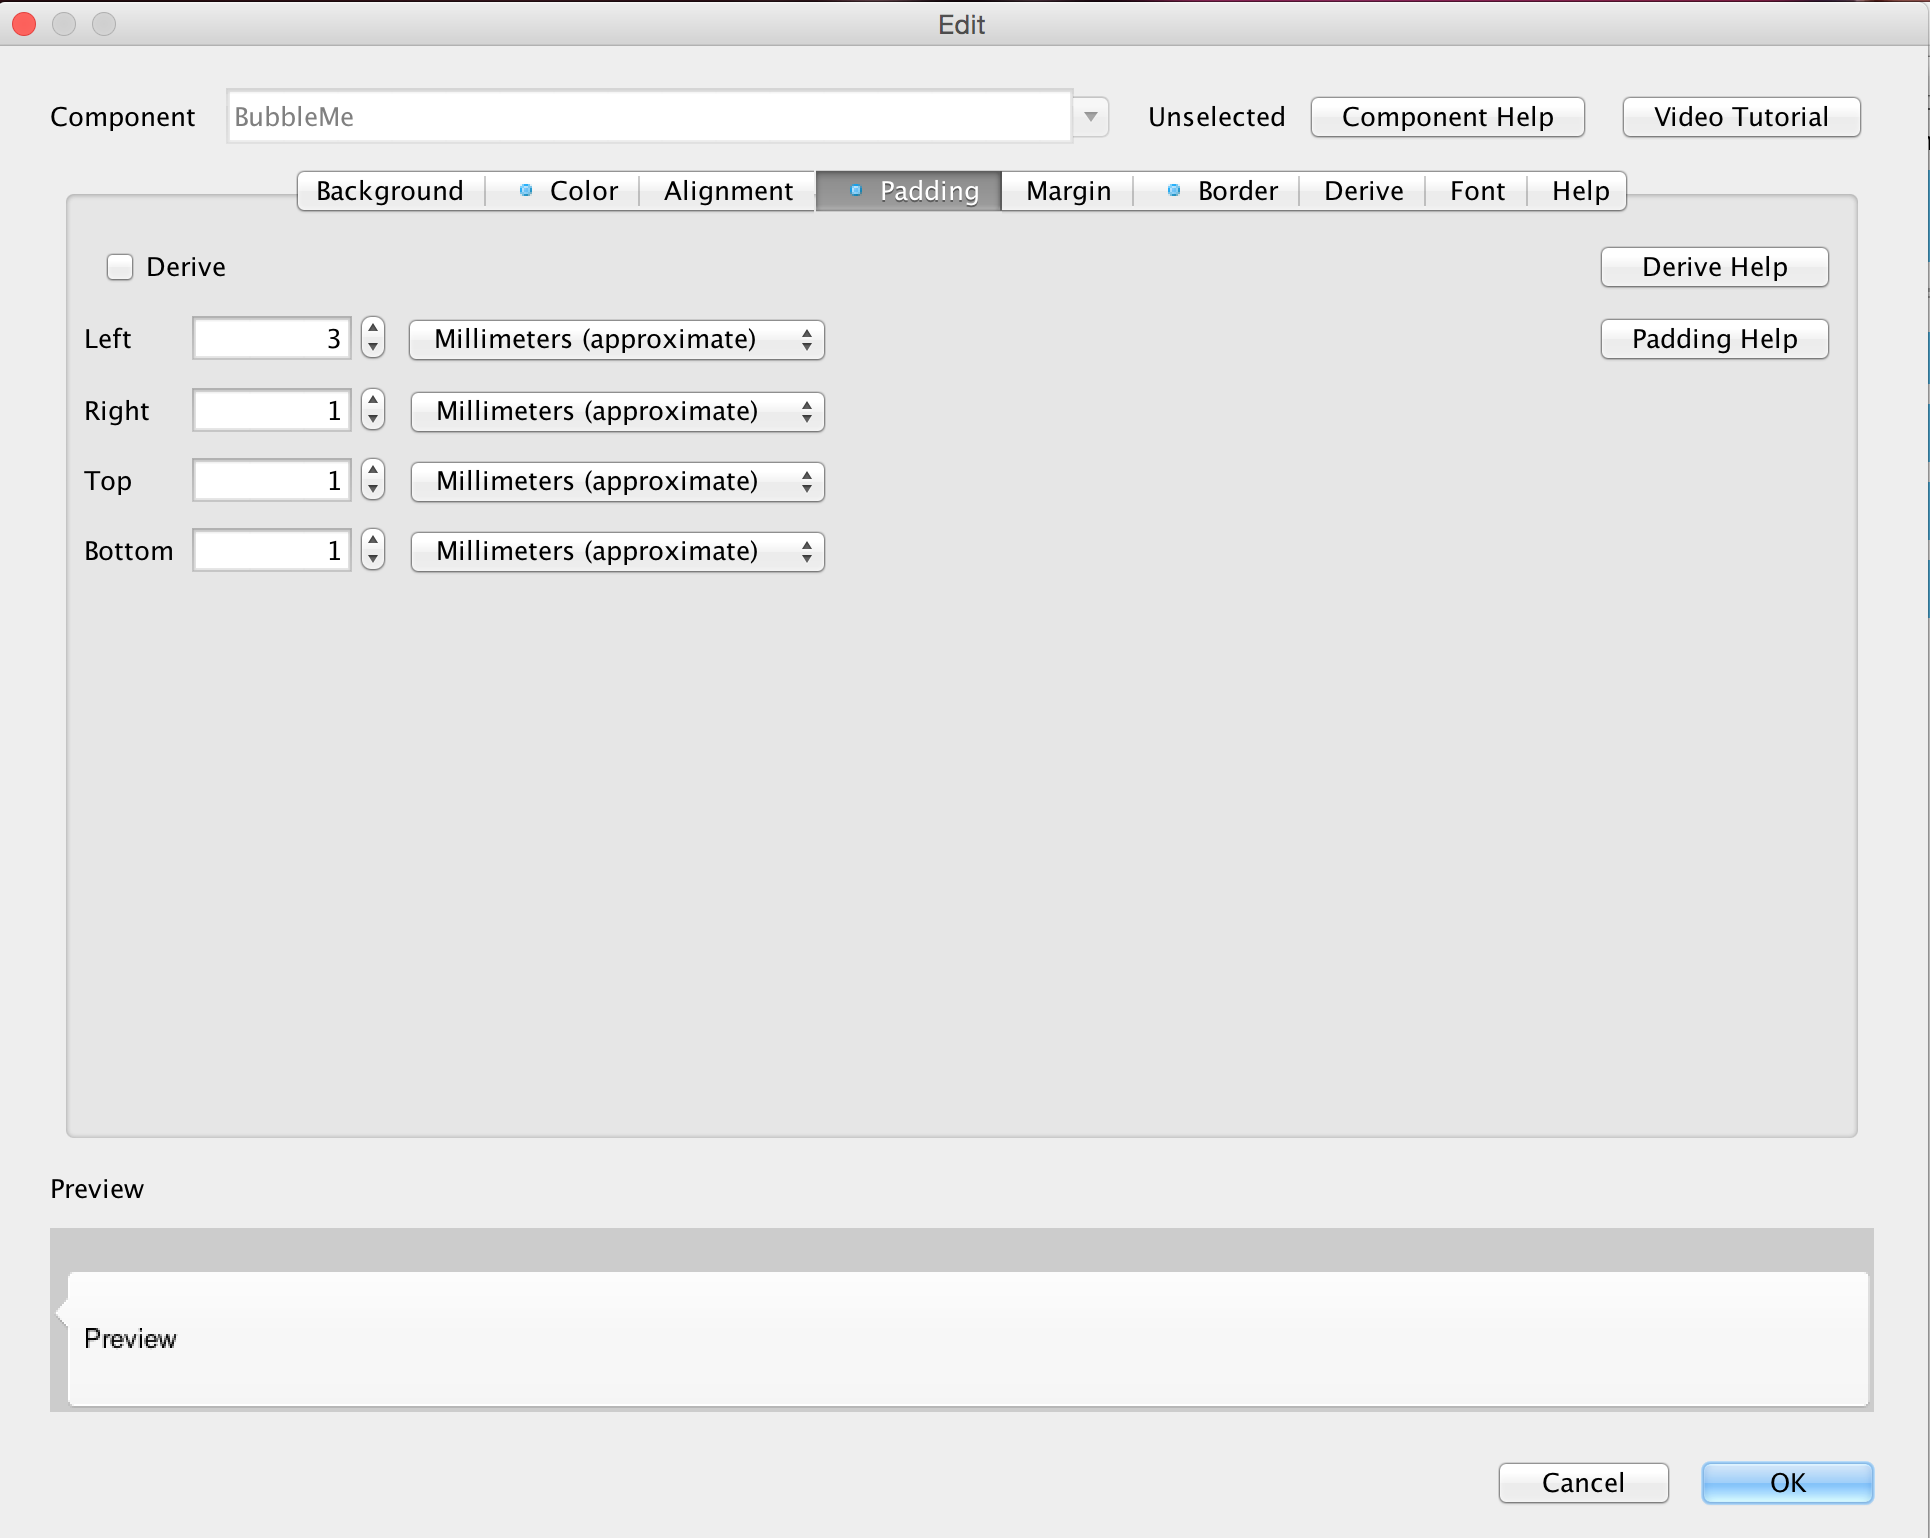
Then we need to set the padding for the speech bubble so the text won’t be on top of the speech arrow or the border
itself. We set the padding in millimeters to keep the design portable and set 3mm on the left side to leave room
for the arrow:
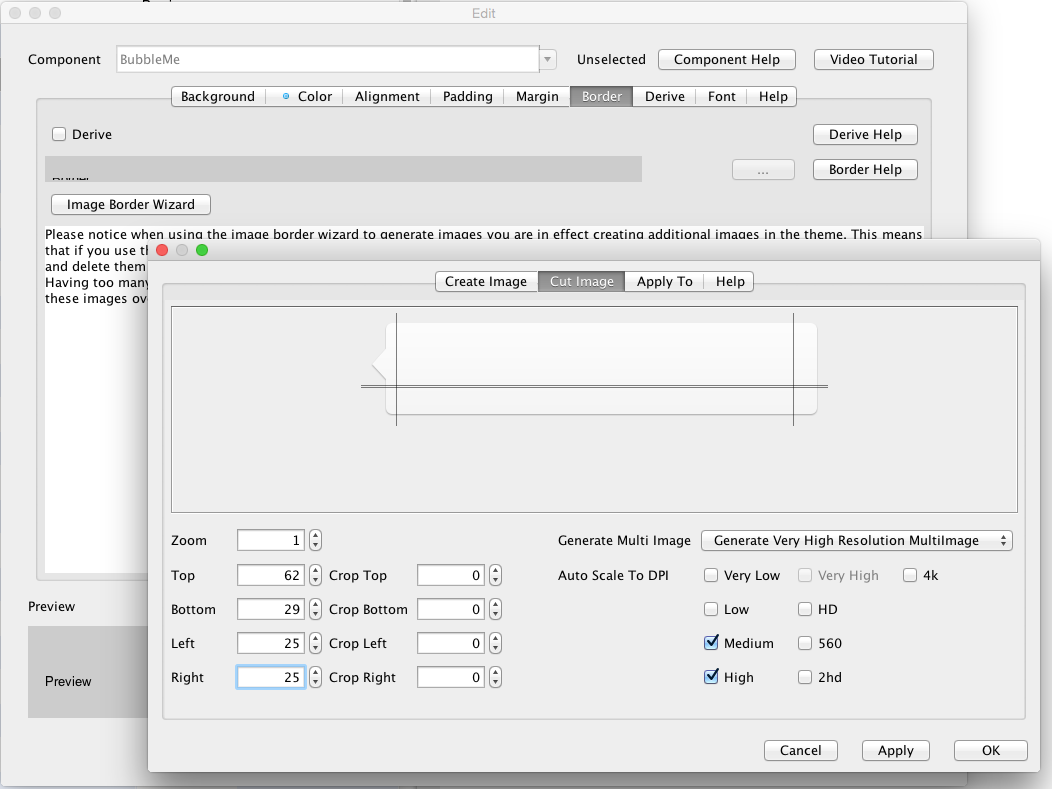
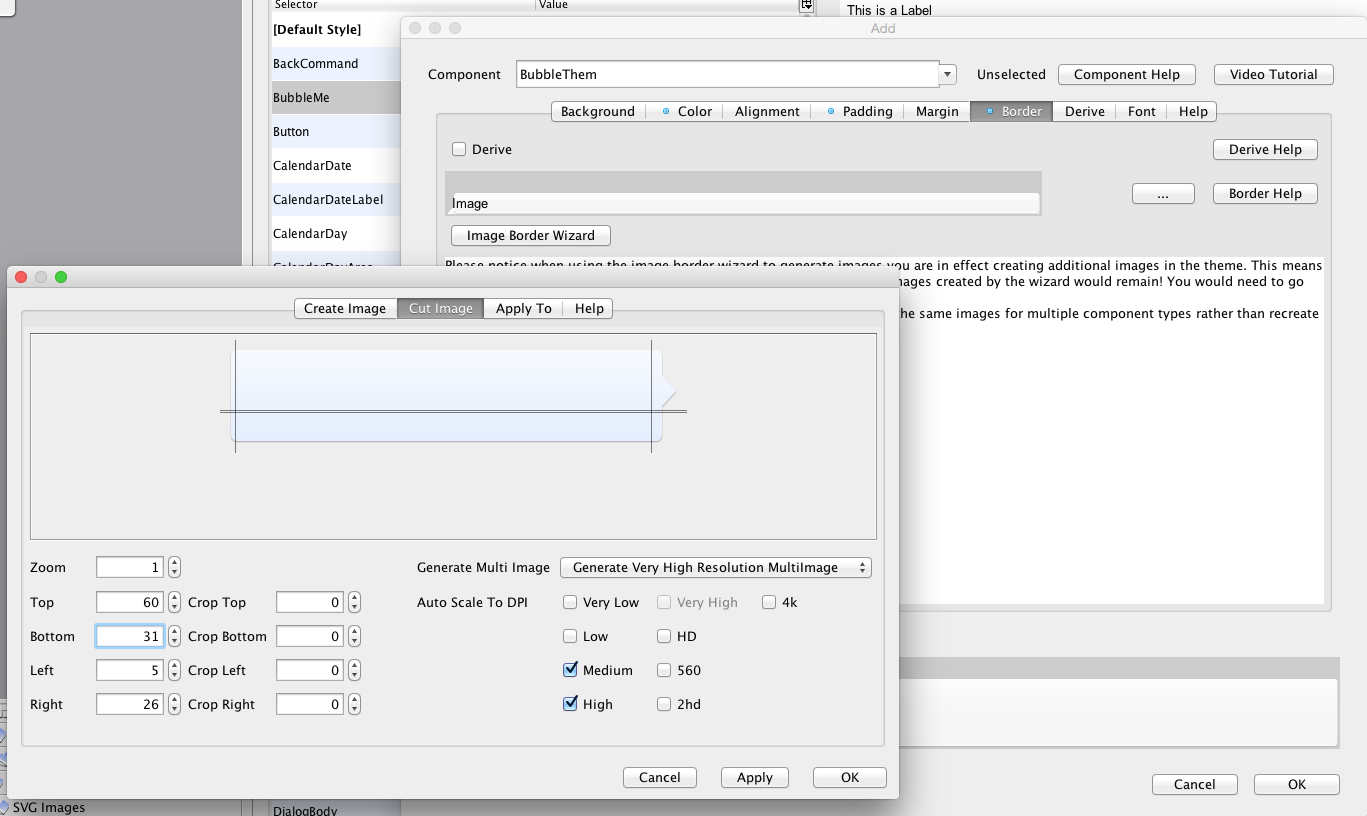
Now we need to cut the image border using the image border wizard and the chat-bubble-left.png image we
mentioned earlier. Notice that we take the lines as close as possible to each other to make the border work:
We need to do the exact same thing for the BubbleThem UIID with the only difference being the chat-bubble-right.png
and larger padding on the right side instead of the left side.
The Message Class
Up until now we used mostly inner classes in a single file which makes things rather simple for a demo. But now
we’ll add a new Message class that will represent a message sent/received and encapsulate the JSON parsing
logic required for PubNub communication.
This class is Externalizeable which means we can store it into storage relatively easily. That’s important to keep
past messages in the conversation in place:
public class Message implements Externalizable {

    private long time;
    private String senderId;
    private String recepientId;
    private String picture;
    private String name;
    private String message;

    /**
     * Required default constructor for externalizable to work...
     */
    public Message() {}

    public Message(String senderId, String recepientId, String picture, String name, String message) {
        this.senderId = senderId;
        this.recepientId = recepientId;
        this.picture = picture;
        this.name = name;
        this.message = message;
    }

    public Message(JSONObject obj) {
        try {
            time = Long.parseLong(obj.getString("time"));
            senderId = obj.getString("fromId");
            recepientId = obj.getString("toId");
            message = obj.getString("message");
            name = obj.getString("name");
            picture = obj.getString("pic");
        } catch (JSONException ex) {
            // will this ever happen?
            Log.e(ex);
        }
    }

    public JSONObject toJSON() {
        JSONObject obj = createJSONObject("fromId", senderId,
                "toId", recepientId,
                "name", name,
                "pic", picture,
                "time", Long.toString(System.currentTimeMillis()),
                "message", message);
        return obj;
    }

    /**
     * Helper method to create a JSONObject
     */
    JSONObject createJSONObject(String... keyValues) {
        try {
            JSONObject o = new JSONObject();
            for(int iter = 0 ; iter < keyValues.length ; iter += 2) {
                o.put(keyValues[iter], keyValues[iter + 1]);
            }
            return o;
        } catch(JSONException err) {
            // will this ever happen?
            err.printStackTrace();
        }
        return null;
    }


    @Override
    public int getVersion() {
        return 1;
    }

    @Override
    public void externalize(DataOutputStream out) throws IOException {
        out.writeLong(time);
        Util.writeUTF(senderId, out);
        Util.writeUTF(recepientId, out);
        Util.writeUTF(picture, out);
        Util.writeUTF(name, out);
        Util.writeUTF(message, out);
    }

    @Override
    public void internalize(int version, DataInputStream in) throws IOException {
        time = in.readLong();
        senderId = Util.readUTF(in);
        recepientId = Util.readUTF(in);
        picture = Util.readUTF(in);
        name = Util.readUTF(in);
        message = Util.readUTF(in);
    }

    @Override
    public String getObjectId() {
        return "Message";
    }

    public long getTime() {
        return time;
    }

    public String getSenderId() {
        return senderId;
    }

    public String getRecepientId() {
        return recepientId;
    }

    public String getPicture() {
        return picture;
    }

    public String getName() {
        return name;
    }

    public String getMessage() {
        return message;
    }
}
This class is pretty simple, notice a few interesting things about externalization:
We use
Util.writeUTFandUtil.readUTFwhich adds support for null strings by writing/reading a boolean first
to indicate if the value is null…getObjectIdis a hardcoded string and not something likegetClass().getName(). Using class name is a very
common mistake which is why I’m mentioning it. It will work in the simulator and seem to work during development
but will fail with upgrades since class names are obfuscated on some devices and might result in serious problems.We also need the default constructor for externalization support.
Global Variables & Initialization
To get started we need to add some global variables:
private Pubnub pb;
private Image roundedMeImage;
private final WeakHashMap<String, EncodedImage> roundedImagesOfFriends = new WeakHashMap<>();
These should be pretty self explanatory, pubnub represents the API for push. The roundedMeImage is a cached
version of the image we created earlier. It allows us to reuse that UI element in different forms. The WeakHashMap
allows us to cache pictures of friends without triggering a memory leak…
We also need to add this to the init method:
public void init(Object context) {
    ...
    Util.register("Message", Message.class);
    ...
}
This effectively registers the Message class into the system so when we de-serialize it on loading we can recognize the
class. Developers often make the mistake of using the static initializer code in the class to register itself. That’s
problematic since the class might not be loaded before it is read.
Listening To Messages
We’d like to start listening to incoming messages the moment we are logged in and this happens in theshowContactsForm so we can add this call to the top of that method:
void showContactsForm(UserData data) {
    listenToMessages();
    ...
}

private void listenToMessages() {
    try {
        pb = new Pubnub("pub-c-*********-****-****-****-*************", "sub-c-*********-****-****-****-*************");
        pb.subscribe(tokenPrefix + uniqueId, new Callback() {
            @Override
            public void successCallback(String channel, Object message, String timetoken) {
                    Display.getInstance().callSerially(() -> {
                        respond(new Message((JSONObject)message));
                    });
            }
        });
    } catch(PubnubException err) {
        Log.e(err);
        Dialog.show("Error", "There was a communication error: " + err, "OK", null);
    }
}
Subscribing to messages thru pubnub is trivial, we convert the JSON object received by response and send it to the method
that posts the response. Notice that we wrap the call in a call serially since the response is received off the EDT
and processing it should probably be on the EDT as we will interact with the UI. We’ll get deeper into the response
processing later…
PubNub works by providing message queues that you can subscribe to and publish to, imagine this like email
where you can subscribe to a mailing list and handle incoming messages. However, if you aren’t listening a message
might be gone… They do provide an option for a persistent queue that will keep the last 100 messages for you which
can be very useful for this sort of app!
The architecture we are going to use is pretty simple, every person just listens on his own unique ID. That way
to send a message to a specific person just publish to his queue and that person can reply by publishing to yours.
We include sender details in every message thus allowing us to distinguish among the people we are chatting with.
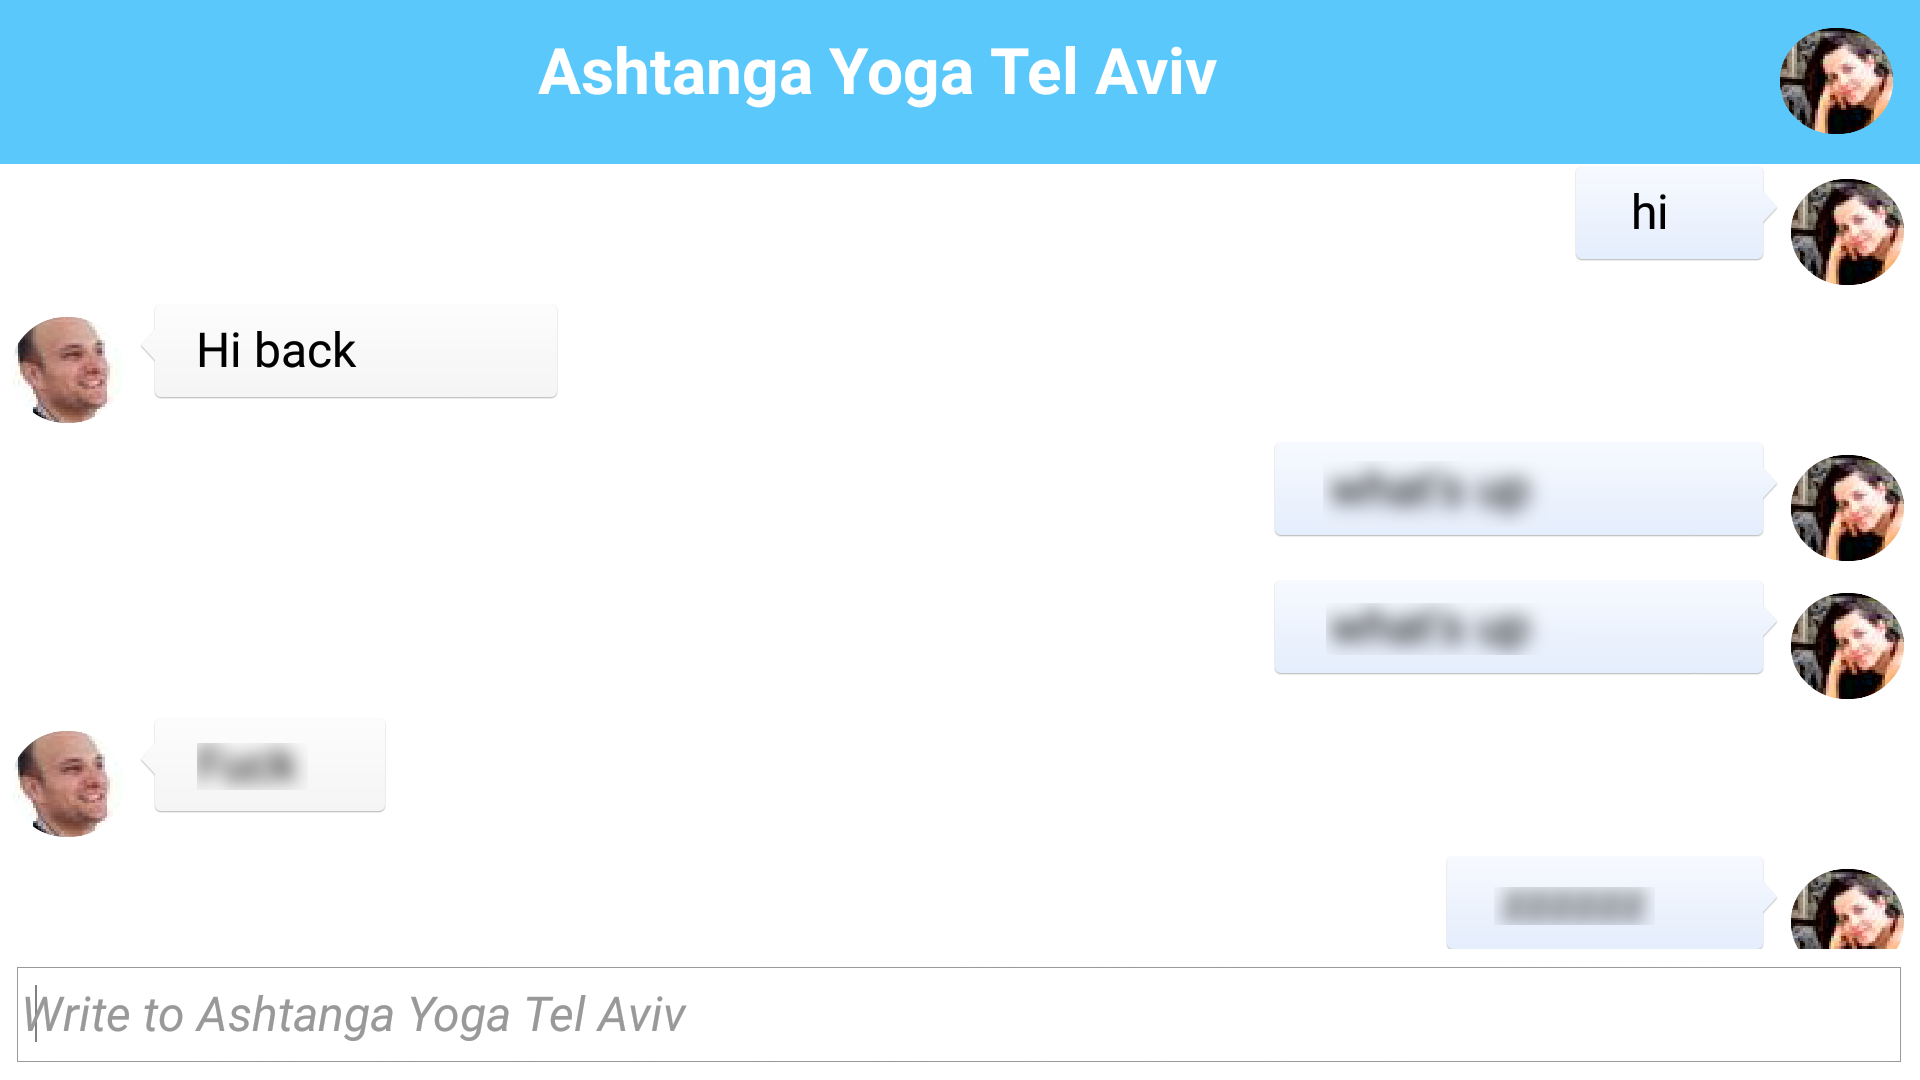
The Chat Form
That’s a screenshot from a chat on my Android device… The chat form is created via this method which is a bit
verbose but relatively simple.
void showChatForm(ContactData d, Component source) {
    Form chatForm = new Form(d.name);

    // this identifies the person we are chatting with, so an incoming message will know if this is the right person...
    chatForm.putClientProperty("cid", tokenPrefix + d.uniqueId);
    chatForm.setLayout(new BorderLayout());
    Toolbar tb = new Toolbar();
    final Container chatArea = new Container(new BoxLayout(BoxLayout.Y_AXIS));
    chatArea.setScrollableY(true);
    chatArea.setName("ChatArea");
    chatForm.setToolBar(tb);
    chatForm.setBackCommand(new Command("Contacts") {
        @Override
        public void actionPerformed(ActionEvent evt) {
            source.getComponentForm().showBack();
        }
    });

    // Provides the ability to swipe the screen to go back to the previous form
    SwipeBackSupport.bindBack(chatForm, (args) -> {
        return source.getComponentForm();
    });

    // Gets a rounded version of our friends picture and caches it
    Image roundedHimOrHerImage = getRoundedFriendImage(d.uniqueId, d.imageUrl);

    // load the stored messages and add them to the form
    java.util.List<Message> messages = (java.util.List<Message>)Storage.getInstance().readObject(tokenPrefix + d.uniqueId);
    if(messages != null) {
        for(Message m : messages) {
            if(m.getRecepientId().equals(tokenPrefix + uniqueId)) {
                respondNoLayout(chatArea, m.getMessage(), roundedHimOrHerImage);
            } else {
                sayNoLayout(chatArea, m.getMessage());
            }
        }
    }

    // to place the image on the right side of the toolbar we just use a command that does nothing...
    Command himOrHerCommand = new Command("", roundedHimOrHerImage);
    tb.addCommandToRightBar(himOrHerCommand);

    // we type the message to the chat partner in the text field on the south side
    TextField write = new TextField(30);
    write.setHint("Write to " + d.name);
    chatForm.addComponent(BorderLayout.CENTER, chatArea);
    chatForm.addComponent(BorderLayout.SOUTH, write);

    // the action listener for the text field creates a message object, converts it to JSON and publishes it to the listener queue
    write.addActionListener((e) -> {
        String text = write.getText();
        final Component t = say(chatArea, text);

        // we make outgoing messages translucent to indicate that they weren’t received yet
        t.getUnselectedStyle().setOpacity(120);
        write.setText("");

        final Message messageObject = new Message(tokenPrefix + uniqueId, tokenPrefix + d.uniqueId, imageURL, fullName, text);
        JSONObject obj = messageObject.toJSON();

        pb.publish(tokenPrefix + d.uniqueId, obj, new Callback() {
            @Override
            public void successCallback(String channel, Object message) {
                // a message was received, we make it opauqe and add it to the storage
                t.getUnselectedStyle().setOpacity(255);
                addMessage(messageObject);
            }

            @Override
            public void errorCallback(String channel, PubnubError error) {
                chatArea.removeComponent(t);
                chatArea.revalidate();
                Dialog.show("Error", "Connection error message wasn’t sent", "OK", null);
            }
        });
    });

    chatForm.show();
}
There are several things of interest in the above method:
chatArea contains all the chat entries, notice we give it a name explicitly! This is useful later on, when a chat
message arrives if we are in the chat form we’d like to add the message into that form…We use a client property on the chat form
cidto store the user we are chatting with. That way if we are chatting
with a different contact an incoming message from another contact won’t get pushed into that conversation.The chat area is scrollable and the text field is in the south. Notice that since we set the layout to border layout
the default scrollability of the form’s content pane was implicitly disabled.We used a command that does nothing to place the image of the contact on the toolbar, its simpler than the effect
we had in the previous form but still pretty nice.We load the existing messages if available from storage using the object externalization capability of the
Storage
class.By default we have a
sayandrespondmethods that encapsulate the bubble chat component creation. However,
they do a nice incoming animation that we don’t want when a new message arrives so we use a version that doesn’t
do the layout for both during construction of the formThis is all the code you need to work with PubNub! That’s pretty cool… Everything else is handled for us.
There are several important methods used by this method and we’ll go over them one by one:
private Component say(Container chatArea, String text) {
    Component t = sayNoLayout(chatArea, text);
    t.setY(chatArea.getHeight());
    t.setWidth(chatArea.getWidth());
    t.setHeight(40);
    chatArea.animateLayoutAndWait(300);
    chatArea.scrollComponentToVisible(t);
    return t;
}

private Component sayNoLayout(Container chatArea, String text) {
    SpanLabel t = new SpanLabel(text);
    t.setIcon(roundedMeImage);
    t.setTextBlockAlign(Component.LEFT);
    t.setTextUIID("BubbleMe");
    chatArea.addComponent(t);
    return t;
}
These two methods essentially print out what we have to say as a chat bubble. The latter method just sets the span label
icon to my picture (which we made previously) and aligns the block to the left. It also sets the bubble UIID we created
previously to the text portion of the span label.
The former method makes the bubble animate from the bottom by setting the size/location of the component and then doing an
animate layout that flows it into the right place.
The basic respond methods are practically identical with some minor changes:
private void respond(Container chatArea, String text, Image roundedHimOrHerImage) {
    Component answer = respondNoLayout(chatArea, text, roundedHimOrHerImage);
    answer.setX(chatArea.getWidth());
    answer.setWidth(chatArea.getWidth());
    answer.setHeight(40);
    chatArea.animateLayoutAndWait(300);
    chatArea.scrollComponentToVisible(answer);
}

private Component respondNoLayout(Container chatArea, String text, Image roundedHimOrHerImage) {
    SpanLabel answer = new SpanLabel(text);
    answer.setIcon(roundedHimOrHerImage);
    answer.setIconPosition(BorderLayout.EAST);
    answer.setTextUIID("BubbleThem");
    answer.setTextBlockAlign(Component.RIGHT);
    chatArea.addComponent(answer);
    return answer;
}
The main difference here is the UIID and alignment to the right, also you will notice that we pass the image of the speaker
as an argument since it might not be available…
But the big difference is that those methods aren’t invoked for incoming chat entries directly, instead we use:
private void respond(Message m) {
    String clientId = (String)Display.getInstance().getCurrent().getClientProperty("cid");
    addMessage(m);
    EncodedImage rounded = getRoundedFriendImage(m.getSenderId(), m.getPicture());
    if(clientId == null || !clientId.equals(m.getSenderId())) {
        // show toast, we aren’t in the chat form...
        InteractionDialog toast = new InteractionDialog();
        toast.setUIID("Container");
        toast.setLayout(new BorderLayout());

        SpanButton messageButton = new SpanButton(m.getMessage());
        messageButton.setIcon(rounded);

        toast.addComponent(BorderLayout.CENTER, messageButton);
        int h = toast.getPreferredH();
        toast.show(Display.getInstance().getDisplayHeight() - h - 10, 10, 10, 10);
        UITimer uit = new UITimer(() -> {
            toast.dispose();
        });
        uit.schedule(3000, false, Display.getInstance().getCurrent());

        messageButton.addActionListener((e) -> {
            uit.cancel();
            toast.dispose();
            showChatForm(getContactById(m.getSenderId()), Display.getInstance().getCurrent());
        });
    } else {
        Container chatArea = getChatArea(Display.getInstance().getCurrent().getContentPane());
        respond(chatArea, m.getMessage(), rounded);
    }
}
As you recall from the original subscribe call, this is the method invoked internally as a message arrives from pubnub.
At that point we are logged in but we might be in a chat with someone else or we might even be in the contacts form
in one of those two cases the id will be either null or different to the current ID so we will show an interaction dialog effect
that you can see in the video below, otherwise we just invoke the regular respond method we saw above:
The interaction dialog is just a container placed on the layered pane. Because of that it doesn’t block input
like a regular dialog would, so if I’m chatting with someone when a message arrives this shouldn’t cause a problem.
We use a UITimer to automatically dispose of the dialog, the UITimer is convenient since its invoked on the EDT
unlike a regular timer so the effort is minimal.
We use a button for the notification so we can click it and go directly to the chat window as is shown at the end of the
video above.
private Container getChatArea(Container cnt) {
    String n = cnt.getName();
    if(n != null && n.equals("ChatArea")) {
        return cnt;
    }

    for(Component cmp : cnt) {
        if(cmp instanceof Container) {
            Container cur = getChatArea((Container)cmp);
            if(cur != null) {
                return cur;
            }
        }
    }
    return null;
}
You’ll notice we used getChatArea above as a simple tool to abstract the chat area. We could also save the reference
to chatArea in the class itself but that might risk a memory leak so this is simpler. I’m not too concerned about threads
or race conditions since pretty much everything is on the EDT.
private EncodedImage getRoundedFriendImage(String uid, String imageUrl) {
    EncodedImage roundedHimOrHerImage = roundedImagesOfFriends.get(uid);
    if(roundedHimOrHerImage == null) {
        roundedHimOrHerImage = URLImage.createToStorage(roundPlaceholder, "rounded" + uid, imageUrl, URLImage.createMaskAdapter(mask));
        roundedImagesOfFriends.put(uid, roundedHimOrHerImage);
    }
    return roundedHimOrHerImage;
}
We mentioned this method much earlier, its relatively simple so I glossed over it. Its roughly identical to the “me picture”
we had in the previous posts just applied to pictures of friends.
private void addMessage(Message m) {
    String personId;

    // if this is a message to me then store based on sender otherwise store based on recepient
    if(m.getRecepientId().equals(tokenPrefix + uniqueId)) {
        personId = m.getSenderId();
    } else {
        personId = m.getRecepientId();
    }
    java.util.List messages = (java.util.List)Storage.getInstance().readObject(personId);
    if(messages == null) {
        messages = new ArrayList();
    }
    messages.add(m);
    Storage.getInstance().writeObject(personId, messages);
}
The last method of interest stores the message data into storage. We use an array list of messages which is pretty
simple.
Potential Improvements
Next time we’ll discuss push messages, in this version of the app messages that don’t arrive get lost… That’s a problem.
For that case we’ll use push notification from the OS to alert the other side.
We can also enable storage for the message queue thus allowing messages to remain cached until the next time the
user logs in.
There is also an issue if the user logs in from multiple devices he won’t see the chat history and one device
will grab incoming messages that might not reach another… This can be easily solved with a central database
architecture or possibly persistent queues in pubnub (although I don’t have experience there).
Other potential improvements can be:
Facebook’s invite friends and share buttons
Unread count and icon badging for iOS
Notification bar entries
Attachments and more complex data
All of those should be pretty trivial. We’ll publish the full source code and the project with the next update of this
series and let you guys play with it.
Other Posts In This Series
This is a multi-part series of posts including the following parts:
You can check out the final source code of this tutorial here.
Archived Comments
This post was automatically migrated from the legacy Codename One blog. The original comments are preserved below for historical context. New discussion happens in the Discussion section.
Lanre Makinde — August 17, 2015 at 6:37 pm (permalink)
Whoaoooooo. U guys are so far ahead. For you to despite your busy schedule have time for this kinda tutorials. Although I will wish to see login through twitter handled in your tutorial as well. Thanks great guys, great work.
salah Alhaddabi — November 19, 2016 at 1:34 pm (permalink)
Dear Shai, I have tried the chat app up until now without the pubnub functionality. I have copied the exact same code from here and also missing pieces from gethub. When I use it on the simulator and clock on google login I login ok. But when I try to get friends I get an error even when the token is valid. I immediately get 400 error code when I try to use facebook login. I have tried the app on my android device S7 and I get a message the socialChat app has closed when I click on google login.
Shai Almog — November 20, 2016 at 6:13 am (permalink)
Try running with the device connected with a cable and DDMS to see the output.
salah Alhaddabi — November 20, 2016 at 6:34 pm (permalink)
Dear Shai,
I have downloaded the apk file and start android studoi and opened the apk file in android studo and connected my samsung to PC with a USB cable but not sure what to do next as nothing appears in the console when the application fails. Can you please instruct me on how to go about this debugging??
Shai Almog — November 21, 2016 at 4:52 am (permalink)
You don’t need to open the APK in Android studio. Just run the app as usual on the device and in android studio select the DDMS tool. This will open a special console on the bottom where you can pick your device and look thru the logs.
salah Alhaddabi — November 21, 2016 at 6:59 pm (permalink)
Dear Shai,
This is what I get from the DDMS log when I run SocialChat.
Initially after installing the app I get google login asking me to allow SocialChat to access my google account. Then I get transfered to the initial screen and stay on the login form without opening the contact form. The When I try to click again on the google login it tells me the “Unfortunately, SocialChat has stopped”. This is what I get when I try to do the google login again while connected my device through USB and use the DDMS tool:
11-21 22:29:15.822: E/AndroidRuntime(27804): at com.codename1.social.GoogleImpl$a.a(GoogleImpl.java:187)
11-21 22:29:15.822: E/AndroidRuntime(27804): at com.codename1.social.GoogleImpl$a.doInBackground(GoogleImpl.java:179)As for the Facebook login, I login successfuly but the contact form is empty with no contacts loaded even though I am sure many of my contacts are online.
Your help is much appreciated.
Shai Almog — November 22, 2016 at 4:49 am (permalink)
As explained in the article Facebook doesn’t provide access to all your contacts. It only provides access to contacts who installed the app…
There is more output in the Google login which should probably clarify that. Also make sure you are building with API level 21 to workaround this issue: https://github.com/codename…
Discussion
Join the conversation via GitHub Discussions.