
| __ | This is the third post in a three-part series on In-App purchase. Please check out Part I: Introduction to In-App Purchase and Part 2: Implementing Non-Renewable Subscriptions. |
|---|
Auto-renewable subscriptions provide, arguably, an easier path to recurring revenue than non-renewable subscriptions because all of the subscription stuff is handled by the app store. You defer almost entirely to the app store (iTunes for iOS, and Play for Android) for billing and management.
If there is a down-side, it would be that you are also subject to the rules of each app store – and they take their cut of the revenue. On iOS, you keep 70% of the revenue for the first year of a subscription. This increases to 85% after the first year. Google also lets you keep 70% of the revenue on subscriptions. I read a number of news articles from June 2016, stating that they planned to increase this to 85% to match Apple but I haven’t been able to find any corroborating information on the Play site itself, so at the time of writing, it appears that they are still on the 70/30 split model.
For more information about Apple’s auto-renewable subscription features and rules see this document.
For more information about subscriptions in Google play, see this document.
Auto-Renewable vs Non-Renewable. Best Choice?
When deciding between auto-renewable and non-renewable subscriptions, as always, the answer will depend on your needs and preferences. Auto-renewables are nice because it takes the process completely out of your hands. You just get paid. On the other hand, there are valid reasons to want to use non-renewables. E.g. You can’t cancel an auto-renewable subscription for a user. They have to do that themselves. You may also want more control over the subscription and renewal process, in which case a non-renewable might make more sense.
I recommend this blog post for a well-informed, critical review of Apple’s auto-renew process. (TLDR> He says to never use auto-renewables). I don’t have as much experience with in-app purchase as that author, but from my experiments, the auto-renewable option seems like a perfectly good solution.
Learning By Example
The remainder of this post describes the general workflow of subscription management on the server. It also demonstrates how to use Apple’s and Google’s web services to validate receipts and stay informed of important events (such as when users cancel or renew their subscriptions).
Building the IAP Demo Project
To aid in this process, I’ve created a fully-functional in-app purchase demo project that includes both a client app and a server app.
Setting up the Client Project
Create a new Codename One project in Netbeans, and choose the “Bare-bones Hello World Template”. You should make your package name something unique so that you are able to create real corresponding apps in both Google Play and iTunes connect.
Once the project is created, copy this source file contents into your main class file. Then change the package name, and class name in the file to match your project settings. E.g. change
package ca.weblite.iapdemo;topackage <your.package.name.here>;andclass IAPDemo implements PurchaseCallbacktoclass YourClassName implements PurchaseCallback.Add the Generic Web Service Client library to your project by going to “Codename Settings” > “Extensions”, finding that library, and click “Download”. Then “Refresh CN1 libs” as it suggests.
Change the
localHostproperty to point to your local machine’s network address. Using “http://localhost” is not going to cut it here because when the app is running on a phone, it needs to be able to connect to your web server over the network. This address will be your local network address (e.g. 192.168.0.9, or something like that).private static final String localHost = "http://10.0.1.32";Add the
ios.plistInjectbuild hint to your project with the value<key>NSAppTransportSecurity</key> <dict> <key>NSAllowsArbitraryLoads</key> <true/> </dict>. This is so that we can use http urls in iOS. Since we don’t intend to full publish this app, we can cut corners like this. If you were creating a real app, you would use proper secure URLs.
| __ | In the client project, you’ll notice some places where we use Purchase.purchase(sku) for purchasing a product, and other places where we use Purchase.subscribe(sku). The correct method will depend on how you have set up the product in the Google Play store. If the product is set up as a subscription, you must use subscribe(). Otherwise, you should use purchase(). |
|---|
Setting up the Server Project
Download the CN1-IAP-Server demo project from Github, and run its “install-deps” ANT task in order to download and install its dependencies to your local Maven repo.
| __ | For the following commands to work, make sure you have “ant”, “mvn”, and “git” in your environment PATH. |
|---|
$ git clone https://github.com/shannah/cn1-iap-demo-server
$ cd cn1-iap-demo-server
$ ant install-deps
Open the project in Netbeans
Setting up the Database
Create a new database in your preferred DBMS. Call it anything you like.
Create a new table named “RECEIPTS” in this database with the following structure:
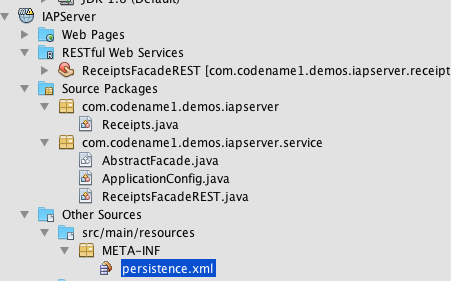
create TABLE RECEIPTS
(
	TRANSACTION_ID VARCHAR(128) not null,
	USERNAME VARCHAR(64) not null,
	SKU VARCHAR(128) not null,
	ORDER_DATA VARCHAR(32000),
	PURCHASE_DATE BIGINT,
	EXPIRY_DATE BIGINT,
	CANCELLATION_DATE BIGINT,
	LAST_VALIDATED BIGINT,
	STORE_CODE VARCHAR(20) default '' not null,
	primary key (TRANSACTION_ID, STORE_CODE)
)
Open the “
persistence.xml” file in the server netbeans project.
- Change the data source to the database you just created.
If you’re not sure how to create a data source, see my previous tutorial on connecting to a MySQL database.
Testing the Project
At this point we should be able to test out the project in the Codename One simulator to make sure it is working.
Build and Run the server project in Netbeans. You may need to tell it which application server you wish to run it on. I am running it on the Glassfish 4.1 that comes bundled with Netbeans.
Build and run the client project in Netbeans. This should open the Codename One simulator.
When the app first opens you’ll see a screen as follows:
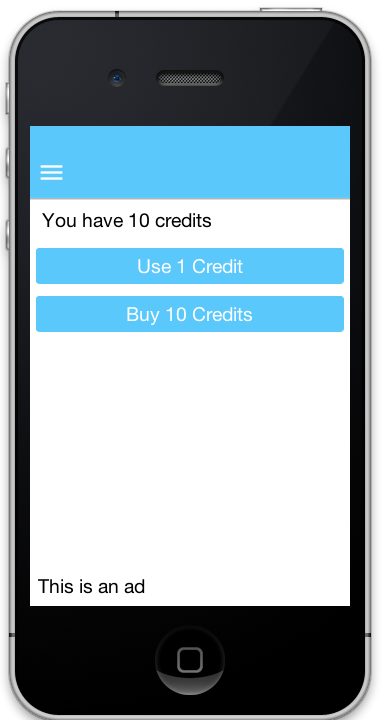
This screen is for testing consumable products, so we won’t be making use of this right now.
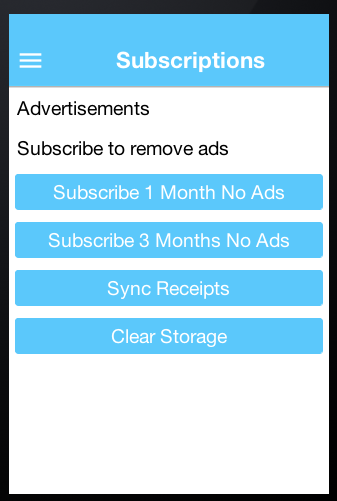
Open the hamburger menu and select “Subscriptions”. You should see something like this:
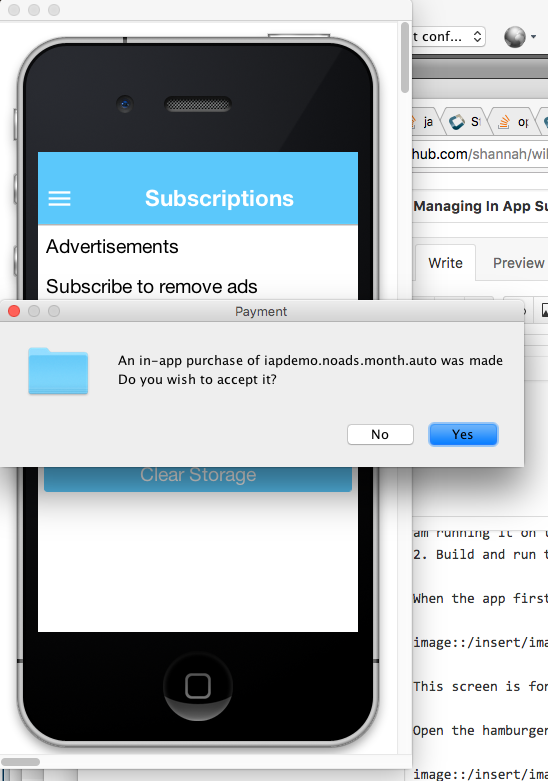
Click on the “Subscribe 1 Month No Ads” button. You will be prompted to accept the purchase:
Upon completion, the app will submit the purchase to your server, and if all went well, it will retrieve the updated list of receipts from your server also, and update the label on this form to say “No Ads. Expires <some date>”:
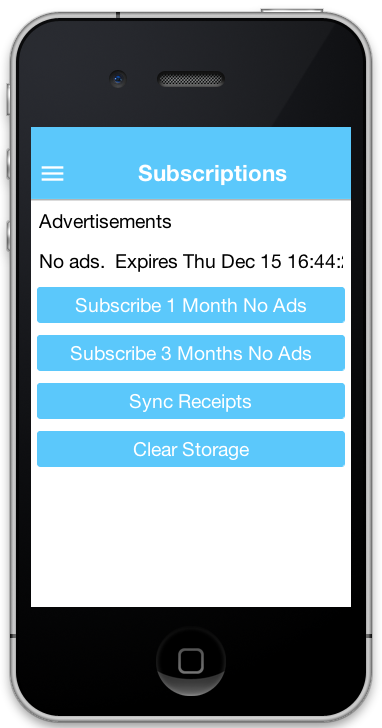
| __ | This project is set up to use an expedited expiry date schedule for purchases from the simulator. 1 month = 5 minutes. 3 months = 15 minutes. This helps for testing. That is why your expiry date may be different than expected. |
|---|
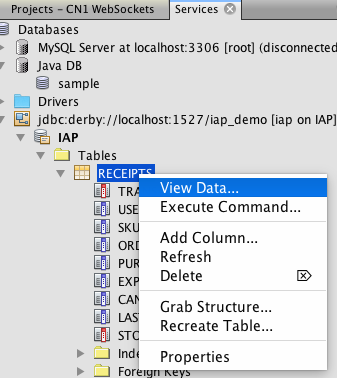
Just to verify that the receipt was inserted correctly, you should check the contents of your “RECEIPTS” table in your database. In Netbeans, I can do this easily from the “Services” pane. Expand the database connection down to the RECEIPTS table, right click “RECEIPTS” and select “View Data”. This will open a data table similar to the following:
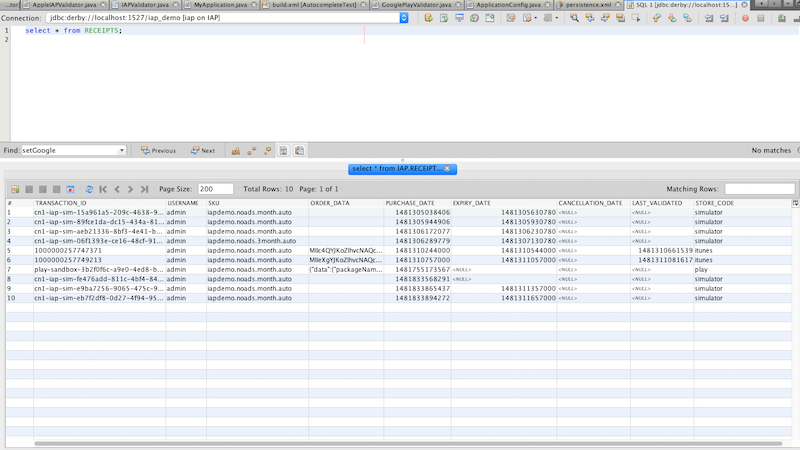
A few things to mention here:
The “username” was provided by the client. It is hard-coded to “admin”, but the idea is that you would have the user log in and you would have access to their real username.
All dates are stored as unix timestamps in milliseconds.
If you delete the receipt from your database, then press the “Synchronize Receipts” button in your app, the app will again say “No subscriptions.” Similarly if you wait 5 minutes and hit “Synchronize receipts” the app will say no subscriptions found, and the “ads” will be back.
Troubleshooting
Let’s not pretend that everything worked for you on the first try. There’s a lot that could go wrong here. If you make a purchase and nothing appears to happen, the first thing you should do is check the Network Monitor in the simulator (“Simulate” > “Network” > “Network Monitor”). You should see a list of network requests. Some will be GET requests and there will be at least one POST request. Check the response of these requests to see if they succeeded.
Also check the Glassfish server log to see if there is an exception.
Common problems would be that the URL you have set in the client app for endpointURL is incorrect, or that there is a database connection problem.
Looking at the Source of the App
Now that we’ve set up and built the app, let’s take a look at the source code so you can see how it all works.
Client Side
I use the Generic Webservice Client Library from inside my ReceiptStore implementation to load receipts from the web service, and insert new receipts to the database.
The source for my ReceiptStore is as follows:
    private ReceiptStore createReceiptStore() {
        return new ReceiptStore() {

            RESTfulWebServiceClient client = createRESTClient(receiptsEndpoint);

            @Override
            public void fetchReceipts(SuccessCallback<Receipt[]> callback) {
                RESTfulWebServiceClient.Query query = new RESTfulWebServiceClient.Query() {

                    @Override
                    protected void setupConnectionRequest(RESTfulWebServiceClient client, ConnectionRequest req) {
                        super.setupConnectionRequest(client, req);
                        req.setUrl(receiptsEndpoint);
                    }

                };
                client.find(query, rowset->{
                    List<Receipt> out = new ArrayList<Receipt>();
                    for (Map m : rowset) {
                        Result res = Result.fromContent(m);
                        Receipt r = new Receipt();
                        r.setTransactionId(res.getAsString("transactionId"));
                        r.setPurchaseDate(new Date(res.getAsLong("purchaseDate")));
                        r.setQuantity(1);
                        r.setStoreCode(m.getAsString("storeCode"));
                        r.setSku(res.getAsString("sku"));

                        if (m.containsKey("cancellationDate") && m.get("cancellationDate") != null) {
                            r.setCancellationDate(new Date(res.getAsLong("cancellationDate")));
                        }
                        if (m.containsKey("expiryDate") && m.get("expiryDate") != null) {
                            r.setExpiryDate(new Date(res.getAsLong("expiryDate")));
                        }
                        out.add(r);

                    }
                    callback.onSucess(out.toArray(new Receipt[out.size()]));
                });
            }

            @Override
            public void submitReceipt(Receipt r, SuccessCallback<Boolean> callback) {
                Map m = new HashMap();
                m.put("transactionId", r.getTransactionId());
                m.put("sku", r.getSku());
                m.put("purchaseDate", r.getPurchaseDate().getTime());
                m.put("orderData", r.getOrderData());
                m.put("storeCode", r.getStoreCode());
                client.create(m, callback);
            }

        };
    }
Notice that we are not doing any calculation of expiry dates in our client app, as we did in the previous post (on non-renewable receipts). Since we are using a server now, it makes sense to move all of that logic over to the server.
The createRESTClient() method shown there simply creates a RESTfulWebServiceClient and configuring it to use basic authentication with a username and password. The idea is that your user would have logged into your app at some point, and you would have a username and password on hand to pass back to the web service with the receipt data so that you can connect the subscription to a user account. The source of that method is listed here:
    /**
     * Creates a REST client to connect to a particular endpoint.  The REST client
     * generated here will automatically add the Authorization header
     * which tells the service what platform we are on.
     * @param url The url of the endpoint.
     * @return
     */
    private RESTfulWebServiceClient createRESTClient(String url) {
        return new RESTfulWebServiceClient(url) {

            @Override
            protected void setupConnectionRequest(ConnectionRequest req) {
                try {
                    req.addRequestHeader("Authorization", "Basic " + Base64.encode((getUsername()+":"+getPassword()).getBytes("UTF-8")));
                } catch (Exception ex) {}
            }

        };
    }
Server-Side
On the server-side, our REST controller is a standard JAX-RS REST interface. I used Netbeans web service wizard to generate it and then modified it to suit my purposes. The methods of the ReceiptsFacadeREST class pertaining to the REST API are shown here:
@Stateless
@Path("com.codename1.demos.iapserver.receipts")
public class ReceiptsFacadeREST extends AbstractFacade<Receipts> {

    // ...

    @POST
    @Consumes({"application/xml", "application/json"})
    public void create(Receipts entity) {

        String username = credentialsWithBasicAuthentication(request).getName();
        entity.setUsername(username);

        // Save the receipt first in case something goes wrong in the validation stage
        super.create(entity);

        // Let’s validate the receipt
        validateAndSaveReceipt(entity);
            // validates the receipt against appropriate web service
            // and updates database if expiry date has changed.
    }

    // ...
    @GET
    @Override
    @Produces({"application/xml", "application/json"})
    public List<Receipts> findAll() {
        String username = credentialsWithBasicAuthentication(request).getName();
        return getEntityManager()
                .createNamedQuery("Receipts.findByUsername")
                .setParameter("username", username)
                .getResultList();
    }
The magic happens inside that validateAndSaveReceipt() method, which I’ll cover in detail later on in this post.
Notifications
It is important to note that you will not be notified by apple or google when changes are made to subscriptions. It is up to you to periodically “poll” their web service to find if any changes have been made. Changes we would be interested in are primarily renewals and cancellations. In order to deal with this, set up a method to run periodically (once-per day might be enough). For testing, I actually set it up to run once per minute as shown below:
    private static final long ONE_DAY = 24 * 60 * 60 * 1000;
    private static final long ONE_DAY_SANDBOX = 10 * 1000;
    @Schedule(hour="*", minute="*")
    public void validateSubscriptionsCron() {
        System.out.println("----------- DOING TIMED TASK ---------");
        List<Receipts> res = null;
        final Set<String> completedTransactionIds = new HashSet<String>();
        for (String storeCode : new String[]{Receipt.STORE_CODE_ITUNES, Receipt.STORE_CODE_PLAY}) {
            while (!(res = getEntityManager().createNamedQuery("Receipts.findNextToValidate")
                    .setParameter("threshold", System.currentTimeMillis() - ONE_DAY_SANDBOX)
                    .setParameter("storeCode", storeCode)
                    .setMaxResults(1)
                    .getResultList()).isEmpty() &&
                    !completedTransactionIds.contains(res.get(0).getTransactionId())) {

                final Receipts curr = res.get(0);
                completedTransactionIds.add(curr.getTransactionId());
                Receipts[] validatedReceipts =  validateAndSaveReceipt(curr);
                em.flush();
                for (Receipts r : validatedReceipts) {
                    completedTransactionIds.add(r.getTransactionId());
                }

            }
        }
    }
That method simply finds all of the receipts in the database that haven’t been validated in some period of time, and validates it. Again, the magic happens inside the validateAndSaveReceipt() method which we cover later.
| __ | In this example we only validate receipts from the iTunes and Play stores because those are the only ones that we currently support auto-renewing subscriptions on. |
|---|
The CN1-IAP-Validator Library
For the purpose of this tutorial, I created a library to handle receipt validation in a way that hides as much of the complexity as possible. It supports both Google Play receipts and iTunes receipts.
The general usage is as follows:
IAPValidator validator = IAPValidator.getValidatorForPlatform(receipt.getStoreCode());
if (validator == null) {
   // no validators were found for this store
   // Do custom validation
} else {
    validator.setAppleSecret(APPLE_SECRET);
    validator.setGoogleClientId(GOOGLE_DEVELOPER_API_CLIENT_ID);
    validator.setGooglePrivateKey(GOOGLE_DEVELOPER_PRIVATE_KEY);
    Receipt[] result = validator.validate(receipt);
    ...
}
As you can see from this snippet, the complexity of receipt validation has been reduced to entering three configuration strings:
APPLE_SECRET– This is a “secret” string that you will get from iTunes connect when you set up your in-app products.GOOGLE_DEVELOPER_API_CLIENT_ID– A client ID that you’ll get from the google developer API console when you set up your API service credentials.GOOGLE_DEVELOPER_PRIVATE_KEY– A PKCS8 encoded string with an RSA private key that you’ll receive at the same time as theGOOGLE_DEVELOPER_API_CLIENT_ID.
I will go through the steps to obtain these values later on in this post.
The validateAndSaveReceipt() Method
You are now ready to see the full magic of the validateAndSaveReceipt() method in all its glory:
    /**
     * Validates a given receipt, updating the expiry date,
     * @param receipt The receipt to be validated
     * @param forInsert If true, then an expiry date will be calculated even if there is no validator.
     */
    private Receipts[] validateAndSaveReceipt(Receipts receipt) {
        EntityManager em = getEntityManager();
        Receipts managedReceipt = getManagedReceipt(receipt);
            // managedReceipt == receipt if receipt is in database or null otherwise

        if (Receipt.STORE_CODE_SIMULATOR.equals(receipt.getStoreCode())) { __**(1)**
            if (receipt.getExpiryDate() == null && managedReceipt == null) {
                //Not inserted yet and no expiry date set yet
                Date dt = calculateExpiryDate(receipt.getSku(), true);
                if (dt != null) {
                    receipt.setExpiryDate(dt.getTime());
                }
            }
            if (managedReceipt == null) {
                // Receipt is not in the database yet.  Add it
                em.persist(receipt);
                return new Receipts[]{receipt};
            } else {
                // The receipt is already in the database.  Update it.
                em.merge(managedReceipt);
                return new Receipts[]{managedReceipt};
            }
        } else {
            // It is not a simulator receipt
            IAPValidator validator = IAPValidator.getValidatorForPlatform(receipt.getStoreCode());
            if (validator == null) {
                // Receipt must have come from a platform other than iTunes or Play
                // Because there is no validator

                if (receipt.getExpiryDate() == null && managedReceipt == null) {
                    // No expiry date.
                    // Generate one.
                    Date dt = calculateExpiryDate(receipt.getSku(), false);
                    if (dt != null) {
                        receipt.setExpiryDate(dt.getTime());
                    }

                }
                if (managedReceipt == null) {
                    em.persist(receipt);
                    return new Receipts[]{receipt};
                } else {
                    em.merge(managedReceipt);
                    return new Receipts[]{managedReceipt};
                }

            }

            // Set credentials for the validator
            validator.setAppleSecret(APPLE_SECRET);
            validator.setGoogleClientId(GOOGLE_DEVELOPER_API_CLIENT_ID);
            validator.setGooglePrivateKey(GOOGLE_DEVELOPER_PRIVATE_KEY);

            // Create a dummy receipt with only transaction ID and order data to pass
            // to the validator.  Really all it needs is order data to be able to validate
            Receipt r2 = Receipt();
            r2.setTransactionId(receipt.getTransactionId());
            r2.setOrderData(receipt.getOrderData());
            try {
                Receipt[] result = validator.validate(r2);
                // Depending on the platform, result may contain many receipts or a single receipt
                // matching our receipt.  In the case of iTunes, none of the receipt transaction IDs
                // might match the original receipt’s transactionId because the validator
                // will set the transaction ID to the *original* receipt’s transaction ID.
                // If none match, then we should remove our receipt, and update each of the returned
                // receipts in the database.
                 Receipt matchingValidatedReceipt = null;
                for (Receipt r3 : result) {
                    if (r3.getTransactionId().equals(receipt.getTransactionId())) {
                        matchingValidatedReceipt = r3;
                        break;
                    }
                }

                if (matchingValidatedReceipt == null) {
                    // Since the validator didn’t find our receipt,
                    // we should remove the receipt.  The equivalent
                    // is stored under the original receipt’s transaction ID
                    if (managedReceipt != null) {
                        em.remove(managedReceipt);
                        managedReceipt = null;
                    }
                }
                List<Receipts> out = new ArrayList<Receipts>();
                // Now go through and
                for (Receipt r3 : result) {
                    if (r3.getOrderData() == null) {
                        // No order data found in receipt.  Setting it to the original order data
                        r3.setOrderData(receipt.getOrderData());
                    }
                    Receipts eReceipt = new Receipts();
                    eReceipt.setTransactionId(r3.getTransactionId());
                    eReceipt.setStoreCode(receipt.getStoreCode());
                    Receipts eManagedReceipt = getManagedReceipt(eReceipt);
                    if (eManagedReceipt == null) {
                        copy(eReceipt, r3);
                        eReceipt.setUsername(receipt.getUsername());
                        eReceipt.setLastValidated(System.currentTimeMillis());
                        em.persist(eReceipt);
                        out.add(eReceipt);
                    } else {

                        copy(eManagedReceipt, r3);
                        eManagedReceipt.setUsername(receipt.getUsername());
                        eManagedReceipt.setLastValidated(System.currentTimeMillis());
                        em.merge(eManagedReceipt);
                        out.add(eManagedReceipt);
                    }
                }

                return out.toArray(new Receipts[out.size()]);

            } catch (Exception ex) {
                // We should probably store some info about the failure in the
                // database to make it easier to find receipts that aren’t validating,
                // but for now we’ll just log it.
                Log.p("Failed to validate receipt "+r2);
                Log.p("Reason: "+ex.getMessage());
                Log.e(ex);
                return new Receipts[]{receipt};

            }
        }
    }
__1 | We need to handle the case where the app is being used in the CN1 simulator. We’ll treat this
| as a non-renewable receipt, and we’ll calculate the expiry date using an “accelerated” clock to assist in testing. |
|---|
| __ | In many of the code snippets for the Server-side code, you’ll see references to both a Receipts class and a Receipt class. I know this is slightly confusing. The Receipts class is a JPA entity the encapsulates a row from the “receipts” table of our SQL database. The Receipt class is com.codename1.payment.Receipt. It is used to interface with the IAP validation library. |
|---|
Google Play Setup
Creating the App in Google Play
In order to test out in-app purchase on an Android device, you’ll need to create an app the Google Play Developer Console. I won’t describe the process in this post, but there is plenty of information around the internet on how to do this. Some useful references for this include:
Getting Started With Publishing – If you don’t already have an account with Google to publish your apps.
Graphics, Icons, etc..
You are required to upload some screenshots and feature graphics. Don’t waste time making these perfect. For the screenshots, you can just use the “Screenshot” option in the simulator. (Use the Nexus 5 skin). For the feature graphics, I used this site that will generate the graphics in the correct dimensions for Google Play. You can also just leave the icon as the default Codename One icon.
Creating Test Accounts
| __ | You cannot purchase in-app products from your app using your publisher account. You need to set up at least one test account for the purpose of testing the app. |
|---|
In order to test your app, you need to set up a test account. A test account must be associated with a real gmail email address. If you have a domain that is managed by Google apps, then you can also use an address from that domain.
The full process for testing in-app billing can be found in this google document. However, I personally found this documentation difficult to follow.
For your purposes, you’ll need to set up a tester list in Google Play. Choose “Settings” > “Tester Lists”. Then create a list with all of the email address that you want to have treated as test accounts. Any purchases made by these email addresses will be treated as “Sandbox” purchases, and won’t require real money to change hands.
Alpha Channel Distribution
In order to test in-app purchase on Android, you must first publish your app. You can’t just build and install your app manually. The app needs to be published on the Play store, and it must be installed through the play store for in-app purchase to work. Luckily you can publish to an Alpha channel so that your app won’t be publicly available.
For more information about setting up alpha testing on Google play see this Google support document on the subject.
Once you have set your app up for alpha testing, you can send an invite link to your test accounts. You can find the link in the Google Play console under the APK section, under the “Alpha” tab (and assuming you’ve enabled alpha testing.
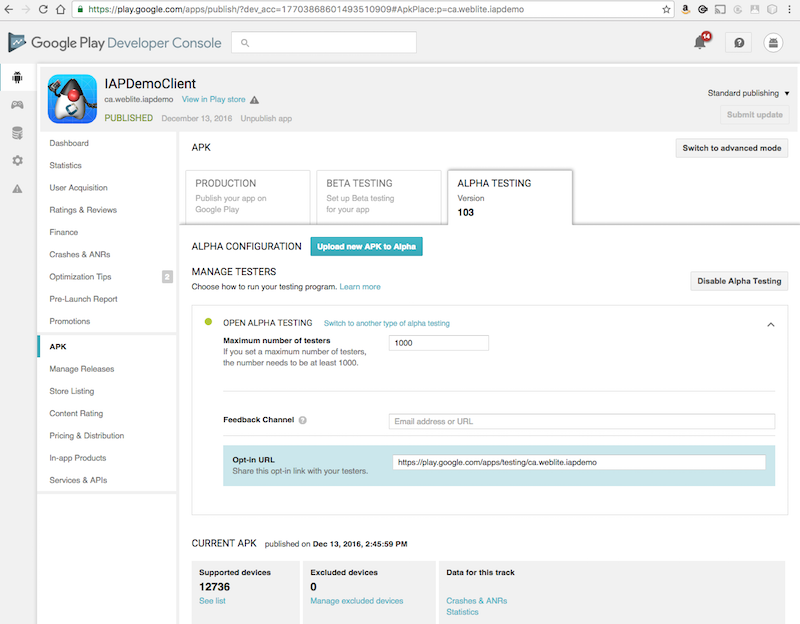
The format of the link is [https://play.google.com/apps/testing/<your-app-id>](https://play.google.com/apps/testing/<your-app-id>); in case you can’t find it. You can email this to your alpha testers. Make sure that you have added all testers to your tester lists so that their purchases will be made in the sandbox environment.
| __ | Make sure that you install the app on your device using the test account that you set up and NOT your Google publisher account. Test purchases are always carried out by the account that installed the app. To install the app under a specific user, open the play store app on your device, then log out from your normal account, and log in using the test account. Then follow the install link for your app. If you accidentally install the app using the wrong user, it is a bit of a painful process to reset the clock. You can’t just simply uninstall and reinstall. I spent several hours caught in this purgatory, and the solution is worth of a blog post in itself. |
|---|
Also, before proceeding with testing in-app purchases, you need to add the in-app products in Google Play.
Adding In-App Products
After you have published your APK to the alpha channel, you can create the products. For the purposes of this tutorial, we’ll just add two products:
iapdemo.noads.month.auto – The 1 month subscription.
iapdemo.noads.3month.auto – The 3 month subscription.
| __ | Since we will be adding products as “Subscriptions” in the pay store, your app must use the Purchase.subscribe(sku) method for initiating a purchase on these products, and not the Purchase.purchase(sku) method. If you accidentally use purchase() to purchase a subscription on Android, the payment will go through, but your purchase callback will receive an error. |
|---|
Adding 1 month Subscription
Open Google Play Developer Console, and navigate to your app.
Click on “In-app Products” in the menu. Then click the “Add New Product” button.
Select “Subscription”, and enter “iapdemo.noads.month.auto” for the Product ID. Then click “Continue”
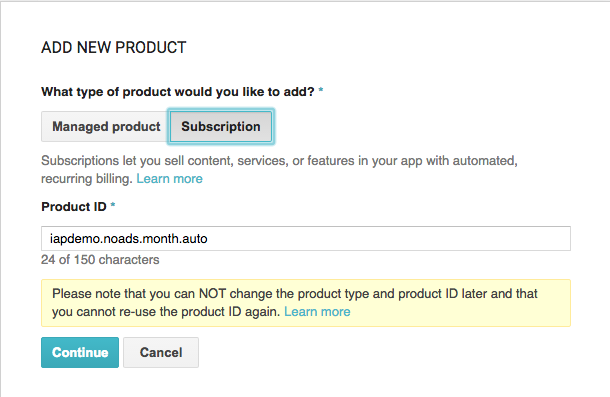
Now fill in the form. You can choose your own price and name for the product. The following is a screenshot of the options I chose.
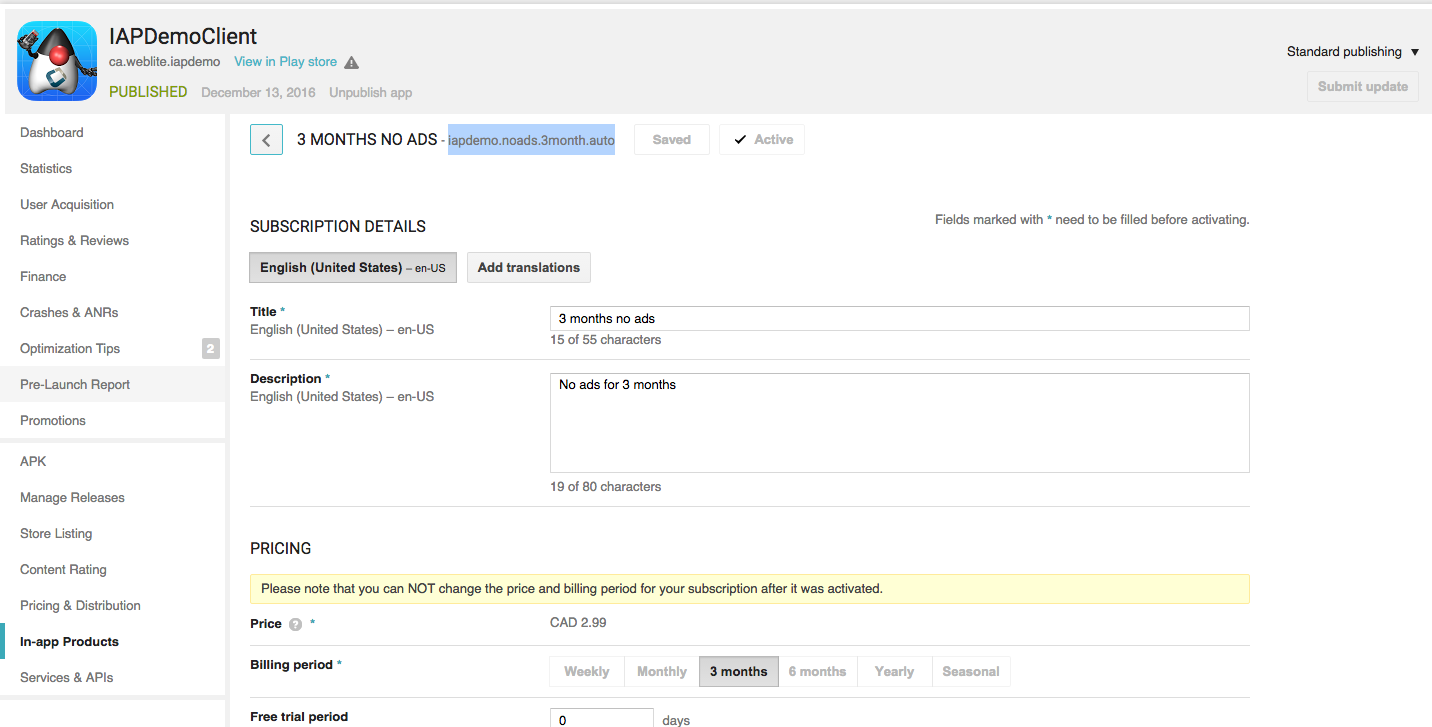
Adding 3 month Subscription
Follow the same process as for the 1 month subscription except use “iapdemo.noads.3month.auto” for the product ID, and select “3 months” for the billing period instead of “Monthly”.
Testing The App
At this point we should be ready to test our app. Assuming you’ve installed the app using the invite link you sent yourself from Google play, as a test account that is listed on your testers list , you should be good to go.
Open the app, click on “Subscriptions”, and try to purchase a 1-month subscription. If all goes well, it should insert the subscription into your database. But with no expiry date, since we haven’t yet implemented receipt validation yet. We’ll do that next.
Creating Google Play Receipt Validation Credentials
Google play receipt validation is accomplished via the android-publisher Purchases: get API. The CN1-IAP-Validation library shields you from most of the complexities of using this API, but you still need to obtain a “private key” and a “client id” to access this API. Both of these are provided when you set up an OAuth2 Service Account for your app.
| __ | The following steps assume that you have already created your app in Google play and have published it to at least the alpha channel. See my previous post on this topic here (Link to be provided). |
|---|
Steps:
Open the Google API Developer Console, and select your App from the menu.
Click on the “Library” menu item in the left menu, and then click the “Google Play Developer API” link.

- Click on the button that says “Enable”. (If you already have it enabled, then just proceed to the next step).

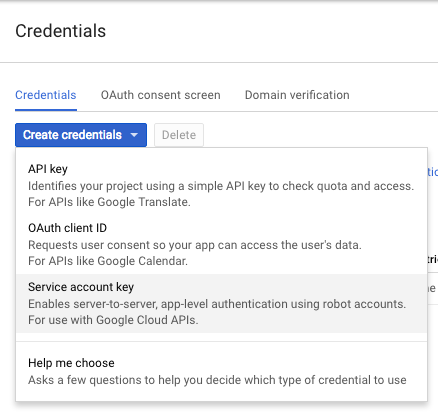
Click on the “Credentials” menu item in the left menu.
In the “Credentials” drop-down menu, select the “Service Account Key” option.
- You will be presented with a new form. In the “Service Account” drop-down, select “New Service Account”. This will give you some additional options.
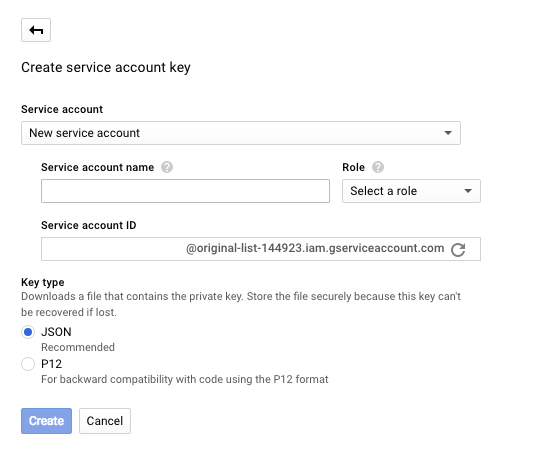
Enter anything you like for the “Service account name”. For the role, we’ll select “Project” > “Owner” for now just so we don’t run into permissions issues. You’ll probably want to investigate further to fine a more limited role that only allows receipt verification, but for now, I don’t want any unnecessary road blocks for getting this to work. We’re probably going to run into “permission denied” errors at first anyways, so the fewer reasons for this, the better.
It will auto-generate an account ID for you.
Finally, for the “Key type”, select “JSON”. Then click the “Create” button.
This should prompt the download of a JSON file that will have contents similar to the following:
{
  "type": "service_account",
  "project_id": "iapdemo-152500",
  "private_key_id": "1b1d39f2bc083026b164b10a444ff7d839826b8a",
  "private_key": "-----BEGIN PRIVATE KEY----- ... some private key string -----END PRIVATE KEY-----n",
  "client_email": "[[email protected]](/cdn-cgi/l/email-protection)",
  "client_id": "117601572633333082772",
  "auth_uri": "https://accounts.google.com/o/oauth2/auth",
  "token_uri": "https://accounts.google.com/o/oauth2/token",
  "auth_provider_x509_cert_url": "https://www.googleapis.com/oauth2/v1/certs",
  "client_x509_cert_url": "https://www.googleapis.com/robot/v1/metadata/x509/iapdemo%40iapdemo-152500.iam.gserviceaccount.com"
}
This is where we get the information we’re looking for. The “client_email” is what we’ll use for your googleClientId, and the “private_key” is what we’ll use for the googlePrivateKey.
| __ | Use the “client_email” value as our client ID, not the “client_id” value as you might be tempted to do. |
|---|
We’ll set these in our constants:
public static final String GOOGLE_DEVELOPER_API_CLIENT_ID="[[email protected]](/cdn-cgi/l/email-protection)";
public static final String GOOGLE_DEVELOPER_PRIVATE_KEY="-----BEGIN PRIVATE KEY----- ... -----END PRIVATE KEY-----n";

...

validator.setGoogleClientId(GOOGLE_DEVELOPER_API_CLIENT_ID);
validator.setGooglePrivateKey(GOOGLE_DEVELOPER_PRIVATE_KEY);
NOT DONE YET
Before we can use these credentials to verify receipts for our app, we need to link our app to this new service account from within Google Play.
Steps:
Open the Google Play Developer Console, then click on “Settings” > “API Access”.
You should see your app listed on this page. Click the “Link” button next to your app.
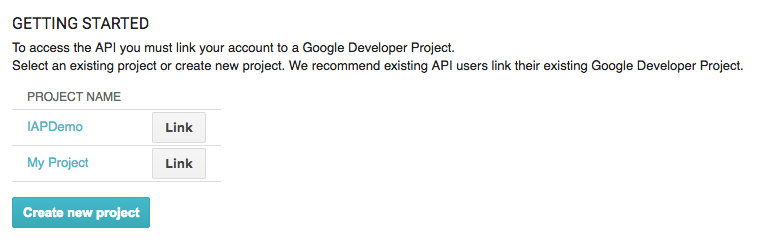
- This should reveal some more options on the page. You should see a “Service Accounts” section with a list of all of the service accounts that you have created. Find the one we just created, and click the “Grant Access” button in its row.

- This will open a dialog titled “Add New User”. Leave everything default, except change the “Role” to “Administrator”. This provides “ALL” permissions to this account, which probably isn’t a good idea for production. Later on, after everything is working, you can circle back and try to refine permissions. For the purpose of this tutorial, I just want to pull out all of the potential road blocks.
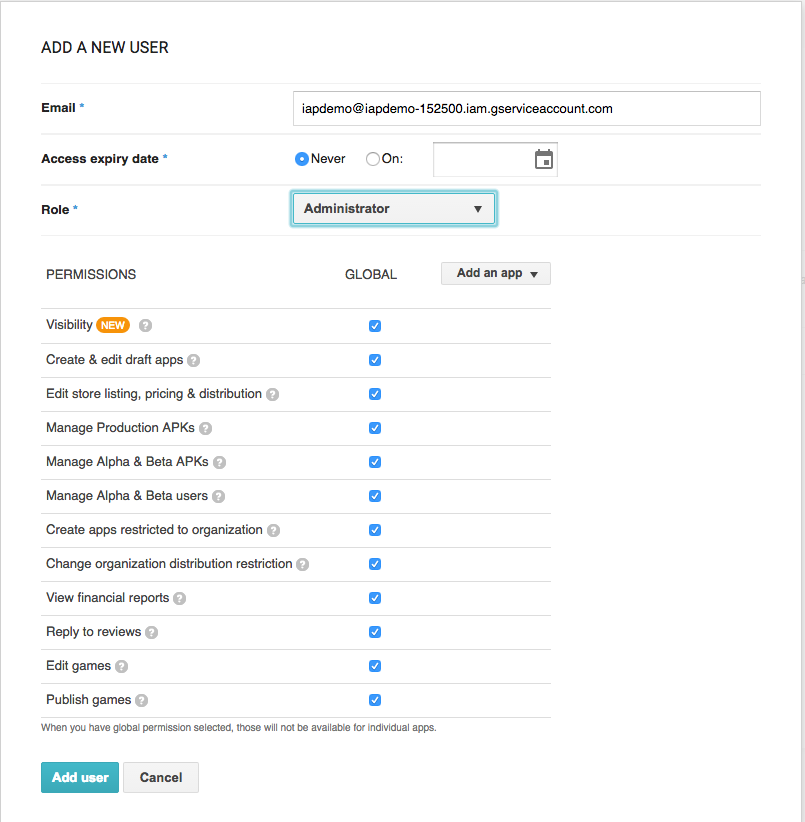
- Press the “Add User” button.
At this point, the service account should be active so we can try to validate receipts.
Testing Receipt Validation
The ReceiptsFacadeREST class includes a flag to enable/disable play store validation. By default it is disabled. Let’s enable it:
public static final boolean DISABLE_PLAY_STORE_VALIDATION=true;
Change this to false.
Then build and run the server app. The validateSubscriptionsCron() method is set to run once per minute, so we just need to wait for the timer to come up and it should try to validate all of the play store receipts.
| __ | I’m assuming you’ve already added a receipt in the previous test that we did. If necessary, you should purchase the subscription again in your app. |
|---|
After a minute or so, you should see “———– VALIDATING RECEIPTS ———” written in the Glassfish log, and it will validate your receipts. If it works, your receipt’s expiry date will get populated in the database, and you can press “Synchronize Receipts” in your app to see this reflected. If it fails, there will like be a big ugly stack trace and exception readout with some clues about what went wrong.
Realistically, your first attempt will fail for some reason. Use the error codes and stack traces to help lead you to the problem. And feel free to post questions here.
iTunes Connect Setup
The process for setting up and testing your app on iOS is much simpler than on Android (IMHO). It took me a couple hours to get the iTunes version working, vs a couple days on the Google Play side of things. One notable difference that makes things simpler is that you don’t need to actually upload your app to the store to test in-app purchase. You can just use your debug build on your device. It is also much easier to roll a bunch of test accounts than on Google Play. You don’t need to set up an alpha program, you just create a few “test accounts” (and this is easy to do) in your iTunes connect account, and then make sure to use one of these accounts when making a purchase. You can easily switch accounts on your device from the “Settings” app, where you can just log out of the iTunes store – which will cause you to be prompted in your app the next time you make a purchase.
Setting up In-App Products
The process to add products in iTunes connect is outlined in this apple developer document. We’ll add our two SKUs:
iapdemo.noads.month.auto – The 1 month subscription.
iapdemo.noads.3month.auto – The 3 month subscription.
Just make sure you add them as auto-renewable subscriptions, and that you specify the appropriate renewal periods. Use the SKU as the product ID. Both of these products will be added to the same subscription group. Call the group whatever you like.
Creating Test Accounts
In order to test purchases, you need to create some test accounts. See this apple document for details on how to create these test accounts. Don’t worry, the process is much simpler than for Android. It should take you under 5 minutes.
Once you have the test accounts created, you should be set to test the app.
Make sure your server is running.
Log out from the app store. The process is described here.
Open your app.
Try to purchase a 1-month subscription
If all went well, you should see the receipt listed in the RECEIPTS table of your database. But the expiry date will be null. We need to set up receipt verification in order for this to work.
Setting up Receipt Verification
In order for receipt verification to work we simply need to generate a shared secret in iTunes connect. The process is described here.
Once you have a shared secret, update the ReceiptsFacadeREST class with the value:
public static final String APPLE_SECRET = "your-shared-secret-here";
And enable iTunes store validation:
public static final boolean DISABLE_ITUNES_STORE_VALIDATION=true;
Change this to false.
If you rebuild and run the server project, and wait for the validateSubscriptionsCron() method to run, it should validate the receipt. After about a minute (or less), you’ll see the text “———– VALIDATING RECEIPTS ———” written to the Glassfish log file, followed by some output from connecting to the iTunes validation service. If all went well, you should see your receipt expiration date updated in the database. If not, you’ll likely see some exception stack traces in the Glassfish log.
| __ | Sandbox receipts in the iTunes store are set to run on an accelerated schedule. A 1 month subscription is actually 5 minutes, 3 months is 15 minutes etc… Also sandbox subscriptions don’t seem to persist in perpetuity until the user has cancelled it. I have found that they usually renew only 4 or 5 times before they are allowed to lapse by Apple. |
|---|
Summary
Setting up in-app purchase is not for the faint of heart. Having to jump through a battery of hoops on Android is poison for the soul. On the other hand, it may all just be worth it. Once you have a working system up and running, it can mostly continue to run on its own. Despite the length of this post, I’m really only just scratching the surface on this topic. There are many other aspects that I simply ignored due to time constraints. I encourage you to take the code in this post and try to make it work for yourself. You’re in for some pain, but I guarantee that the reward at the end of it all is worth it.
Archived Comments
This post was automatically migrated from the legacy Codename One blog. The original comments are preserved below for historical context. New discussion happens in the Discussion section.
bryan — January 3, 2017 at 9:19 pm (permalink)
Thanks Steve – great tutorial.
salah Alhaddabi — August 13, 2017 at 9:46 pm (permalink)
Dear Steve,
when I try to run the demo client, I get the following erros: (I have changed the package name to be com.salah.trails.iapdemo.IAPDemo)java.lang.ClassNotFoundException: com.salah.trails.iapdemo.IAPDemo
at java.net.URLClassLoader.findClass(URLClassLoader.java:381)
at java.lang.ClassLoader.loadClass(ClassLoader.java:424)
at sun.misc.Launcher$AppClassLoader.loadClass(Launcher.java:331)
at java.lang.ClassLoader.loadClass(ClassLoader.java:357)
at java.lang.ClassLoader.findSystemClass(ClassLoader.java:1001)
at com.codename1.impl.javase.ClassPathLoader.findClass(ClassPathLoader.java:100)
at com.codename1.impl.javase.ClassPathLoader.loadClass(ClassPathLoader.java:50)
at java.lang.Class.forName0(Native Method)
at java.lang.Class.forName(Class.java:264)
at com.codename1.impl.javase.Executor$[1.run](http://1.run)([Executor.java](http://Executor.java):86)
at java.awt.event.InvocationEvent.dispatch(InvocationEvent.java:311)
at java.awt.EventQueue.dispatchEventImpl(EventQueue.java:756)
at java.awt.EventQueue.access$500(EventQueue.java:97)
at java.awt.EventQueue$[3.run](http://3.run)([EventQueue.java](http://EventQueue.java):709)
at java.awt.EventQueue$[3.run](http://3.run)([EventQueue.java](http://EventQueue.java):703)
at java.security.AccessController.doPrivileged(Native Method)
at java.security.ProtectionDomain$1.doIntersectionPrivilege(ProtectionDomain.java:75)
at java.awt.EventQueue.dispatchEvent(EventQueue.java:726)
at java.awt.EventDispatchThread.pumpOneEventForFilters(EventDispatchThread.java:201)
at java.awt.EventDispatchThread.pumpEventsForFilter(EventDispatchThread.java:116)
at java.awt.EventDispatchThread.pumpEventsForHierarchy(EventDispatchThread.java:105)
at java.awt.EventDispatchThread.pumpEvents(EventDispatchThread.java:101)
at java.awt.EventDispatchThread.pumpEvents(EventDispatchThread.java:93)
at [java.awt.EventDispatchThrea…](http://java.awt.EventDispatchThread.run)([EventDispatchThread.java](http://EventDispatchThread.java):82)
Shai Almog — August 14, 2017 at 7:04 am (permalink)
You refactored the package name without updating it in the codenameone_settings.proper…
Brenden — June 11, 2019 at 9:15 am (permalink)
Dear Steve
Above it says that there is no need to upload your app to the apple store to test the app , is this still valid now in 2019 ? or has this changed ?
Regards Brenden
Shai Almog — June 12, 2019 at 4:11 am (permalink)
Hi,
it should work fine locally but you need to still configure everything in itunes connect otherwise it won’t work.
Rochana Sawatzky — November 27, 2019 at 1:36 am (permalink)
Hey Steve – no matter what I seem to do, when trying to ant-install deps I get the error:
Cannot run program “mvn” (in directory …"): CreateProcess error=2, The system cannot find the file specified
I have installed maven, and added it to my path, as well as adding maven_home, m2_home, java_home environment variables. I can run mvn -version fine, so I’m at a loss for why I’m getting the error. Any ideas?
Shai Almog — November 27, 2019 at 2:59 am (permalink)
If you added it to the path in Windows GUI it might not impact the currently open shell. If you’re using windows shell this might conflict with spaces you have in the path so make sure you use quotes e.g.
set PATH="PATH TO MAVEN";%PATH%If this doesn’t help try to provide more details about your environment so we can help.
Discussion
Join the conversation via GitHub Discussions.