
Hopefully by now, most of you have had a chance to try out the new GUI Builder – specifically the new “auto layout” mode that allows you to position components with much greater precision than before. For this blog post, I have prepared a couple of video tutorials to walk you through the creation of a Sign In form using the GUI Builder. I have taken the existing Sign In demo project as a basis, but I’m re-doing the UI, which was originally hand-coded, using the GUI Builder.
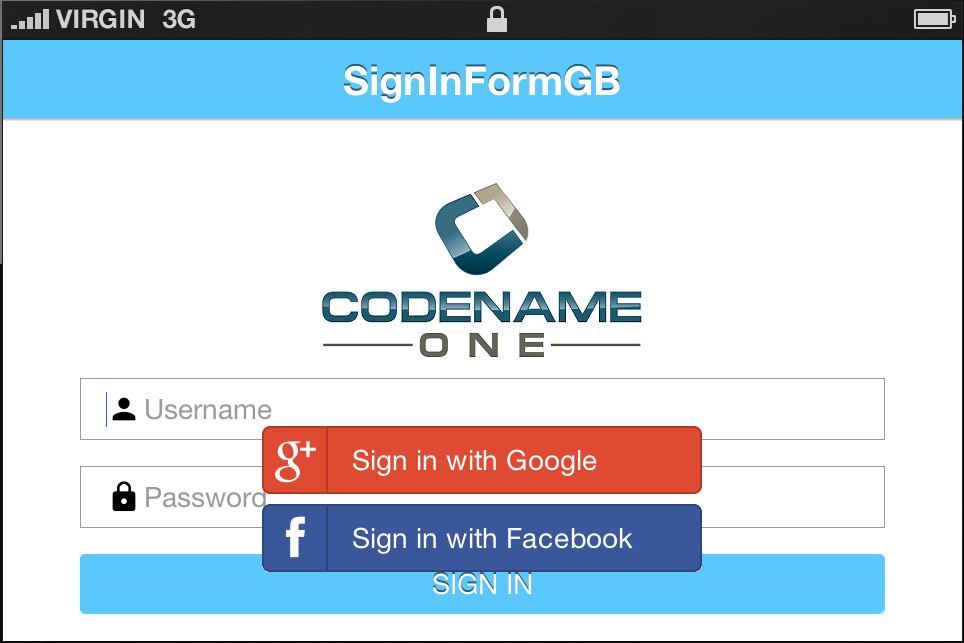
The finished result will look like this :

Following Along
If you want to follow along, you’ll need to do the following :
-
Download the codenameone-demos repository, then open the Sign In project in Netbeans.
-
You’ll need to copy the CodenameOneBuildClient.jar, JavaSE.jar, and lib directory from another Codename One project into the SignIn folder for the dependencies to be met.
-
-
These videos were created using version 3.7.2 of the Codename One plugin. If you are using a different version, your experience will be slightly different.
For this video tutorial, I skipped directly to the blank canvas in the GUI builder. I skipped the part where I create a new GUIForm in Netbeans, and open it in the GUI builder. If you want to begin at the same point, you would perform the following steps :
-
Right click on the
com.codename1.demos.signinpackage in the project explorer, and select “Other…” from the context menu.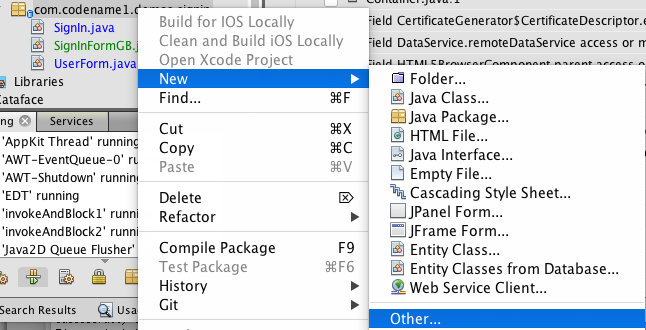
-
Select “Codename One” → “GUI Builder Form”
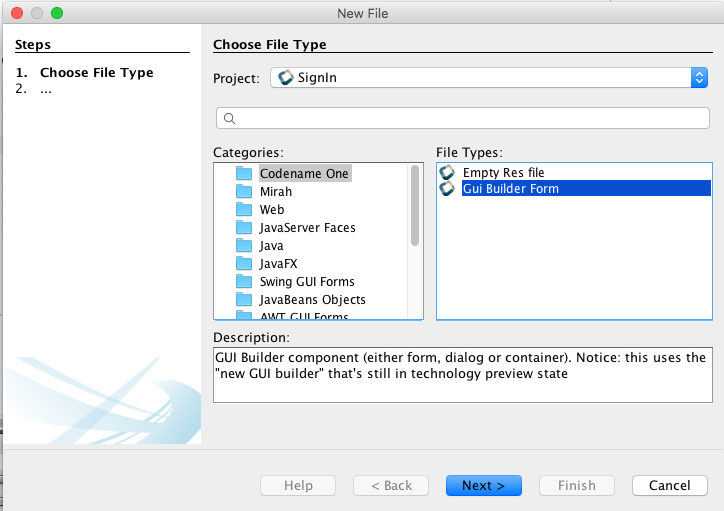
-
In the next form, enter “SignInFormGB” for the name, and keep “Form” selected, and “Auto Layout” checked.
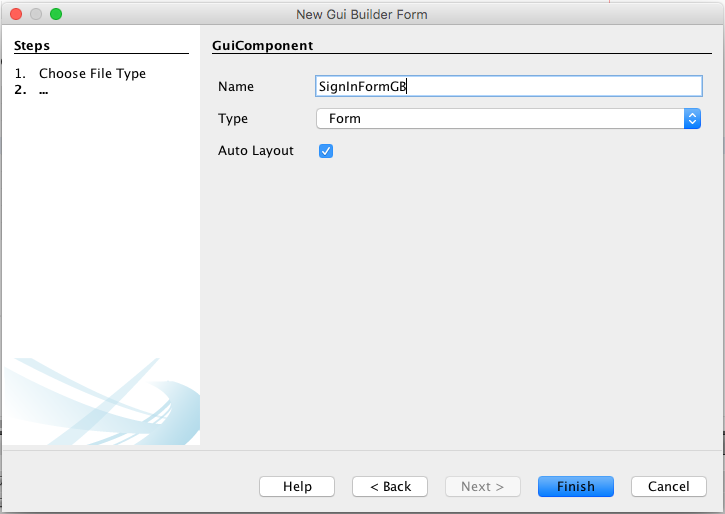
-
Click “Finish”.
This will create a java class named “SignInFormGB.java” in your com.codename1.demos.signin package.
Right-click on this class in the project explorer, and select “Gui Builder” in the context menu to open up the blank form in the GUI Builder.
Now you’re ready to begin.
Part 1: Laying out the Form
Summary of this Video:
In this video I lay out the key elements of the sign-in form. I begin by dragging an empty label onto the canvas which I intend to use as a guide. This is a little trick that can be used in the GUI builder to assist in aligning elements together.
Next I drag the logo onto the canvas. For this I use a “Label” element. I set the “Icon” of this label using the property editor, and I remove the text.
I then drag a text field onto the canvas to be used as the username field. This is positioned below the logo, and its top inset is linked to the logo. The left and right insets are linked to the left and right insets of the guide that we added at the beginning.
I use copy/paste on the username field to add a password textfield below it. Then I drag a button onto the canvas, and position it below the password field.
Finally, I add the buttons to be used for Google and Facebook login. For these buttons, I set their icons to images (which are already in the resource file), and I change their UIIDs to “Label” so that they don’t acquire the normal blue border that regular buttons get. These buttons are positioned at the bottom of the canvas, centered horizontally.
Key Features Demonstrated In this Video
-
Dragging components from the palette onto the canvas.
-
Dragging components around the canvas.
-
Explicitly setting insets using the inset editor.
-
Linking component insets to other components on the form so that they will be repositioned properly if the parent container is resized.
-
Using the property editor to change the text, icon, hint, and name of text fields, buttons, and labels.
The Finished Product
The XML for the SignIn Form can be found here. If you want to skip to the end, you can copy and paste this code into your res/guibuilder/com/codename1/demos/signin/SignInFormGB.gui file.
Part 2: Making the Form Responsive
Summary of this Video
Near the end of the first video I allude to a slight problem with our form: It looks horrible when displayed in landscape mode. This video shows how we can fix this, and produce a form that is fully responsive.
We begin by shifting our attention back to Netbeans. There we inspect the code that was generated by the GUI builder. I note that parts of the source code should not be modified manually, but we are free to modify other parts of the code as we see fit.
I make a small change to the app’s start() method so that it uses our SignInFormGB class instead of the old, hand-coded sign-in form:
new SignInFormGB(theme).show();Then we run our app in both portrait and landscape mode to demonstrate the problem :
There are many solutions to this problem, but the solution I demonstrate in this video is to conditionally hide the logo, and slide the username and password fields up to the top of the form, so that overlap doesn’t occur anymore. To that end, I override the layoutContainer() method in the SignInFormGB class.
@Override
 public void layoutContainer() {
     LayeredLayout ll = (LayeredLayout)getLayout(); (1)
     if (Display.getInstance().isPortrait()) {
         gui_logo.setVisible(true); (2)
         ll.setReferenceComponentTop(gui_username, gui_logo, 1f); (3)
     } else {
         gui_logo.setVisible(false); (4)
         ll.setReferenceComponentTop(gui_username, null, 0f); (5)
     }
     super.layoutContainer();
}| 1 | We get a reference to the LayeredLayout for the form. When Auto-Layout mode is enabled, the GUI Builder always uses LayeredLayout. |
| 2 | In portrait mode we make the logo visible. |
| 3 | In portrait mode, the top inset of the username field is linked to the bottom of the logo. The third parameter 1f, indicates the “oppositeness” of this link – because the top inset (of username) is linked to the bottom edge of the reference component (logo). |
| 4 | In landscape mode, we hide the logo. |
| 5 | With the logo hidden, we still need to slide up the username field. We do this by linking it to the top of the form instead of the logo. The 2nd parameter of setReferenceComponentTop() = null indicates that the top inset of username isn’t linked to any other component on the form. Then it defaults to the top edge of the form. The third parameter, 0f in this context indicates the “same-ness” of the side of the inset with the edge of the reference. I.e. the top inset is linked to the top edge of the form. Hence the 0f value. |
The layoutContainer() method is called whenever the form needs to be re-laid out.
|
Now we run our app again in the simulator and find that our results have improved.
layoutContainer. Form still looks fine.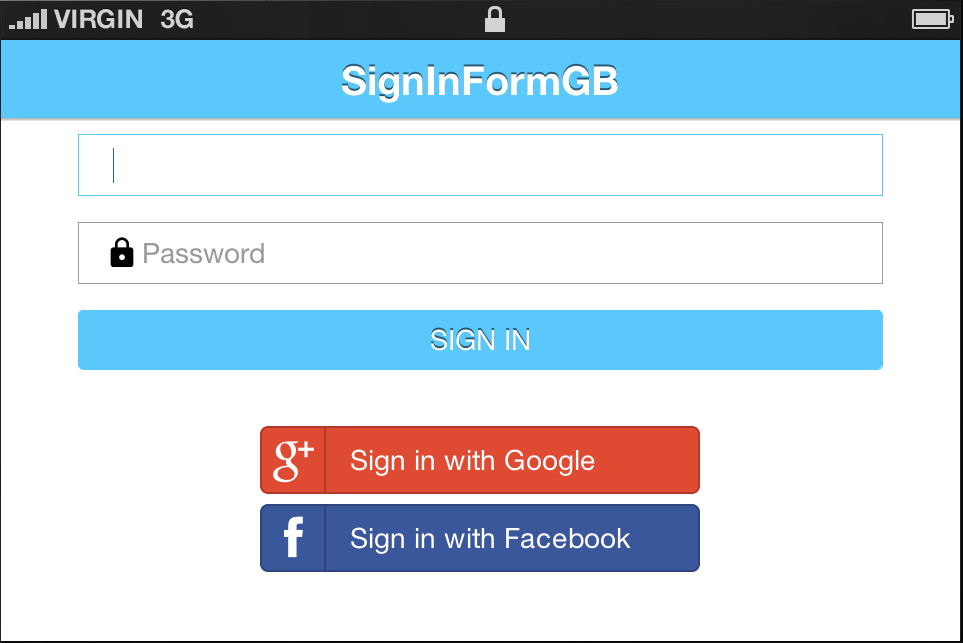
layoutContainer. Logo is now hidden, and the other components fit nicely on the form.
6 Comments
Awsome!
and some of us are still attached to the OGUIB…. 🙁
Very useful tutorial, thank you.
Very good tutorial!
hi!
a n00b to cn1 here.. I followed the above tutorials and was able to largely get the same results however, the final step, upon compiling I got this error:
java.lang.ClassCastException: com.codename1.ui.layouts.FlowLayout cannot be cast to com.codename1.ui.layouts.LayeredLayout
on:
LayeredLayout ll = (LayeredLayout) getLayout();
of:
@Override
public void layoutContainer() {
LayeredLayout ll = (LayeredLayout) getLayout();
if (Display.getInstance().isPortrait()) {
gui_logo.setVisible(true);
ll.setReferenceComponentTop(gui_username, gui_logo, 1f);
} else {
gui_logo.setVisible(false);
ll.setReferenceComponentTop(gui_username, null, 0f);
}
super.layoutContainer();
}
I’ve checked the parent class which instantiated the form and couldnt find any declaration of a form being of type “FlowLayout”.
Any ideas where this casting is set? thanks in advance!
Make sure your plugin is at the latest version and open the project properties then press “OK” it should update the internal jar that should fix this.