Troubleshooting iOS debug build installs
If you’ve access to a Mac, connect the device, open Xcode, and use the device explorer console to inspect messages that may explain what went wrong. If not, check the following:
Make sure the build is the debug version and not the App Store version. The App Store version won’t install on the device and can be distributed through Apple’s store or TestFlight.
Check that the UDID is correct. If you got the UDID from an app, it’s probably wrong because apps no longer have access to the device UDID. Get it from the iOS Settings app or iTunes.
Make sure the device isn’t locked for installing third-party apps. This can happen on devices configured with parental controls.
Check that you own the package name. For example, if you earlier installed an app with the same package name but a different certificate, a new install will fail. This is true for Android too. If you installed the kitchen sink from the store and then built your own app with the same package name, the installation will collide.
This can be a problem if you use a generic package name that someone else already claimed, so use your own domain.
Make sure the device has a recent enough version of iOS for the dependencies. Codename One builds target iOS 14 unless you say otherwise, and never drop below iOS 13 whatever is asked for. Raise the floor with the
ios.deployment_targetbuild hint when a library needs a newer version.Verify that you’re using Safari when installing on the device. If you used a cable, that isn’t a problem. Some developers had issues with Firefox not launching the install process.
Check that the
ios.includePushbuild hint matches your iOS provisioning. It must be false if your provisioning profile doesn’t include push.
Launch screen best practices
Every iOS build declares a launch screen. Apps linked with the iOS 27 SDK or later are rejected unless the bundle declares one of UILaunchStoryboardName, UILaunchStoryboards, UILaunchScreen or UILaunchScreens, and UIRequiresFullScreen isn’t a substitute for any of them. The build checks the finished Info.plist and fails if none of the four is there, so an ios.plistInject that removes the generated key stops the build rather than producing an archive the App Store refuses.
What the build declares by default is UILaunchScreen: the system background color, which follows light and dark mode on its own, with Launch.Foreground.png centered on it. That’s deliberate rather than a simplification. Every Codename One app runs on the UIScene lifecycle, and SplashBoard doesn’t render a launch storyboard for a scene-based app — it animates from a black frame instead. Since iOS prefers the storyboard whenever both keys are present, declaring one would mean a black launch.
You can still take the storyboard, and the build still ships LaunchScreen.storyboard for you to point at. Declare the key yourself, which overrides the generated one:
codename1.arg.ios.plistInject=<key>UILaunchStoryboardName</key><string>LaunchScreen</string>
Do that only if you’ve verified the result on the devices you ship to. The same applies to UILaunchStoryboards and UILaunchScreens: declare either one through ios.plistInject and the build leaves your launch experience alone.
The ios.generateSplashScreens, ios.uiscene and ios.launchStoryboardName build hints have been removed, and a build that still sets one fails with a message explaining what replaced it. The first named the pre-storyboard Default*.png generator, which iOS stopped using long ago; the second selected the legacy UIApplicationDelegate lifecycle, which Apple no longer permits; the third named the storyboard for a key only that legacy lifecycle emitted.
Key files
The build provides the default launch screen automatically. Customize it by adding either of the following files under your project’s ios/src/main/resources directory:
Launch.Foreground.png- Shown in the center of the screen instead of your app icon. Used by the defaultUILaunchScreen.Launch.Background.png- Drawn behind the content to provide a color or illustration. Read byLaunchScreen.storyboard, so it only applies if you opt into the storyboard as shown above.
You can also replace LaunchScreen.storyboard itself with a custom storyboard created in Xcode.
Designing a flexible Layout
Keep the launch storyboard simple and static. The layout is rendered before your app code runs, so avoid views that depend on live data or animation. Follow these guidelines when editing LaunchScreen.storyboard in Xcode:
Use Auto Layout constraints and safe-area guides so the design scales to every device, including split view on iPad.
Prefer system colors or vector/PDF assets for logos so the result stays crisp on high-density screens and supports Dark Mode.
Reserve text for short taglines or status messages that don’t need localization at launch. Dynamic localization isn’t available.
Avoid referencing application delegate outlets or custom classes. Only design-time UIKit elements are supported.
Asset reference
The default storyboard expects PNG assets with the following characteristics. All sizes are specified in points (pt). Supply @2x and @3x variants for Retina displays when possible.
| Asset | Purpose | Suggested 1x dimensions | Notes |
|---|---|---|---|
| Brand mark centered on screen | 152×152 | Provide optional |
| Full-screen backdrop, storyboard only | 1024×1024 | Supply complementary |
| Complete custom layout | N/A | Only used if you declare |
Testing changes
When iterating locally with a Mac, open the generated Xcode project and run it on a device or simulator to verify that the layout adapts. On Windows or Linux, submit a TestFlight or Ad-Hoc build and check on hardware before shipping.
Local notifications on iOS and Android
Local notifications are like push notifications, except that they’re initiated locally by the app, rather than remotely. They’re useful for communicating information to the user while the app is running in the background, since they manifest themselves as pop-up notifications on supported devices.
ic_stat_notify.png under android/src/main/resources. The icon can be white with transparency areasSending notifications
The process for sending a notification is:
Create a LocalNotification object with the information you want to send in the notification.
Pass the object to
Display.scheduleLocalNotification().
Notifications can either be set up as one-time or as repeating.
Example sending notification
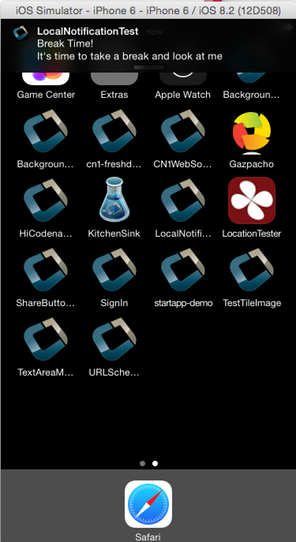
id that already exists now replaces the earlier scheduled notification with that same id instead of keeping duplicates.The resulting notification will look like
Receiving notifications
The API for receiving/handling local notifications is also like push. Your application’s main lifecycle class needs to implement the com.codename1.notifications.LocalNotificationCallback interface which includes a single method:
public void localNotificationReceived(String notificationId) {
}
The notificationId parameter will match the id value of the notification as set using LocalNotification.setId().
Example receiving notification
localNotificationReceived() is called when the user responds to the notification by tapping on the alert. If the user doesn’t click on the notification, then this event handler will never be fired.Canceling notifications
Repeating notifications will continue until they’re canceled by the app. You can cancel a single notification by calling:
Display.getInstance().cancelLocalNotification(notificationId);
Where notificationId is the string id that was set for the notification using LocalNotification.setId().
iOS beta testing (testflight)
Apple provides the ability to distribute beta versions of your application to beta testers using testflight. This allows you to recruit up to 1000 beta testers without the typical UDID limits a typical Apple account has.
To take advantage of that capability use the build hint ios.testFlight=true and then submit the app to the store for
beta testing. Make sure to use a release build target.
Metal renderer
iOS builds render through Metal. The pipeline drives a CAMetalLayer; there is no second renderer to choose between, and nothing to configure to get it.
Choosing a color space for the Metal renderer
The CAMetalLayer is configured with the sRGB color space. CG-rasterized images and gradients, which are tagged DeviceRGB in their CGBitmapContext, are displayed with the brightness their tag implies.
For most apps the default is the right choice. Apps that need a different color profile — for example, wide-gamut artwork that should be displayed in Display P3, or a strictly device-RGB pipeline that matches a custom rendering toolchain — can override the choice with the ios.metal.colorSpace build hint:
| Value | Effect |
|---|---|
| Sets |
| Sets |
| Calls |
| Sets |
| Sets |
| Sets |
| Leaves |
Accessing insecure URLs
Due to security exploits Apple blocked some access to insecure URLs which means that http code that worked before could stop working for you on iOS 9+. This is a good move, you should use https and avoid http as much as possible but that’s sometimes impractical when working with an internal or debug environment.
You can disable the strict URL checks from Apple by using the venerable ios.plistInject build hint and setting it to:
<key>NSAppTransportSecurity</key><dict><key>NSAllowsArbitraryLoads</key><true/></dict>
For example, it seems that Apple will reject your app if you include that and don’t have a good reason.
Using Cocoapods
CocoaPods is a dependency manager for Swift and Objective-C Cocoa projects. It has over eighteen thousand libraries and can help you scale your projects. Cocoapods can be used in your Codename One project to include native iOS libraries without having to go through the hassle of bundling the actual library into your project. Rather than bundling .h and .a files in your ios/src/main/resources directory, you can specify which "pods" your app uses through the ios.pods build hint. (Other build hints also exist if you need more advanced features.)
Examples
Include the AFNetworking library in your app:
ios.pods=AFNetworking
Include the AFNetworking version 3.0.x library in your app:
ios.pods=AFNetworking ~> 3.0
For full versioning syntax specifying pods see the Podfile spec for the "pod" directive.
Including multiple pods
Multiple pods can be separated by either commas or semi-colons in the value of the ios.pods build hint. For example: To include GoogleMaps and AFNetworking, you could:
ios.pods=GoogleMaps,AFNetworking
Or specifying versions:
ios.pods=AFNetworking ~> 3.0,GoogleMaps
Other pod related build hints
ios.pods.platform : The least platform to target. Sometimes, Cocoapods require functionality that isn’t in older version of iOS. For example, the GoogleMaps pod requires iOS 7.0 or higher, so you would need to add the ios.pods.platform=7.0 build hint.
ios.pods.sources : Some pods require that you specify a URL of the source of the pod spec. This may be optional if the spec is hosted in the central CocoaPods source (https://github.com/CocoaPods/Specs.git).
Converting PodFile to build hints
Most documentation for Cocoapods "pods" provide instructions on what you need to add to your Xcode project’s PodFile. Here is an example from the GoogleMaps cocoapod to show you how a PodFile can be converted into equivalent build hints in a Codename One project.
The GoogleMaps cocoapod directs you to add the following to your PodFile:
source 'https://github.com/CocoaPods/Specs.git'
platform :ios, '7.0'
pod 'GoogleMaps'
This would translate to the following build hints in your Codename One project:
ios.pods.sources=https://github.com/CocoaPods/Specs.git
ios.pods.platform=7.0
ios.pods=GoogleMaps
(Note that the ios.pods.sources directive is optional).
Using Swift package manager
Swift Package Manager can be used as an alternative to CocoaPods for remote Swift package dependencies on iOS. Select the dependency path with ios.dependencyManager. Supported values are auto, CocoaPods, spm, and both.
For an SPM-only configuration, declare the packages in ios.spm.packages using the format <identity>|<url>|<requirement> and then declare the products to link using ios.spm.products.<identity>.
ios.dependencyManager=spm
ios.spm.packages=swift-collections|https://github.com/apple/swift-collections.git|from:1.1.0
ios.spm.products.swift-collections=Collections
Supported need formats are from:, exact:, branch:, revision:, and range:.
ios.dependencyManager=auto preserves backward compatibility. Existing projects with ios.pods continue to use CocoaPods. Projects with ios.spm.* use SPM. If both hint families are present, both are applied.
Explicit dependency-manager modes are validated rather than dropping
dependencies. ios.dependencyManager=spm fails when the project or a built-in
API requires a CocoaPod; use auto or both. Likewise,
ios.dependencyManager=none fails while pod or SPM hints are present; remove
the dependency hints only if suppression is intentional, or switch to
auto. This is a migration-visible change for older projects that used
spm or none to ignore declared native dependencies.
Including dynamic frameworks
If you need to use a dynamic framework (for example: SomeThirdPartySDK.framework), and it isn’t available through CocoaPods, then you can add it to your project by zipping up the framework and copying it to ios/src/main/resources.
For example: ios/src/main/resources/SomeThirdPartySDK.framework.zip
No build hints necessary for this approach. The build server will automatically detect the framework and link it into your app.