Codename One uses Maven as the standard way to create, run, and maintain applications. This chapter consolidates the workflow guidance that used to live in the standalone Maven manual so the developer guide provides a single source of truth for building apps, updating projects, and managing add-ons.
Introduction
Codename One uses Maven as its primary build tool. This guide aims to be the definitive source of information for this project structure.
Conventions
The instructions throughout this chapter provide parallel guidance for the supported development environments. Each subsection heading identifies the target tooling so you can follow the directions that match your workflow:
Command Line (CLI): Focused on running Maven from a terminal. The commands use a Unix-style shell syntax; adapt the examples for Windows when necessary.
IntelliJ IDEA: Step-by-step directions for working inside IntelliJ.
NetBeans: Equivalent instructions tailored to NetBeans.
Eclipse: Maven-based guidance for Eclipse users.
When you reach environment-specific sections later in the guide, follow the subsection corresponding to your preferred tools.
Getting started
Prerequisites
Codename One supports JDK 11 through 25 for running the simulator and the "Run as desktop app" target. Eclipse Temurin is the easiest source of a supported JDK on macOS, Windows, and Linux.
After installing the JDK, point JAVA_HOME at it and confirm with:
java -version
mvn -v
Both should report Java 11 or newer. The Codename One Maven plugin checks the
runtime JDK version when you invoke mvn cn1:run or mvn cn1:debug and fails
fast with a friendly message if it’s older than 11. Build-only goals (such as
-Pexecutable-jar) still work on older JDKs.
Creating a new project
Codename One initializr
The easiest way to create a new project is to use the Codename One initializr.
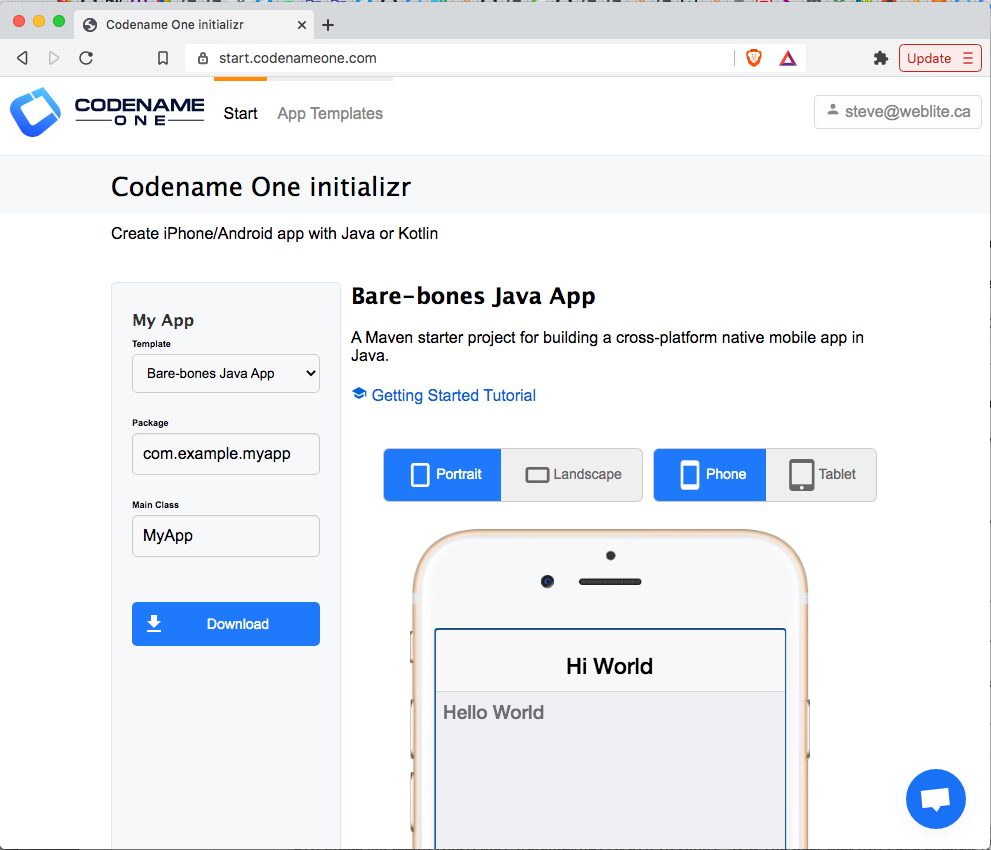
This tool will allow you to choose from a growing selection of project templates, and download a starter project that you can open in your preferred IDE (IntelliJ IDEA, NetBeans, etc.), or build directly on the command-line using Maven.
The starter projects are based on the Codename One application project archetype (cn1app-archetype).
The initializr also offers Gradle as the build tool. A Gradle project is a single directory with a one-line settings file, and it gets native or backend directories only once it needs them. See Gradle project workflow for when to choose it and how it maps to the Maven workflow in this chapter.
The following tutorials provide step-by-step instructions for getting started with bare-bones app templates. Those tutorials are a better starting place for Codename One development than this manual, as they’re written in tutorial form.
Java Getting Started Tutorial:
Kotlin Getting Started Tutorial:
Generating a new project from the command-line
Configuring the Codename One repository
Codename One releases are published to the Codename One Maven repository at
https://repo.codenameone.com/maven2, not to Maven Central. A generated project declares
that repository in its own pom.xml, so once you have a project nothing further is needed.
The commands in this section run before there is a project, so Maven has no pom.xml to
read the repository from and searches only Maven Central. Central still serves every
version published before the move, so these commands keep working, but they can’t see a
release published after it. Add the repository to your Maven settings once, in
~/.m2/settings.xml (%USERPROFILE%\.m2\settings.xml on Windows), and they can:
<settings>
    <profiles>
        <profile>
            <id>codenameone</id>
            <repositories>
                <repository>
                    <id>codenameone</id>
                    <url>https://repo.codenameone.com/maven2</url>
                    <releases><enabled>true</enabled></releases>
                    <snapshots><enabled>false</enabled></snapshots>
                </repository>
            </repositories>
            <pluginRepositories>
                <pluginRepository>
                    <id>codenameone-plugins</id>
                    <url>https://repo.codenameone.com/maven2</url>
                    <releases><enabled>true</enabled></releases>
                    <snapshots><enabled>false</enabled></snapshots>
                </pluginRepository>
            </pluginRepositories>
        </profile>
    </profiles>
    <activeProfiles>
        <activeProfile>codenameone</activeProfile>
    </activeProfiles>
</settings>
Both lists are needed. Maven resolves ordinary dependencies through <repositories> and
build plugins through <pluginRepositories>, and the commands below invoke the Codename
One plugin directly, which is the second list.
Bare-bones Java project
If you prefer to generate your projects directly on the command-line, you can use the Codename One application project archetype (cn1app-archetype) to generate the project directly on the command-line:
mvn archetype:generate \
  -DarchetypeGroupId=com.codenameone \
  -DarchetypeArtifactId=cn1app-archetype \
  -DarchetypeVersion=LATEST \
  -DgroupId=YOUR_GROUP_ID \
  -DartifactId=YOUR_ARTIFACT_ID \
  -Dversion=1.0-SNAPSHOT \
  -DmainName=YOUR_MAIN_NAME \
  -DinteractiveMode=false
This will generate a project in the current directory. The project’s directory will have the same name as the artifact ID you specified here. For example, If your command had -DartifactId=myapp, then the project will be located in a newly created directory named "myapp."
-DarchetypeVersion=LATEST resolves against whichever repositories Maven knows about. Without the settings from Configuring the Codename One repository, Maven Central is the only one, so the newest archetype it can offer is the last one published before the move. The generated project is still correct — it declares the Codename One repository, so mvn cn1:update moves it to a current release — but configuring the repository first gets you there directly.This command uses the Codename One application project archetype (cn1app-archetype) which has the following Maven coordinates:
<dependency>
  <groupId>com.codenameone</groupId>
  <artifactId>cn1app-archetype</artifactId>
  <version>LATEST</version>
  <type>maven-archetype</type>
</dependency>
This archetype generates a bare-bones Java project (the same one described in Getting Started with the Bare-bones Java App Template).
You can learn more about using the archetype in the appendix.
Project templates
The bare-bones Kotlin App project template is an alternative starter project that uses Kotlin as the primary language instead of Java. It’s built on the cn1app-archetype at its core, but it includes some more configuration settings and sources to change the template. You can use such templates as starter projects by using the generate-app-project goal of the Codename One Maven plugin.
Here is an example which generates a project based on the bare-bones Kotlin template:
mvn com.codenameone:codenameone-maven-plugin:7.0.210:generate-app-project \
  -DarchetypeGroupId=$archetypeGroupId \
  -DarchetypeArtifactId=$archetypeArtifactId \
  -DarchetypeVersion=$archetypeVersion \
  -DartifactId=$artifactId \
  -DgroupId=$groupId \
  -Dversion=$version \
  -DmainName=$mainName \
  -DinteractiveMode=false \
-DsourceProject=/path/to/kotlin-example-appLike the archetype:generate goal, this will create the project in a directory named after your specified artifact ID. For example, If your command included -DartifactId=myapp, then the project would be in a newly created directory named "myapp."
Some notes here:
The
com.codenameone:codenameone-maven-plugin:7.0.210:generate-app-projectargument is the fully qualified goal name for thegenerate-app-project. This is necessary since you aren’t running this goal in the context of any existing project. You should adjust the version number (7.0.210) to reflect the latest available Codename One version, listed as<release>in the repository metadata. Because there is no project here, Maven finds that version only if you have configured the Codename One repository in your Maven settings.The
archetypeGroupId,archetypeArtifactId, andarchetypeVersionparameters are the same as when using thearchetype:generategoal, and they will (almost) always refer to the Codename One application project archetype (cn1app-archetype).The
groupId,artifactId, andversionwork the same as for thearchetype:generategoal. That’s, that they specify the coordinates for your newly created project.The
mainNamespecifies the Main class name for your app. This is the class name, and shouldn’t include the full package. For example,MyApp, not "com.example.MyApp"The
sourceProjectproperty is the path to the "template" project. In this case, you will assume that you’ve cloned the bare-bones Kotlin project template repository at /path/to/kotlin-example-app.
A project template isn’t much different than a regular project. The template can be either a legacy Ant project, or a new Maven project. In fact, this goal is the same one you would use to migrate a legacy Ant project to use the new Maven project structure.
See Creating project templates for instructions on building your own project templates.
Migrating an existing project
If you have an existing Codename One application project that uses the old Ant project structure, you can use the generate-app-project goal to migrate the project over to maven. This goal doesn’t make any changes to the Ant project. It creates a new Maven project and copies over all the project sources and libraries, reorganized to fit the new project structure.
A minimal invocation of this goal would look like:
# Specify your the version of the codenameone-maven-plugin.
# Find the latest version at
# https://search.maven.org/search?q=a:codenameone-maven-plugin
CN1VERSION=7.0.210
mvn com.codenameone:codenameone-maven-plugin:$CN1VERSION:generate-app-project \
  -DgroupId=YOUR_GROUP_ID \
  -DartifactId=YOUR_ARTIFACT_ID \
  -DsourceProject=/path/to/your/project \
  -Dcn1Version=$CN1VERSION
This will generate the new project in the current directory inside a folder named after the artifactId parameter.
After building the project, try running it to make sure that the migration worked. For example, Assuming that your artifactId was myapp:
Command line
cd myapp
./run.shrun.bat instead of run.sh.If All goes well, your app should open in the Codename One simulator.
IntelliJ IDEA
Open the myapp folder in IntelliJ. Then press the "Run"  button in the upper right of the toolbar.
If All goes well, your app should open in the Codename One simulator.
NetBeans
Open the myapp folder as a project in NetBeans. Then press the "Run"  button on the toolbar.
If all goes well it should open in the Codename One simulator.
Eclipse IDE
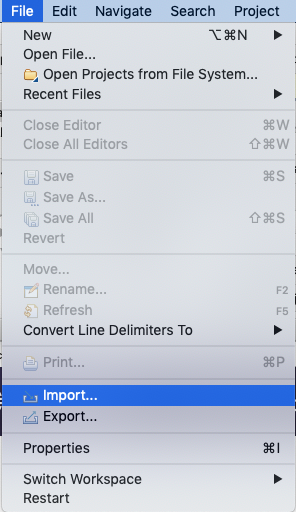
Open Eclipse, and select "File" > "Import…"
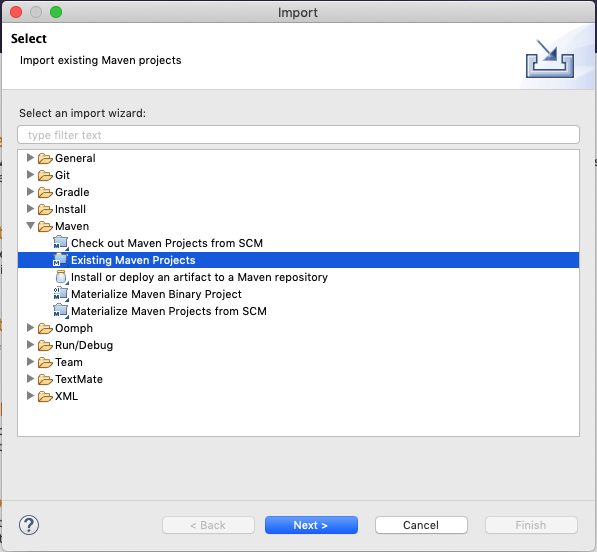
In the Import dialog, expand Maven, select Existing Maven Projects, and press Next.
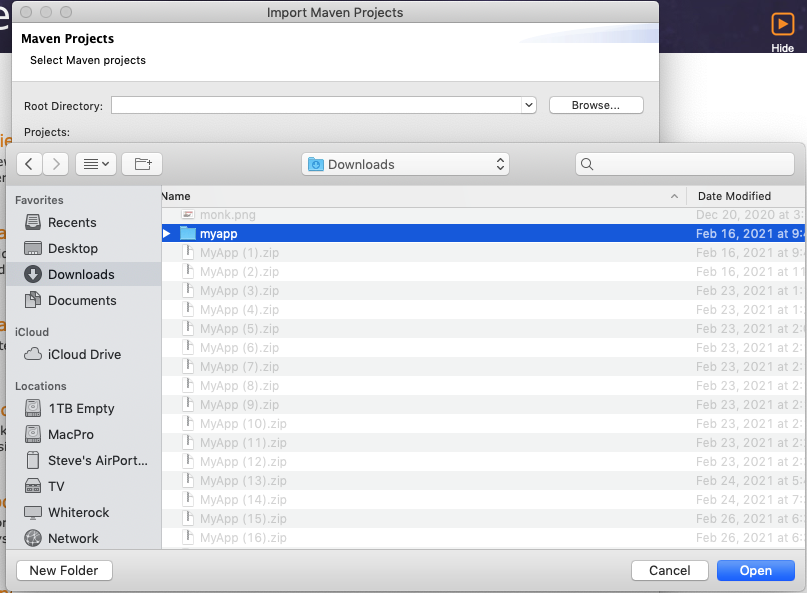
In the next panel, press the Browse button, and, in the file dialog, select the "myapp" directory, and press Next.
The next panel should look like the one below. Make sure all the projects are "checked," and press Finish.
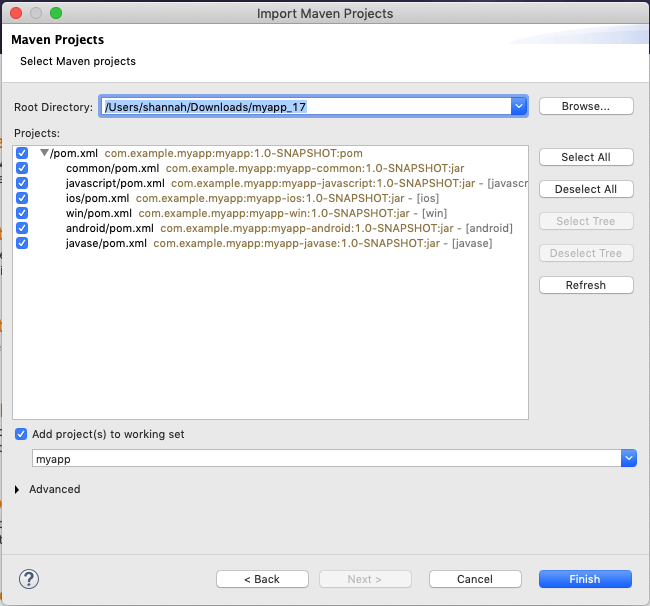
Almost there, but not quite…
Next you need to import the Eclipse launch configurations located inside the tools/eclipse directory.
Select File > Import… again, but this time, in the Import dialog, select Run/Debug > Launch Configurations and click Next.
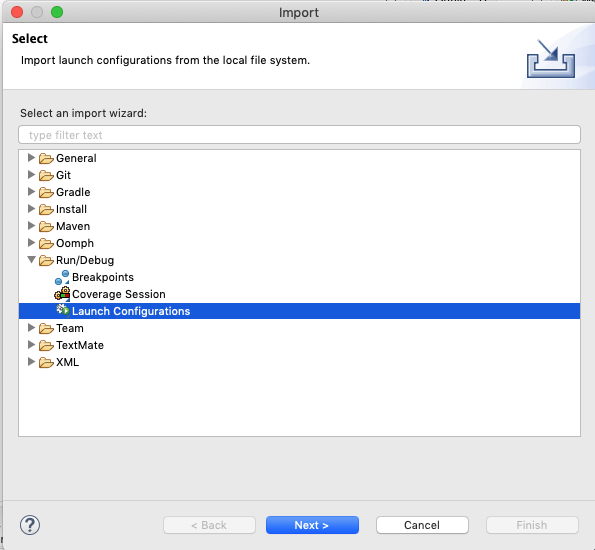
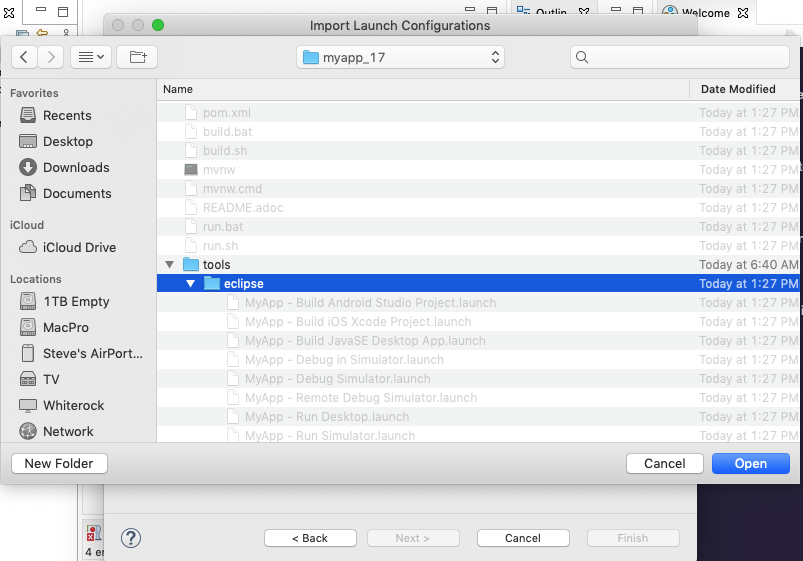
In the next panel, press Browse… then select the tools/eclipse directory.
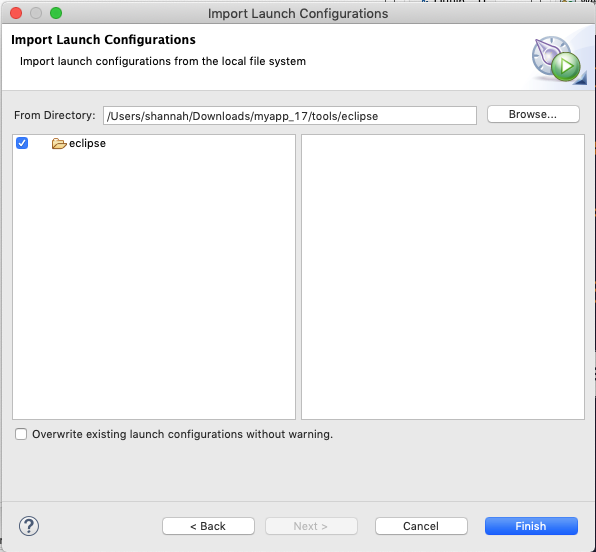
Then check the eclipse option, and press Finish
The "Run" button menu should now include options for all the major build targets. You can see them by pressing on the Run button in the toolbar:
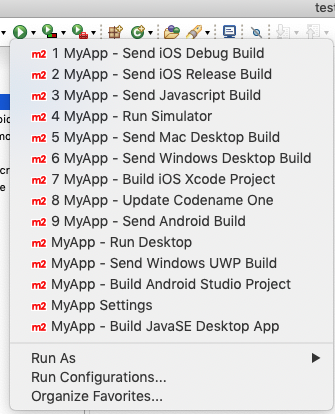
Select the MyApp - Run Simulator option from this menu.
If all goes well it should open in the Codename One simulator.
Example: Migrating kitchen sink app
Consider a concrete example, now. Download the KitchenSink Ant project from here and extract it.
The following is a bash script that uses curl to download this project as a zip file, and then converts it to a fully functional Maven project:
CN1_VERSION=7.0.210
curl -L https://github.com/codenameone/KitchenSink/archive/v1.0-cn7.0.11.zip > master.zip
unzip master.zip
rm master.zip
mvn com.codenameone:codenameone-maven-plugin:${CN1_VERSION}:generate-app-project \
  -DarchetypeGroupId=com.codename1 \
  -DarchetypeArtifactId=cn1app-archetype \
  -DarchetypeVersion=${CN1_VERSION} \
  -DartifactId=kitchensink \
  -DgroupId=com.example \
  -Dversion=1.0-SNAPSHOT \
  -DinteractiveMode=false \
  -DsourceProject=KitchenSink-1.0-cn7.0.11
This will generate the maven project in a directory named "kitchensink" in the current working directory because of the -DartifactId=kitchensink directory.
Adding project dependencies
One of the reasons to use Maven as the build tool is because it makes the management of project dependencies almost trivial. If the library you want to add is on Maven central, then you can copy and paste its <dependency> snippet into your pom.xml file and you’re good to go. Maven does the rest.
With Codename One projects, there are a few caveats (see The compliance check), and a few added niceties that make it easier to find and install add-on libraries in your project (see Managing add-ons in Codename One Settings).
Which pom.xml to add the <dependency> snippet to
Suppose you have a Maven <dependency> snippet that you’ve copied from Maven central, and it’s burning a hole in your clipboard while you’re trying to figure out where to paste it into your project.
Codename One application projects are multi-module projects, so they have more than one pom.xml file: the root one, the common module’s, and one per platform module the project has. A project generated with the defaults has no platform modules (see Projects without platform modules).
Question: Which pom.xml file should you paste the snippet into?
Answer: common/pom.xml (almost always).
The "common" module is where all your Codename One application resides. It houses your Java and Kotlin files, your CSS files, your GUI builder files, your Codename One configuration files (that is, codenameone_settings.properties). Pretty much everything. The things you’d place in the other modules (for example, Java SE, ios, etc.) are your platform-specific native interface implementations; And in many applications you won’t need any of that.
When adding dependencies into your app, you’ll therefore almost always place them inside the pom.xml file for the "common" module.
mvn cn1:settings. See Managing add-ons in Codename One Settings.Example: Adding Google Maps dependency via Maven central
Add the GoogleMaps library to your app as a maven dependency.
As described in the GoogleMaps cn1lib README, the dependency snippet is:
<dependency>
  <groupId>com.codenameone</groupId>
  <artifactId>googlemaps-lib</artifactId>
  <version>1.0.1</version>
  <type>pom</type>
</dependency>
You should, but, look on Maven central to see what the latest version number is, and substitute that version into the <version> tag of the snippet.
Copy and paste this snippet into the <dependencies> section of your common/pom.xml file. And save it.
The common/pom.xml file has a lot of existing configuration in it, and it may not be clear, on first glance, where the <dependencies> tag is located. A simple "find" for <dependencies> may also lead you astray, since there are a few <profile> tags which also include <dependencies> sections.
The correct <dependencies> section, is located near the top of the file. You can identify it because it will include the following comment:
<!-- INJECT DEPENDENCIES -->This is a special marker that’s used by some Codename One tooling to help it locate the optimal place to inject dependencies.
Don’t REMOVE THIS COMMENT. Just add your dependency snippet somewhere before or after it.
Compatibility with Codename One
You can paste any Maven dependency snippet you like into your project, but libraries that haven’t been specifically developed for Codename One might not be compatible. See Appendix C, API. If you’re unsure whether a library is compatible, you could add the dependency and try to use it in your app. If it isn’t compatible, it will fail when you try to build the app, during the compliance check.
The easiest way to find Codename One libraries is to use the Extensions view in Codename One Settings. These libraries were built specifically for Codename One. Settings warns before installing catalog entries known to target older Codename One releases.
The compliance check
All application code in the common module of your Codename One project must be compatible with Codename One. This includes all dependencies. When you build your project, it will perform a compliance check to ensure that no code uses unsupported APIs. (See Appendix C, API).
If the compliance check fails (that is, the app uses unsupported APIs), the build will fail. The error log should provide some clues about where the offending code resides.
Managing add-ons in Codename One Settings
Launch Codename One Settings from the project root, then select Extensions in the left navigation rail:
mvn cn1:settings
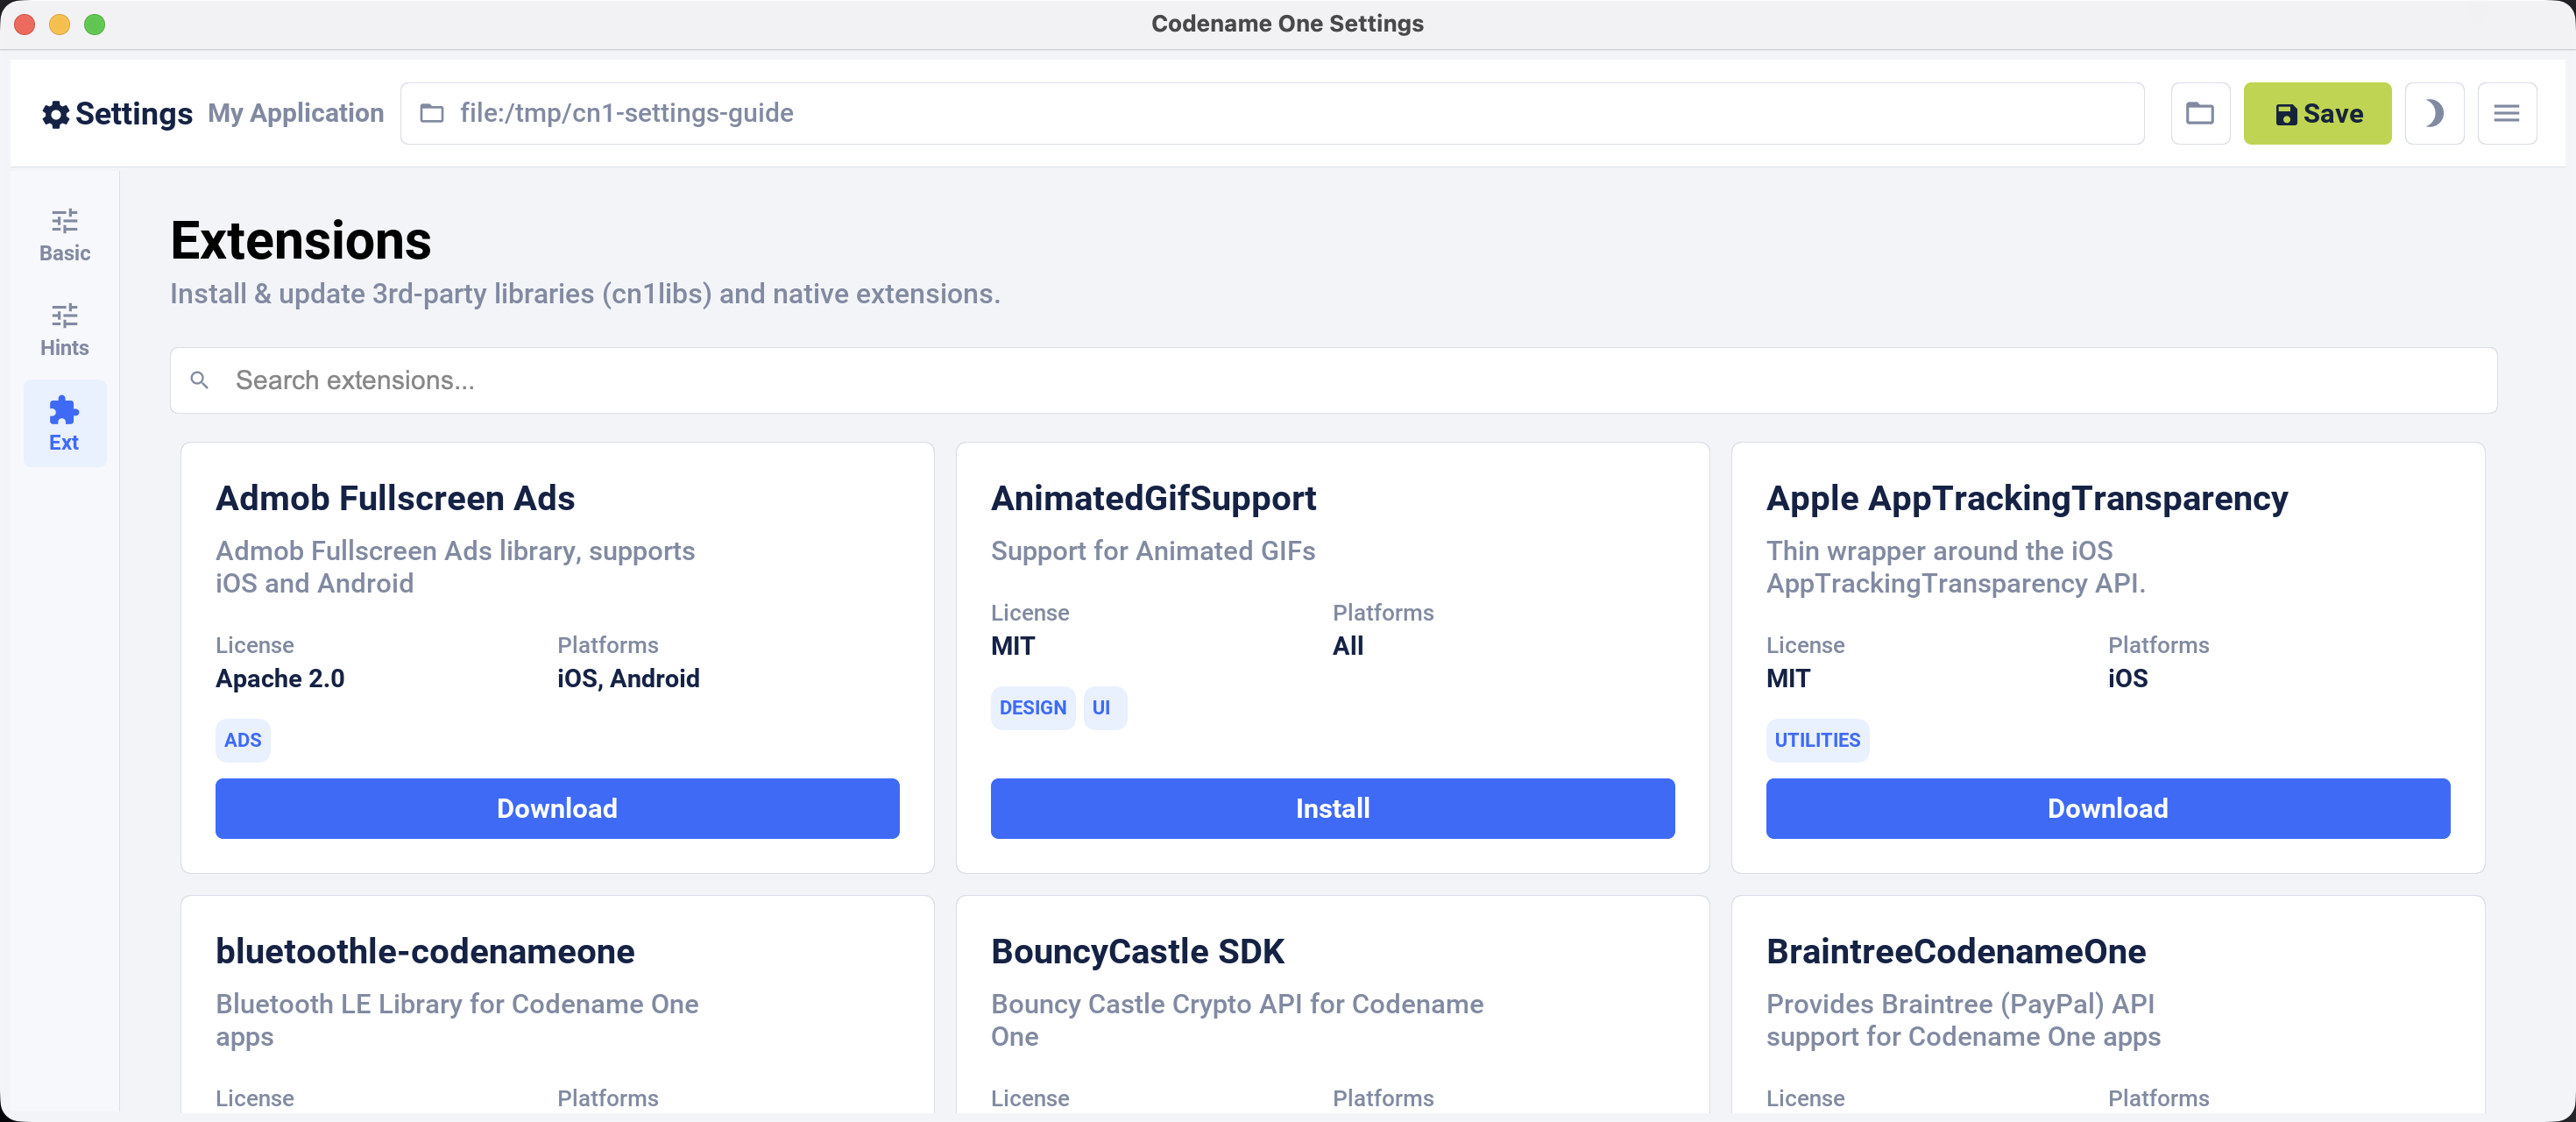
As an example, install the "Google Maps" library.
Type Maps in the search field and locate Codename One Google Native, the Google Maps library.
Click Install or Download, depending on how the catalog entry is distributed.
Settings shows progress while it installs the extension. For an installed extension, click the same action area and confirm Uninstall to remove it.
If the Settings window opens blank
Settings is a Codename One app hosted in a native window, so a window that opens but shows nothing can come from the window layer, the display scale, the theme, or font loading. Capture the render state and attach it to a bug report rather than guessing:
mvn cn1:settings -Dsettings.diagnostics=cn1-settings-diagnostics.txt
The file records the OS and JDK, the HiDPI scale the JVM reports, the window and canvas geometry, the size Codename One laid the form out at, and the colours and font metrics resolved for the theme. Add -Dsettings.screenshot=shot.png to also write the window contents; a second shot.onscreen.png captures the pixels actually on screen, which can differ from the offscreen paint. The launch log is at ~/.codenameoneSettings/settings.log.
Installing legacy cn1libs
The recommended approach for installing add-ons is to use Codename One Settings or add the Maven dependency to common/pom.xml. In some situations neither method is available. For example, you might have a legacy cn1lib file that isn’t listed in the extension catalog or deployed to Maven Central.
In cases like this you can use the install-cn1lib Maven goal to install it as follows:
mvn cn1:install-cn1lib -Dfile=/path/to/yourlibrary.cn1lib
Updating Codename One
Codename One releases new versions weekly to the Codename One Maven repository. It’s recommended that you stay up to date with the latest version as much as possible to ensure compatibility with the Codename One build server, which is always running the latest version.
You can use the update goal to update both the Codename One libraries, and the Codename One dependencies in your project.
For example:
mvn cn:update
CLI
Or you can use the run.sh/run.bat script to run this goal as follows:
./run.sh update
run.bat update instead on WindowsIntelliJ
Or you can click on the "Configuration" menu, and select "Tools" > "Update Codename One" as shown here:
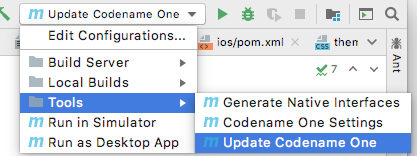
Then press the button.
NetBeans
Or you can right-click on the project in the project inspector, and select "Run Maven" > "Update Codename One" as shown here:
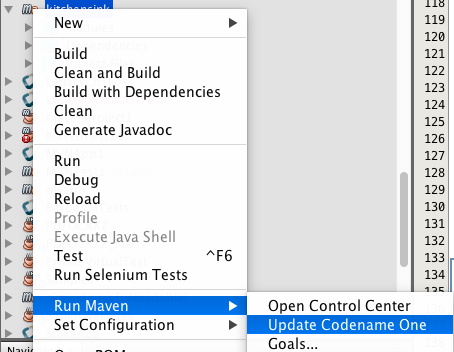
Then press the button.
Manually updating the pom.xml file
You can also update your Codename One dependencies manually by modifying the cn1.version and cn1.plugin.version properties defined in your project’s pom.xml file.
For example, Open the pom.xml file, and look for the following:
<cn1.plugin.version>7.0.210</cn1.plugin.version>
<cn1.version>7.0.210</cn1.version>
Change these values to reflect the latest version of the codenameone-maven-plugin, listed as <release> in the repository metadata. The update goal reads the same metadata and edits both properties for you.
cn1.plugin.version and cn1.version properties manually will update the Maven dependencies for your project but it won’t update the other Codename One tools such as the GUI builder, and the Build Server Client, which are managed outside of Maven. You should use the Update Codename One (update) as described at the beginning of this section to perform a "full" update.Creating project templates
A project template is a Codename One application project that can be used as a starting point for building a Codename One application. Codename One initializr uses project templates to generate starter projects for Codename One applications. You can also use the Generate app project (generate-app-project) goal to generate starter projects from templates directly in Maven.
Any Codename One project can be converted into a project template.
Converting a Codename One application project into a project template
If you have an existing maven Codename One application project, you can convert it into a project template by adding a file named generate-app-project.rpf in the root directory of the project.
The contents of this file should look like:
template.mainName=$YOUR_PROJECT_MAIN_NAME
template.packageName=$YOUR_PROJECT_PACKAGE_NAME

[dependencies]
====
... YOUR PROJECT MAVEN DEPENDENCIES ...
====

[parentDependencies]
====
... YOUR PARENT PROJECT MAVEN DEPENDENCIES ...
====
Where you make the following substitutions:
- $YOUR_PROJECT_MAIN_NAME
This should be the value of the
codename1.mainNameproperty in the project’scodenameone_settings.propertiesfile.- $YOUR_PROJECT_PACKAGE_NAME
This should be the value of the
codename1.packageNameproperty in the project’scodenameone_settings.propertiesfile.- … YOUR PROJECT MAVEN DEPENDENCIES…
Paste any maven dependencies that the project requires into this section. These will be injected into the
<dependencies>section of the common/pom.xml file.- … YOUR PARENT PROJECT MAVEN DEPENDENCIES…
Paste any maven dependencies that the parent project requires into this section. These will be injected into the
<dependencies>section of the pom.xml file.
See Sample generate-app-project.rpf file for a more concrete example of the generate-app-project.rpf.
Test your project template
You can test your project template by using it as the sourceProject parameter for the generate-app-project goal. See Generate app project (generate-app-project).
Codename One libraries
A Codename One Library (cn1lib) is a module that can be distributed and added to Codename One applications to add functionality. It can be distributed as a self-contained bundle (a file with the.cn1lib extension), or deployed on Maven central to be included in application projects as a pom dependency.
A cn1lib may contain any of the following:
Cross-platform Java classes.
Native code that targets specific platforms.
Build hints, which will affect how projects will be built that include this library. These can contain things like Gradle dependencies on Android, Cocoapods dependencies on iOS, and other hints to affect the build-server process.
CSS files.
Creating a library project
Use the cn1lib-archetype for generating a new Codename One library project as follows:
Command line
mvn archetype:generate \
  -DarchetypeArtifactId=cn1lib-archetype \
  -DarchetypeGroupId=com.codenameone \
  -DarchetypeVersion=LATEST \
  -DgroupId=com.example.mylib \
  -DartifactId=mylib \
  -Dversion=1.0-SNAPSHOT \
  -DinteractiveMode=false
In the above snippet you would change the groupId, artifactId, and version properties to reflect your project settings.
You can run the archetype:generate goal with as many or few properties as you like, and it will prompt you to enter any properties that are required. For example, You could enter:
mvn archetype:generateAnd then follow the prompts. Or you could enter:
mvn archetype:generate -DarchetypeGroupId=com.codenameone \
-DarchetypeArtifactId=cn1lib-archetypeAnd follow the prompts. This will, result in fewer prompts because you’ve already specified the archetype to use.
This will create a new project for you in the current directory, in a newly created directory named after the artifactId that you entered.
IntelliJ IDEA
Select "File" > "New Project"…

Select "Maven" in the left menu.
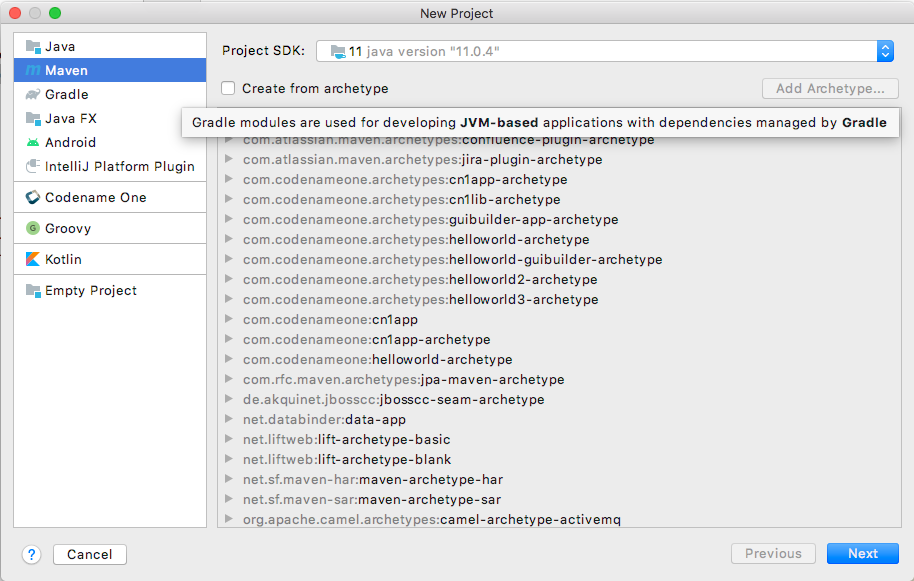
Check the "Create from Archetype" checkbox
 . This should allow you to choose from the archetypes that are already known to IntelliJ.
If you don’t see an option for
com.codenameone:cn1lib-archetype, then IntelliJ doesn’t know about it yet. If, but you do see this option, you can skip to the next step. Press the "Add Archetype…" button. This will display a dialog for you to enter the details of the archetype.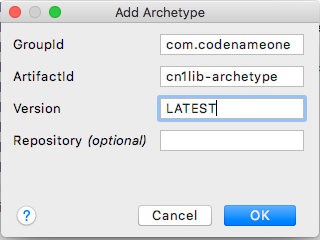
Fill in this dialog as shown in the above image. Specifically
groupId=com.codenameone,artifactId="cn1lib-archetype," andversion="LATEST"Then press
OK.Select the option that says "com.codenameone:cn1lib-archetype"

Then press "Next"
This will display a form where you can enter the details of your project such as its location (where you want to create the project folder), the name, the artifact ID, and the groupID. Fill in this form as you see fit.
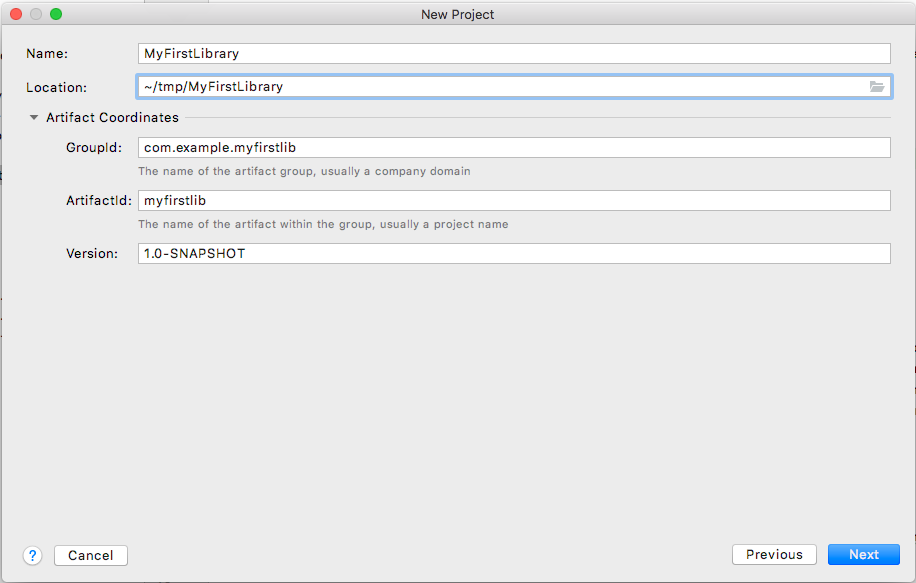
Then click "Next"
The final form in this wizard summarizes the project details and gives you an opportunity to add more properties to pass to the
archetype:generategoal. In your case you don’t need to add any more properties. If the information looks correct, you can pressNext.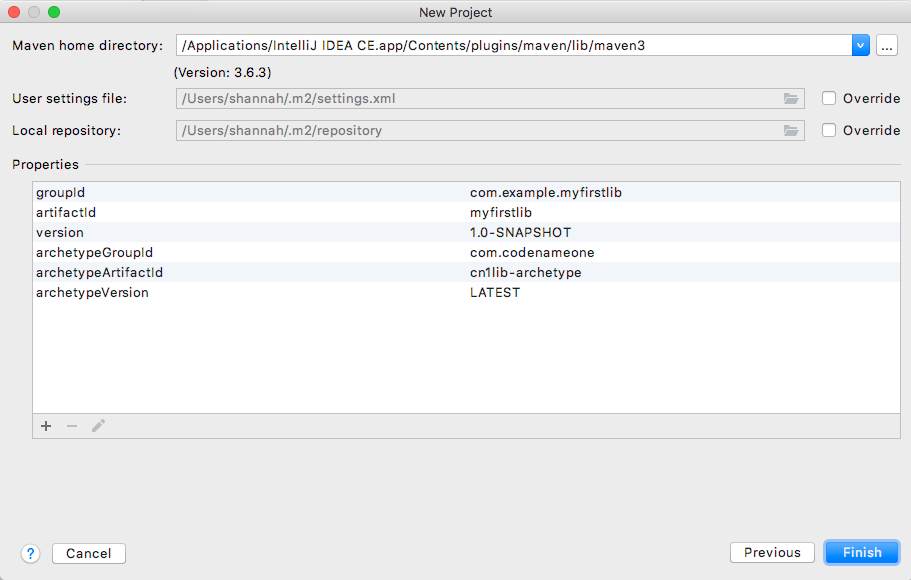
At this point you will be prompted to open the project.
NetBeans
Select "File" > "New Project…"

In the "New Project" dialog, select "Java with Maven" in the left panel, and "Project from Archetype" in the right panel, as shown below.
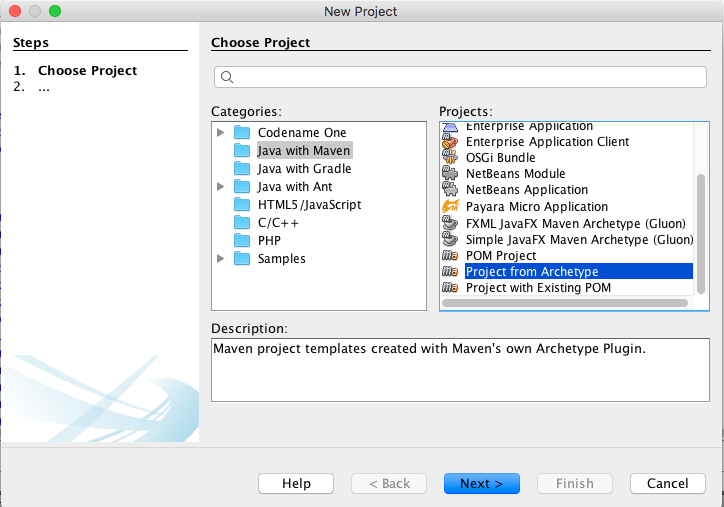
Then press "Next"
This will bring you to the "Maven Archetype" dialog as shown below:
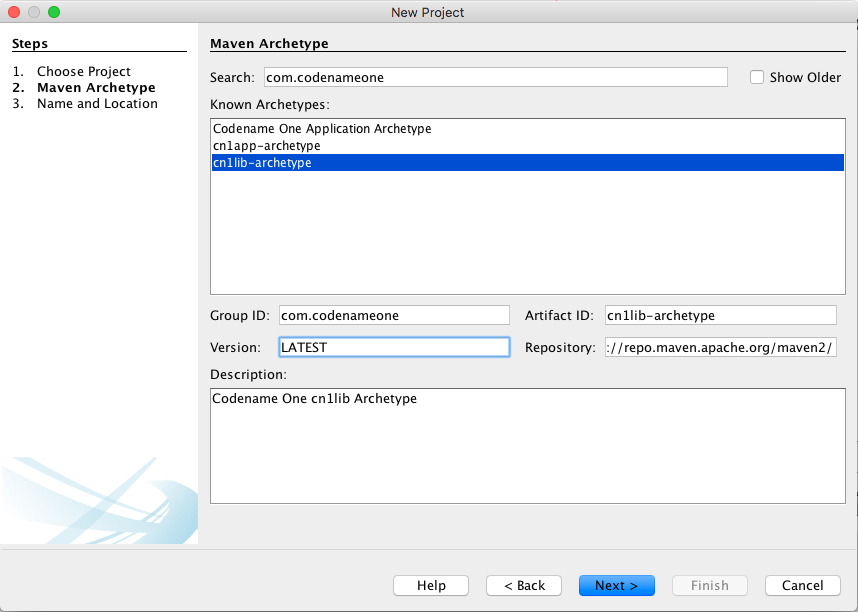
Enter "com.codenameone" or "cn1lib-archetype" into the search field. Then select "cn1lib-archetype" in the "Known archetypes:" panel. This will prefill the Group ID, Artifact ID and Version fields for you. You may want to change Version to LATEST to ensure that it tries to use the latest available version of the archetype.
Then click "Next"
This will bring you to the "Name and Location" panel of the wizard.
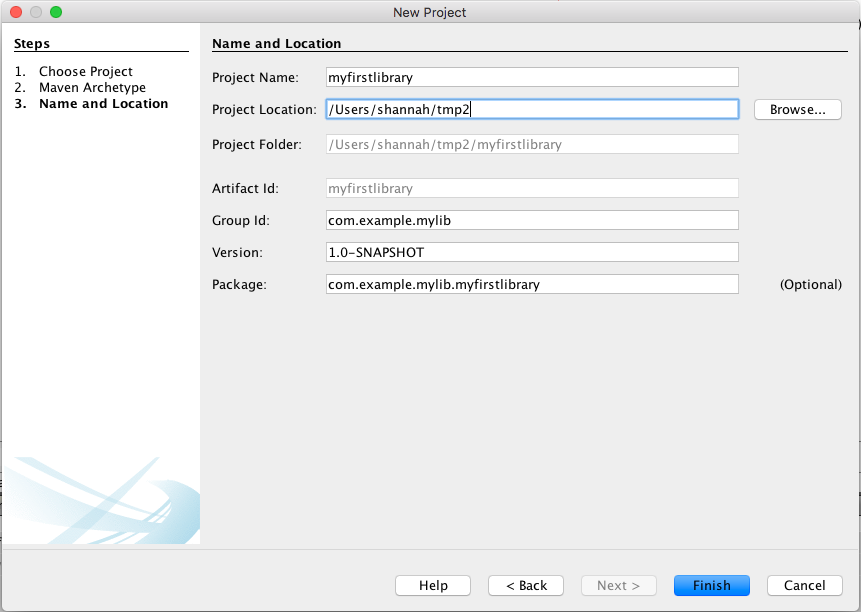
Enter in the project name (which you’ll be forced to use as the artifact ID also), project location, groupId, version, and package. The "Package" is unimportant here as it isn’t used anywhere in the project.
Once you’ve entered the information to your liking press the "Finish" button.
This will create a new library project for you at the location you specified.
Eclipse IDE
Select "File" > "New Project…"
In the New Project dialog, expand the Maven item, and select Maven Project
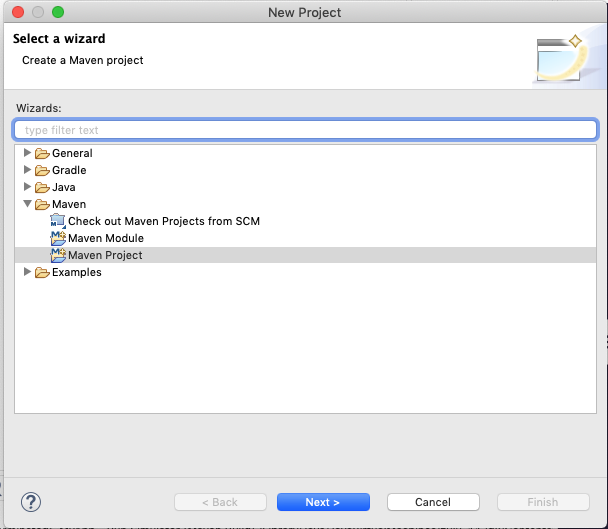
Then press "Next"
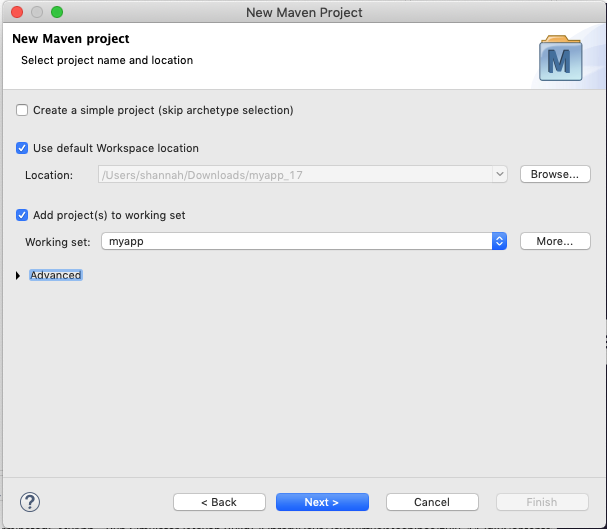
The next panel will look like the below image. The default settings on this panel should be fine. Press Next
In the next panel, enter "cn1lib" in the Filter field. After a moment the cn1lib-archetype should appear in the area below as shown here:
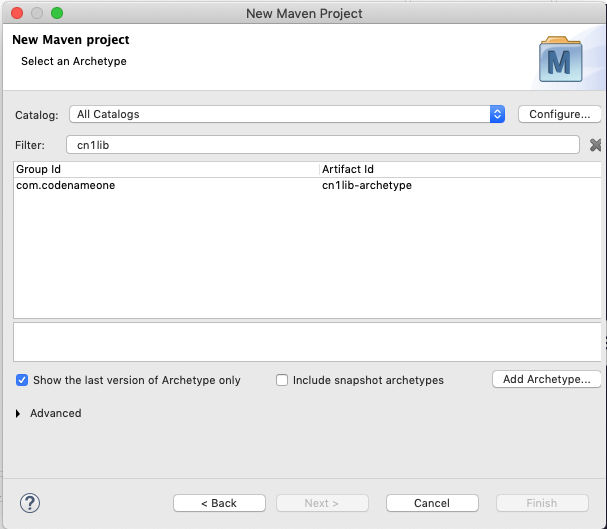
Select that option, and press Next
The next panel, allows you to enter your project details, such as group ID, and artifact ID. Your project information here and then press Finish.
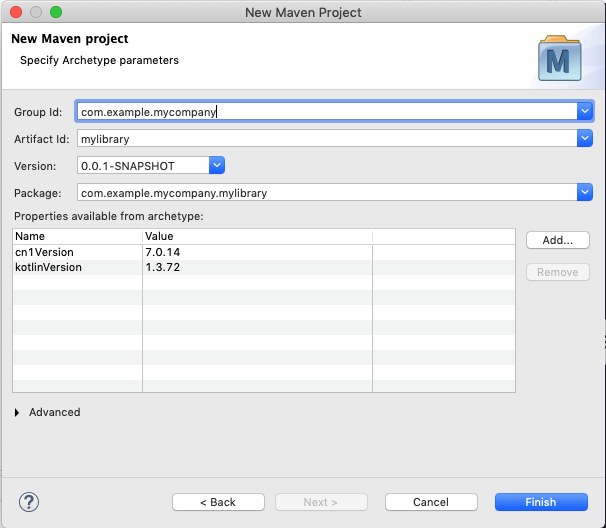
This will create a new library project for you at the location you specified.
Project structure
Take a look at the project that was created. It’s a multi-module Maven project with the following modules:
- common
The module where you’ll add all your cross-platform code and CSS, and build hint configuration. This module is in the "common" directory of the main project.
- Java SE
The module where you can implement native interfaces for the Java SE platform. This module is in the "Java SE" directory of the main project.
- ios
The module where you can implement native interfaces for the iOS platform. This module is in the "ios" directory of the main project.
- android
The module where you can implement native interfaces for the Android platform. This module is in the "android" directory of the main project.
- JavaScript
The module where you can implement native interfaces for the JavaScript platform. This module is in the "JavaScript" directory of the main project.
- lib
The library module which includes all the other modules as dependencies, and can be used as a pom dependency in Codename One application projects that wish to use this library. This module is in the "lib" directory of the main project.
- tests
An application project for writing unit tests against your library. This module is in the "tests" directory of the main project.
IntelliJ IDEA
The project inspector will look like:
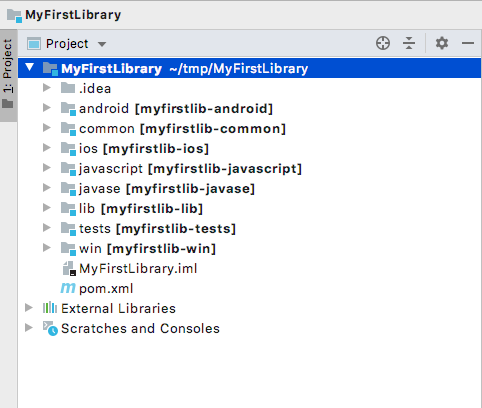
This top-level view of the module structure may seem daunting. Most of your development will occur inside the "common" module. If you expand that module it will look more familiar to developers who have used the old Ant project structure:
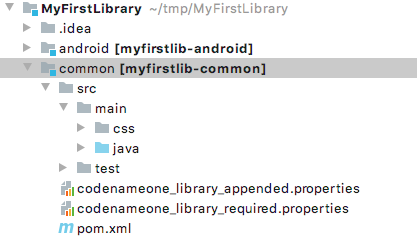
Your cross-platform Java source would go in the common/src/main/java directory. Your CSS files go in the common/src/main/css directory.
NetBeans
The project inspector will look like:
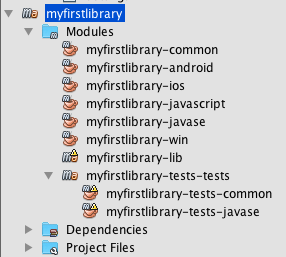
This top-level view of the modules doesn’t provide a clear view of the project landscape, but, since 99% of your development will occur inside the common submodule. Open that "common" sub-module project as well and take a peek.
Right-click on the "Common" sub-module, and select "Open Project" as shown below:
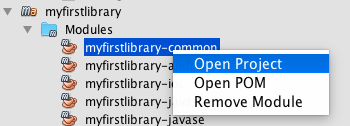
With the common subproject open, the project inspector will look like:
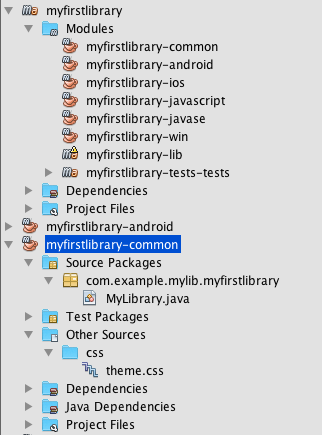
In this screenshot, "Source Packages" and "Other Sources/css" are expanded to highlight where your Java source files and CSS source files will be located.
The project inspector hides a few important files, but, so here is a screenshot of the File inspector for the common project:
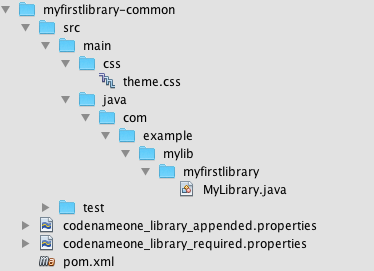
Eclipse IDE
The package explorer will look like:
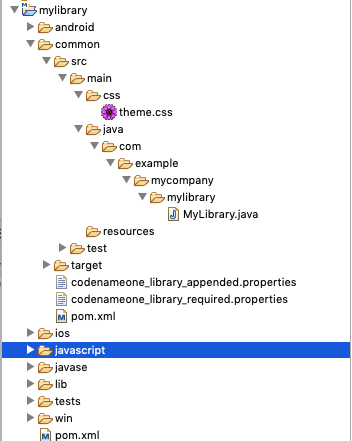
In this screenshot, the common/src/main/css and common/src/main/java directories are expanded since this is where most of your module source will go.
Command line
If you do a file listing on the project directory, it shows the following:
Steves-Mac-Pro:MyFirstLibrary shannah$ find .
.
./tests
./tests/pom.xml
./tests/javase
./tests/javase/pom.xml
./tests/common
./tests/common/codenameone_settings.properties
./tests/common/pom.xml
./tests/common/nbactions.xml
./tests/common/src
./tests/common/src/test
./tests/common/src/test/java
./tests/common/src/test/java/com
./tests/common/src/test/java/com/example
./tests/common/src/test/java/com/example/myfirstlib
./tests/common/src/test/java/com/example/myfirstlib/MyFirstTest.java
./tests/common/src/main
./tests/common/src/main/css
./tests/common/src/main/css/theme.css
./tests/common/src/main/java
./tests/common/src/main/java/com
./tests/common/src/main/java/com/example
./tests/common/src/main/java/com/example/myfirstlib
./tests/common/src/main/java/com/example/myfirstlib/LibraryTests.java
./tests/cn1libs
./tests/.mvn
./tests/.mvn/jvm.config
./pom.xml
./javase
./javase/pom.xml
./javase/src
./javase/src/main
./javase/src/main/java
./javase/src/main/java/com
./javase/src/main/java/com/example
./javase/src/main/java/com/example/myfirstlib
./ios
./ios/pom.xml
./ios/src
./ios/src/main
./ios/src/main/objectivec
./common
./common/codenameone_library_required.properties
./common/pom.xml
./common/codenameone_library_appended.properties
./common/src
./common/src/test
./common/src/test/java
./common/src/test/java/com
./common/src/test/java/com/example
./common/src/test/java/com/example/myfirstlib
./common/src/test/java/com/example/myfirstlib/MyLibraryTest.java
./common/src/main
./common/src/main/css
./common/src/main/css/theme.css
./common/src/main/java
./common/src/main/java/com
./common/src/main/java/com/example
./common/src/main/java/com/example/myfirstlib
./common/src/main/java/com/example/myfirstlib/MyLibrary.java
./android
./android/pom.xml
./android/src
./android/src/main
./android/src/main/java
./android/src/main/java/com
./android/src/main/java/com/example
./android/src/main/java/com/example/myfirstlib
./lib
./lib/pom.xml
./MyFirstLibrary.iml
./javascript
./javascript/pom.xml
./javascript/src
./javascript/src/main
./javascript/src/main/javascript
./.idea
./.idea/encodings.xml
./.idea/jarRepositories.xml
./.idea/.gitignore
./.idea/workspace.xml
./.idea/misc.xml
./.idea/compiler.xml
This may seem daunting at first, but it’s important to realize that 99% of the time, you’ll be working in the "common" module - most of the other stuff is boilerplate.
Important files
A few key files in this project that you’ll be using more than the others.
- pom.xml
The maven configuration file of the root module is where you will set project-wide properties such as the
cn1.versionproperty, which specifies the version of the Codename One libraries that the module should be compiled against. Periodically, you’ll want to update thecn1.versionproperty to point to the latest version.When/if you decide to deploy your module to Maven central, you’ll need to add more deployment-related settings in this file.
- common/pom.xml
The maven configuration file for the "common" module, which will contain most of your cn1lib’s source code, CSS files, and properties files. If your library depends on other libraries or jar files, you’ll be adding them as dependencies in this file, and not the root pom.xml file.
- common/codenameone_library_appended.properties
This file is where you can specify properties that should be merged with the codenameone_settings.properties of application projects that include this library as a dependency. This is where you would add, for example, Gradle dependencies required for the Android builds, or CocoaPods dependencies that are required for iOS builds.
- common/codenameone_library_required.properties
This file allows you to specific build hints that must be present in application projects that include this library. If this library requires a particular android build tools version, or a specific Java version, then those requirements should be specified in this file.
Important directories
As mentioned earlier, 99% of all your development will likely occur inside the "common" module. The other modules are for native implementations of Native interfaces.
- common/src/main/java
This is where your cross-platform Java source files will be placed.
- common/src/main/css
If your library uses CSS, this is where all CSS-related files will be placed.
- common/src/main/resources
Other non-java resources that you want to have included in the classpath.
Building the library
Command line
To build the library, run the "install" goal on the root module as follows:
mvn install
IntelliJ IDEA
Press the "build"  button on the toolbar.
NetBeans
Right-click on the "root" module in the project explorer and select Build.
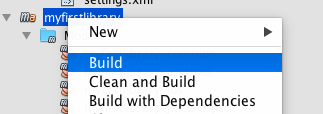
Or you could have selected the "root" module in the project explorer and pressed the "build"  button on the toolbar.
Eclipse IDE
Right-click on the "root" module in the project explorer and select Run as > Maven Install
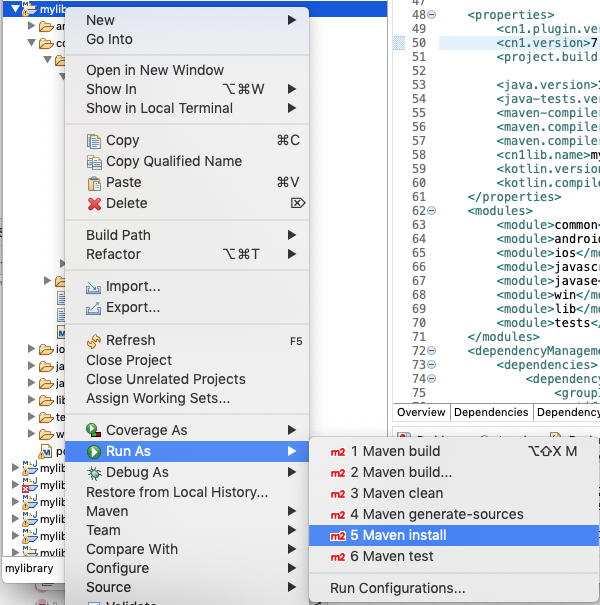
cn1.version and cn1.plugin.version properties to reference the latest version. Check for the latest version, listed as <release> in the repository metadata.Building the Legacy.cnlib file
When using the Maven build tool, you no longer require the.cn1lib file at all. Your library projects can be handled entirely via Maven’s dependency mechanism. The preferred way to distribute your libraries is on Maven central, and the preferred way to add a library to an application is via a Maven "pom" dependency.
That being said, you may still want to distribute your library as a.cn1lib file for the sake of users who are still using Ant as their build tool. For that reason, when you build a library project, the cn1lib is automatically built as well. After running a build, you can look in the common/target directory and find your.cn1lib file ready to be distributed.
Editing Java Code
To get acquainted with your project, add a "Hello World" Java class that you want to make available as part of your cn1lib.
Add a new class inside the "common/src/main/java" directory with package com.example, and name HelloWorld. Enter the following contents into the class:
public class HelloWorld {
    public static void helloWorld() {
        System.out.println("Hello world");
    }
}
Now build the library again. (See Building the library).
Using the library in an application project
Now that you’ve built your library and added a Java class, try adding it as a dependency in an application project. If you haven’t yet created an application project, do that now. See Creating a new project for instructions on creating a new application project.
Open the common/pom.xml file of your application project.
This file may look a little hairy as there is a lot of configuration in there. You will be looking for the <dependencies> section.
The common/pom.xml file will have more than one <dependencies> tag, as it includes some profiles handling things like Kotlin support. There will be one particular <dependencies> tag that includes a comment like
<!-- INJECT DEPENDENCIES -->
You should add your dependencies before this comment.
For the sake of this example, suppose your library was set up with the following coordinates:
groupId: |
|
artifactId: |
|
version: |
|
In this case you would add the following XML snippet to the <dependencies> section of your application’s common/pom.xml file:
<dependency>
    <groupId>com.example</groupId>
    <artifactId>mylib-lib</artifactId>
    <version>1.0-SNAPSHOT</version>
    <type>pom</type>
</dependency>
artifactId. This is because you’re including the "lib" module of your library project as the dependency, and not the root module. Also the <type>pom</type> is important as it indicates that this is a pom dependency - not a regular jar dependency.Now try it out. Try adding the following code to your application project’s main class (or anywhere in the application project, for that matter):
This calls into the library you just built, so it isn’t one of the compiled examples:
import com.example.HelloWorld;

// ... inside start()
HelloWorld.helloWorld();
And build the project. The project should build OK, and if you run it, you should see that the helloWorld() method works as designed.
Adding menus to the simulator
A cn1lib can contribute menu items to the Codename One simulator’s menu bar. This is the same affordance the framework itself uses for the Skins / Native Theme / Simulate menus — opened up so library authors can expose backend-specific actions (for example, "Add a simulated peripheral," "Inject a push notification," or "Switch backend") without users having to write any Swing code or instrument their app.
Every menu item is also reachable from CN1 UnitTests (or any app code) through CN.execute("namespace:itemN") — the JavaSE port’s URL execute is overloaded to recognize a registered hook url and dispatch it on the EDT instead of opening it as a browser URL. On Android, iOS, JavaScript and other production targets no hooks are registered, so a hook-style URL falls through to the normal native execute and (almost always) becomes a no-op; tests should pair CN.execute with CN.canExecute for that reason. Hooks can also be declared with no menu label, which makes them callable from tests but invisible in the menu — useful for state-priming actions a human wouldn’t click.
The contract
Each cn1lib ships a properties file at a well-known classpath location. The simulator scans every jar on its classpath for this resource and merges the results, so multiple cn1libs coexist cleanly:
# META-INF/codenameone/simulator-hooks.properties
name=Bluetooth
namespace=bluetooth   # optional; defaults to slugified `name`

# Each itemN is the action; the matching labelN is the menu text.
# Items are positional — the loader reads item1, item2, item3, ... and
# stops at the first missing index. Don't skip numbers.
item1=com.example.bt.simulator.Hooks#toggleAdapter
label1=Toggle adapter on/off

item2=com.example.bt.simulator.Hooks#addDemoPeripheral
label2=Add demo peripheral

# Label omitted → API-only hook. Callable from tests, invisible in menu.
item3=com.example.bt.simulator.Hooks#primeReadFailure
Required keys:
nameMenu title shown in the simulator’s menu bar. One menu per properties file.
itemNA
fully.qualified.ClassName#staticMethodNamereference for the Nth menu item. The method must bepublic static voidand take no arguments. Items are numbered from 1 upward; the loader stops at the first missingitemN, so don’t leave gaps.
Optional keys:
namespaceIdentifier used for the
CN.executelookup (for example,bluetoothfor a URL likebluetooth:item1). Defaults to lowercased, ASCII-slugifiedname(Push Notifications!→push-notifications). Set this explicitly when you want a different identifier from the display name.labelNDisplay text for the matching
itemN. Omit entirely to make the hook API-only — registered withCN.executebut hidden from the menu.
No groups, no submenus, no priority — flat by design. If you need ordering relative to another cn1lib, you can’t have it: discovery order wins, and that’s intentional so the contract stays small and the future simulator UX can re-render this metadata however it likes.
The action method
The simulator dispatches every action on the Codename One EDT through Display.callSerially, so your method can call Display.getInstance(), Form.show(), Dialog.show(), ToastBar.showInfoMessage() and any other CN1 API. Reflection uses the same classloader that loaded Display, so cn1lib internals (including package-private classes) resolve normally:
This is a method in your own cn1lib, so it isn’t one of the compiled examples:
public static void resetPairing() {
    PairingState.clear();                 // package-private, same cn1lib
    if (Display.isInitialized()) {
        ToastBar.showInfoMessage("Pairing state cleared");
    }
}
The Display.isInitialized() guard is a useful pattern when the same static methods are also called from JUnit tests that don’t run inside a live CN1 simulator — the state mutation runs in both contexts, only the UI feedback is skipped.
Worked example using cn1-bluetooth
The cn1-bluetooth cn1lib ships a JavaSE port with two backends: a scriptable in-memory simulator and a real-hardware backend that talks to a native helper (CoreBluetooth on macOS, BlueZ on Linux, WinRT on Windows). Both are useful in different stages of development, and the menu lets the user choose between them and exercise the simulator without writing any test scaffolding.
Its simulator-hooks.properties looks like this:
name=Bluetooth
namespace=bluetooth

item1=com.codename1.bluetoothle.BluetoothSimulatorHooks#toggleAdapter
label1=Toggle adapter on/off

item2=com.codename1.bluetoothle.BluetoothSimulatorHooks#addDemoPeripheral
label2=Add demo peripheral

item3=com.codename1.bluetoothle.BluetoothSimulatorHooks#switchToNativeBle
label3=Switch backend → native BLE (real hardware)

# API-only: used by the test suite but never displayed in the menu
item4=com.codename1.bluetoothle.BluetoothSimulatorHooks#primeReadFailure
When the user runs an app that depends on cn1-bluetooth, the simulator’s menu bar gets a Bluetooth menu with the three labeled items. Clicking Add demo peripheral drops a peripheral into the in-memory simulator that the running app can then scan for, connect to, and exchange data with — without any real hardware. item4 is callable from tests via CN.execute("bluetooth:item4") but never shows up in the menu.
Calling hooks from CN1 unit tests
CN1 unit tests (AbstractTest subclasses run via mvn cn1:test) compile under the same restrictions as the rest of the app — no reflection, no JavaSE-only imports. Drive a hook the same way you’d execute any URL — CN.execute recognizes registered hook urls and dispatches them on the EDT:
public class BluetoothDemoTest extends AbstractTest {
    @Override
    public boolean runTest() throws Exception {
        // Skip cleanly off-simulator: a real device has no hook registered
        // and CN.canExecute will not return TRUE.
        if (!Boolean.TRUE.equals(CN.canExecute("bluetooth:item2"))) {
            return true;
        }
        // Seed the simulator — same effect as clicking "Add demo peripheral".
        CN.execute("bluetooth:item2");
        // nullnow drive the public Bluetooth API as usual.
        return true;
    }
}
A common pattern: ship label-bearing hooks for actions a developer might want to fire manually (toggle adapter, inject notification), and ship label-less hooks for test-only state setup (primeReadFailure, seedFixture) that would just clutter the menu.
What’s intentionally not exposed
Swing types.
JMenu,JMenuItem,KeyStrokeand friends don’t appear in the contract. The simulator UX may change shape (toolbar, command palette, sidebar) and cn1libs shouldn’t have to follow.Submenus, separators, priority. The metadata is a flat list with no hierarchy. If you want grouping, ship multiple
simulator-hooks.propertiesfiles in separate jars — each becomes its own menu.Long-running work on the EDT. Hook methods run on the CN1 EDT; if you need to do I/O, fire-and-forget a
new Thread(…)from the method or useCN.invokeAndBlockso you don’t block the UI.
Distributing your library
The recommended way to distribute your library is on Maven central. That way users will be able to install your library by copying and pasting a familiar <dependency> snippet into their pom.xml file.