Codename One is a Write Once Run Anywhere mobile development platform for Java/Kotlin developers. It fits into modern Maven-capable IDEs such as IntelliJ IDEA, NetBeans, VS Code, and Eclipse, and you can also drive it entirely from the command line.
Codename One’s mission statement is:
Unify the complex and fragmented task of mobile device programming into a single set of tools, APIs and services. As a result create a more manageable approach to mobile application development without sacrificing the power/control given to developers.
This brings that old "Write Once Run Anywhere" (WORA) Java mantra to mobile devices without dumbing it down to the lowest common denominator.
The things that make Codename One stand out from other tools in this field are:
Write Once Run Anywhere support with no special hardware requirements and 100% code reuse
Compiles Java/Kotlin into native code for iOS, Android and even JavaScript/PWA
Open Source and Free with commercial backing/support
Easy to use with 100% portable Drag GUI builder
Full access to underlying native OS capabilities using the native OS programming language (for example: Objective-C) without compromising portability
Provides full control over every pixel on the screen
Lets you use native widgets (views) and mix them with Codename One components within the same hierarchy (heavyweight/lightweight mixing)
Supports seamless Continuous Integration out of the box
Codename One can trace its roots to the open source LWUIT project started at Sun Microsystem in 2007 by Chen Fishbein (co-founder of Codename One). It has been under constant development for over a decade.
Build cloud
The build cloud approach to mobile development is one of the things that makes Codename One stand out. iOS native development requires a Mac with Xcode. Windows native development requires a Windows machine. To make matters worse, Apple, Google, and Microsoft change their tools.
That makes it hard to keep up.
When you develop an app in Codename One, use the built-in simulator for running and debugging. When you want to build a native app, use the build cloud, where Macs build the native iOS apps and Windows machines build the native Windows apps. This works seamlessly and makes Codename One apps native because the native platform compiles them. For example, iOS builds use Macs running Xcode, the native Apple tool, to build the app.
Why build servers
The build servers can build native iOS apps without a Mac and native Windows apps without a Windows machine. They remove the need to install and update complex toolchains and simplify the process of building a native app to a right click.
Even though the build servers streamline delivery, Codename One also supports fully local builds. You can install the toolchain on your own hardware and follow the workflows in Maven Project Workflow and Working with Codename One sources to compile, package, and test apps without leaving your desktop environment.
For example, because native iOS applications require a Mac with a recent version of Xcode, Codename One maintains such machines in the cloud. When developers send an iOS build, that Mac generates C source code using ParparVM, then compiles the C source code using Xcode and signs the resulting binary using Xcode. You can install the binary on your device or build a distribution binary for the App Store. Since C code is generated, your app is also future-proof against changes from Apple. You can also inject Objective-C native code into the app while keeping it 100% portable thanks to Codename One’s native interfaces capability.
Subscribers can receive the C source code back using the include-sources feature of Codename One and use those sources for benchmarking and debugging on devices.
The same is true for most other platforms. On Android and Java SE, Codename One runs the standard Java code, unchanged.
How does Codename One work
Codename One uses a SaaS-based approach so the information in this appendix might (and probably will) change in the future to accommodate improved architectures. This appendix includes this information for reference, you don’t need to understand this to follow the content of the book…
Since Android is already based on Java, Codename One is already native to Android and works with the Android VM (ART/Dalvik).
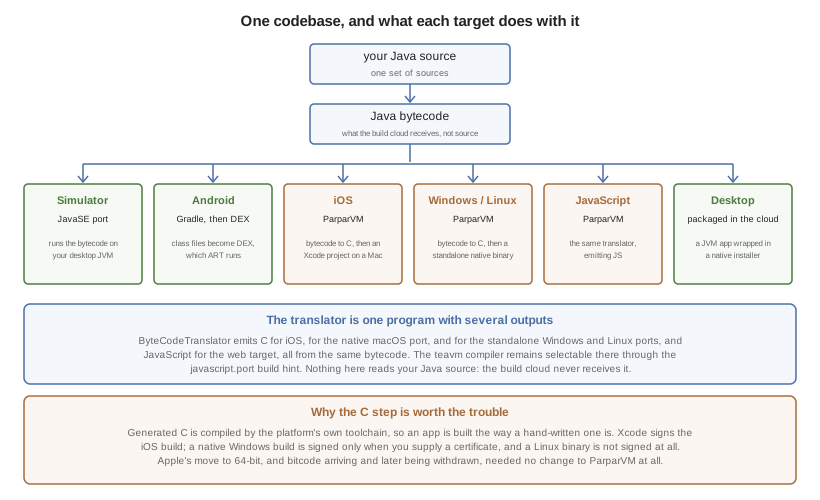
On iOS, Codename One built and open-sourced ParparVM, which is a conservative VM. ParparVM features a concurrent, non-blocking GC and is written entirely in Java/C. ParparVM is a transpiler that generates C source code matching the given Java bytecode. This means that an Xcode project is generated and compiled on the build servers. It’s as if you hand-coded a native app and is thus future-proof against changes that Apple introduces. For example, Apple migrated to 64-bit, then introduced bitcode, then withdrew bitcode again. ParparVM needed no modifications for any of those changes.
Codename One earlier offered a UWP (Universal Windows Platform) target based on iKVM. That target was discontinued in release 7.0.229 and is preserved as historical context in older documentation and blog posts.
JavaScript build targets translate the bytecode statically with ParparVM, the same translator that generates the C sources for iOS. Cloud builds keep the original TeaVM-based compiler as a compatibility fallback, which you select with the javascript.port build hint. To support the complex UI Codename One uses the HTML5 Canvas API which allows absolute flexibility for building applications.
Desktop builds are packaged on the same cloud machines, a Mac for the macOS installer and a Windows machine for the Windows one. The build originally used javapackager, which was abandoned because it couldn’t package a ZuluFX runtime reliably; installers are now produced directly with third-party packaging tools.
Lightweight architecture
What makes Codename One stand out is the approach it takes to UI: “lightweight architecture.”
Lightweight architecture is the “not so secrete sauce” to Codename One’s portability. Essentially it means all the components/widgets in Codename One are written in Java. Thus their behavior is consistent across all platforms and they’re fully customizable from the developer code as they don’t rely on OS internal semantics. This allows developers to preview the application accurately in the simulators and GUI builders.
One of the big accomplishments in Codename One is its unique ability to embed “heavyweight” widgets into place among the “lightweights.” This is crucial for apps such as Uber where the cars and widgets on top are implemented as Codename One components yet below them, you have the native map component.
Codename One achieves fast performance by drawing using the native gaming APIs of most platforms for example: Metal on iOS. The core technologies behind Codename One are all open source including most of the stuff developed by Codename One itself, for example: ParparVM but also the full library, platform ports, designer tool, device skins etc.
Why ParparVM
On iOS, Codename One uses ParparVM which translates Java bytecode to C code and boasts a non-blocking GC. This VM is fully open source in the Codename One git repository. In the past Codename One used XMLVM to generate native code similarly, but the XMLVM solution was too generic for the needs of Codename One. ParparVM boasts a unique architecture of translating code to C (similarly to XMLVM), because of that Codename One is the only solution of its kind that can guarantee future iOS compatibility since the officially supported iOS toolchain is always used instead of undocumented behaviors.
The key advantages of ParparVM over other approaches are:
Truly Native: since code is translated to C rather than directly to ARM or LLVM code, the app is "more native." It uses the official tools and approaches from Apple and can gain from their advancements. For example: bitcode changes or profiling toolchain.
Smaller Class Library: ParparVM includes a small segment of the full JavaAPI’s resulting in final binaries that are smaller than the alternatives by orders of size. This maps directly to performance and memory overhead.
Simple and Extensible: to work with ParparVM you need a basic understanding of C. Unlike other tools that require deep understanding of ARM assembly and LLVM bitcode. This is crucial for the fast-moving world of mobile development, as Apple changes things left and right, you need a more agile VM.
Historical windows ports
Codename One experimented with many Windows ports over the years, including the legacy Windows Phone target and a later UWP (Universal Windows Platform) target based on iKVM.
JavaScript port
The JavaScript port of Codename One uses ParparVM to translate Java bytecode into JavaScript. Cloud builds retain the original TeaVM-based builder as a compatibility fallback, selected with the public javascript.port=teavm build hint.
The JavaScript port allows unmodified Codename One applications to run within a desktop or mobile browser. The port itself is based on the HTML5 Canvas API, which provides a pixel-perfect implementation of the Codename One API.
Desktop and Android
The other ports of Codename One use the VMs available on the host machines and environments to execute the runtime. Historically, Retrolambda was used to provide Java 8 language features portably.
The Android port uses the native Android tools, including the Gradle build environment, in the latest versions.
The desktop port creates a standard Java SE application, which is packaged with the JRE and an installer.
History
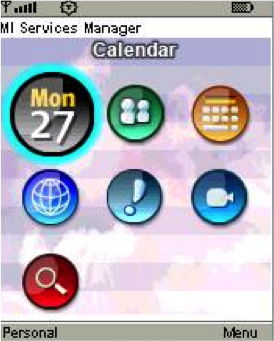
Codename One was started by Chen Fishbein and Shai Almog who authored the Open Source LWUIT project at Sun Microsystems (circa 2007). The LWUIT project aimed to solve the fragmentation within J2ME/Blackberry devices by creating a higher standard of user interface than the common baseline at the time. LWUIT received critical acclaim and traction within many industries but was limited by the declining feature phone market. It was forked by many companies including Nokia. It was used as the base standard for DTV in Brazil. Another fork has brought a LWUIT into high-end cars from Toyota and other companies. This fork later adapted Codename One as well.
In 2012 Shai and Chen formed Codename One as they left Oracle. The project has taken many of the basic concepts developed within the LWUIT project and adapted them to the smartphone world which is still experiencing similar issues to the device fragmentation of the old J2ME phones.
Core concepts of mobile programming
Before you proceed, this section explains some universal core concepts of mobile programming that might not be intuitive. These are universal concepts that apply to mobile programming regardless of the tools you’re using.
You can skip this section if you feel you’re familiar enough with the core problems/issues in mobile app development.
Density
Density is also known as DPI (Dots Per Inch) or PPI (pixels or points per inch). Density is confusing, unintuitive and might collide with common sense. For example, an iPhone 7 plus has a resolution of 1080x1920 pixels and a PPI of 401 for a 5-inch screen. But, an iPad 4 has 1536x2048 pixels with a PPI of 264 on a 9.7 inch screen… Smaller devices can have higher resolutions!
As the following figure shows, if a Pixel 2 XL had pixels the size of an iPad, it would have been twice the size of that iPad. While in reality, it’s half the height of the iPad!
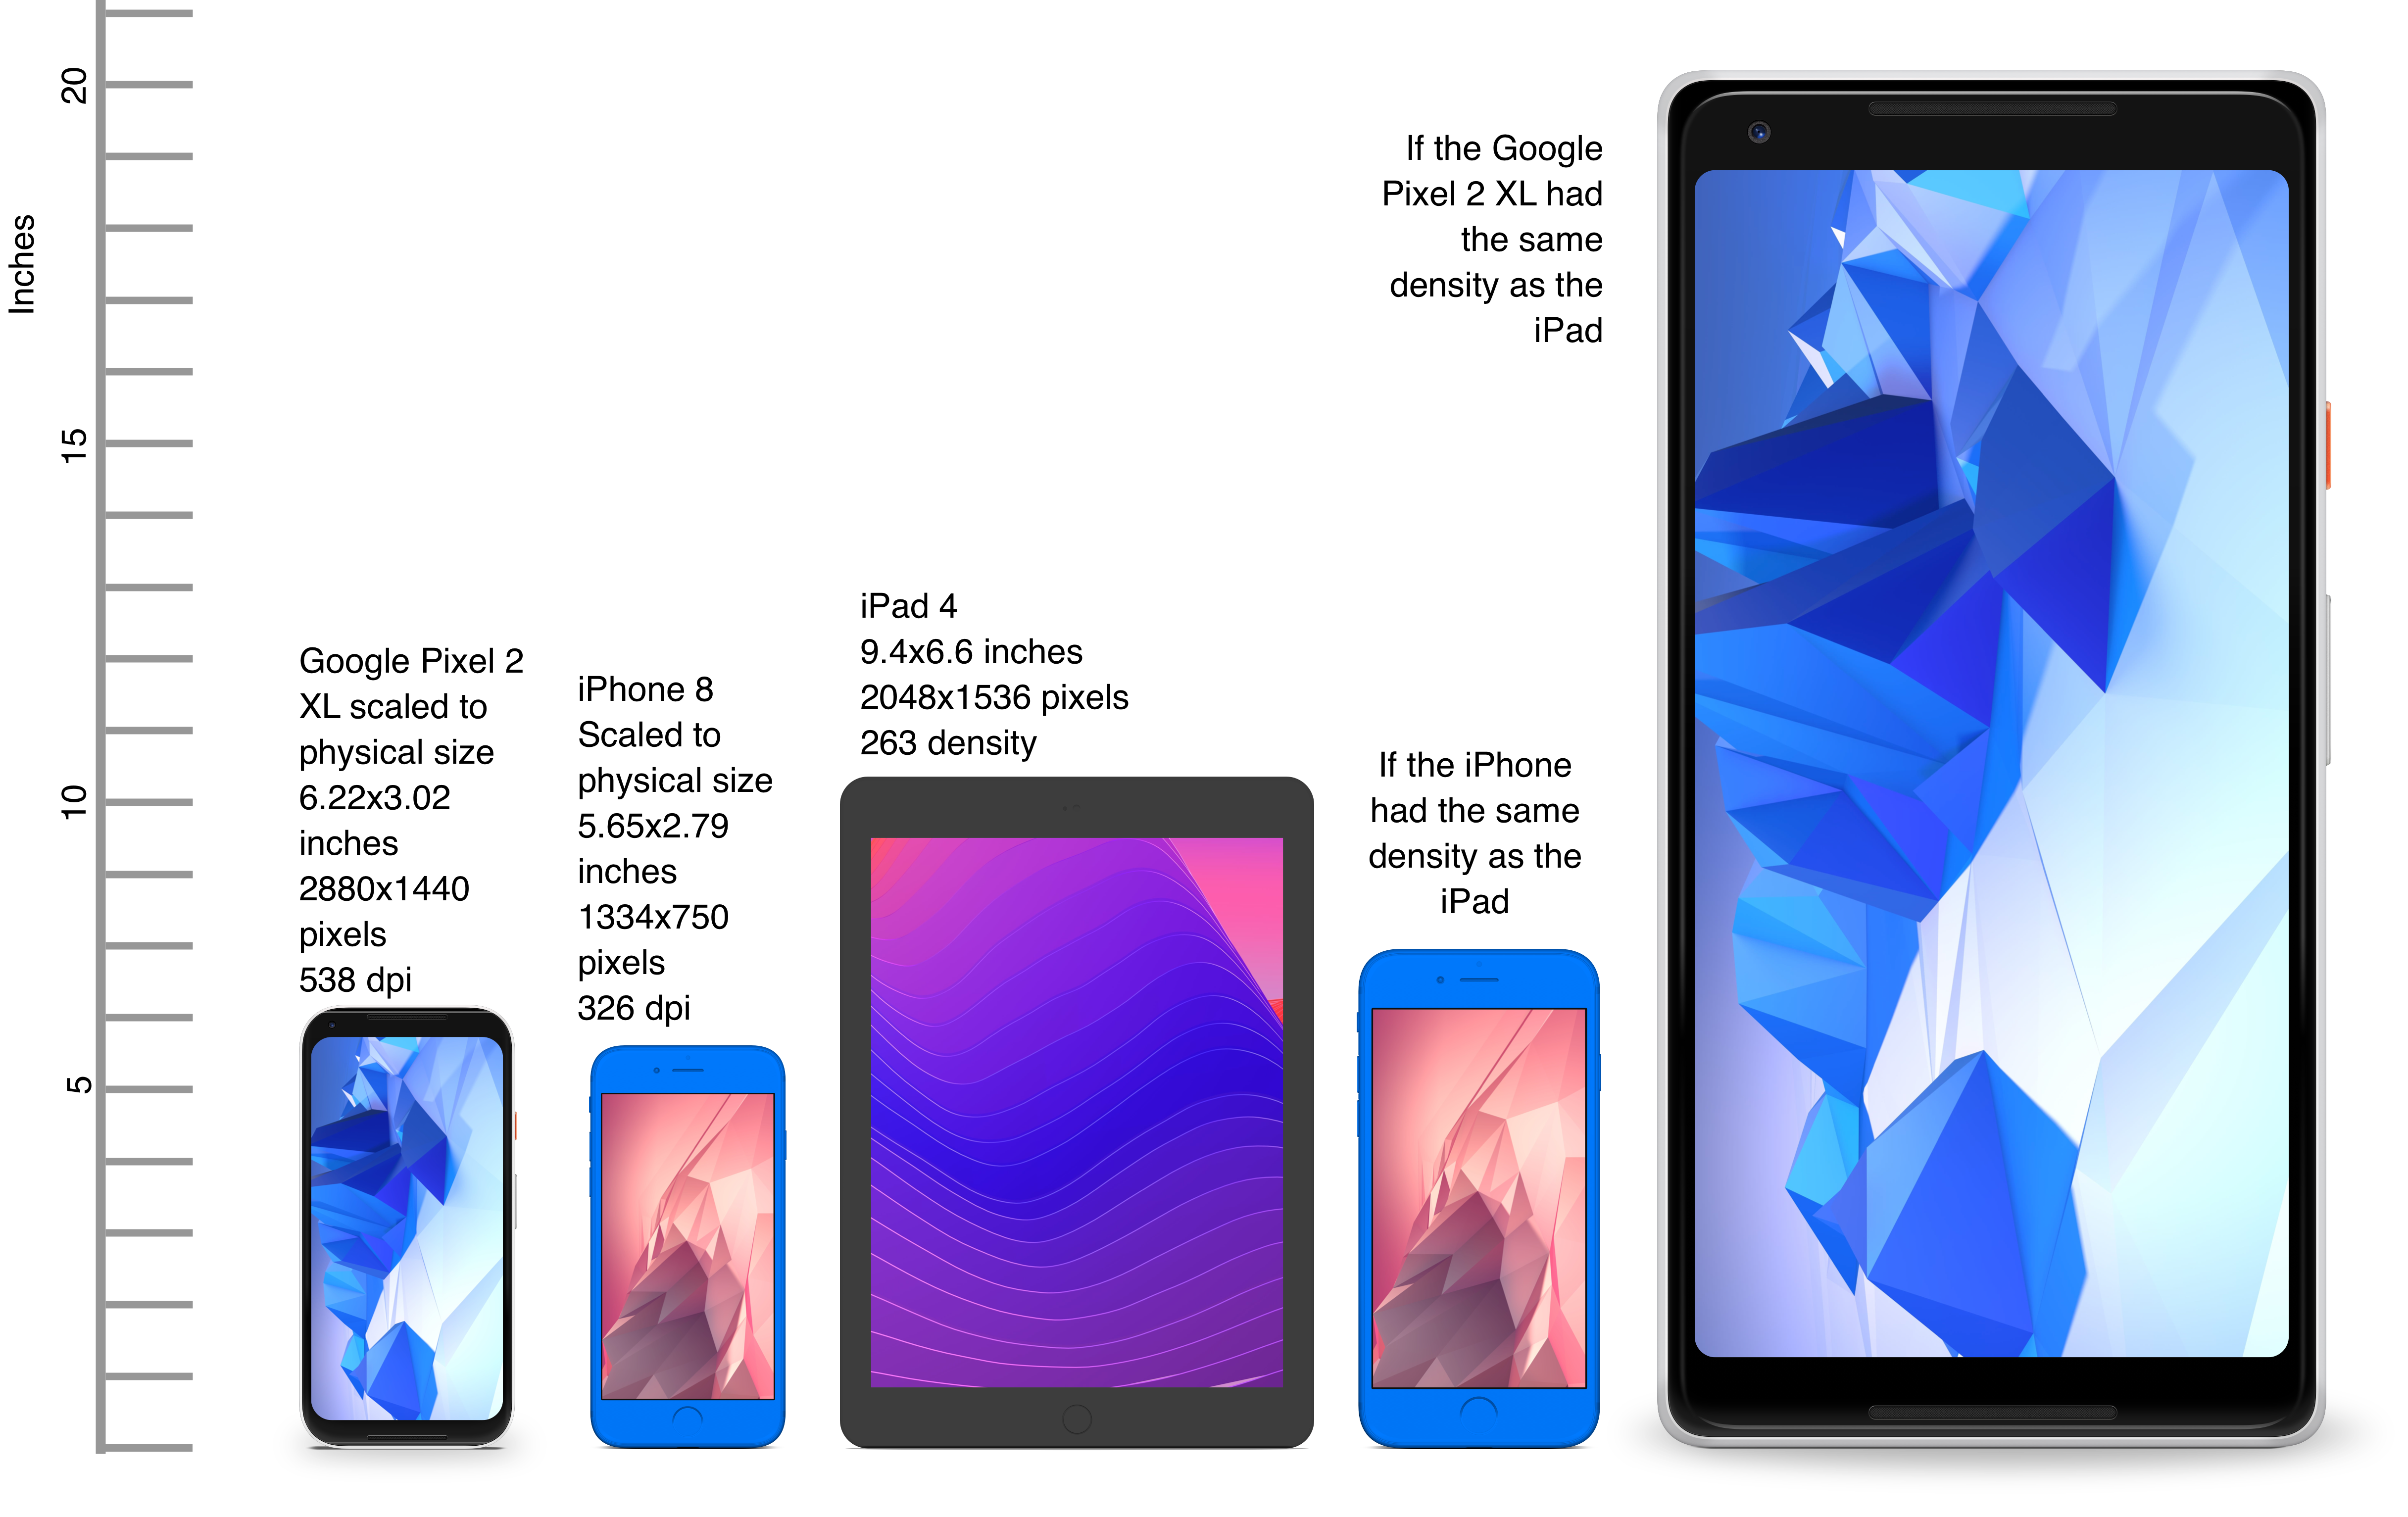
Differences in density can be extreme. A second generation iPad has 132 PPI, where modern phones have PPI that’s over 600 dpi.
Low resolution images on high PPI devices will look either small or pixelated. High resolution images on low PPI devices will look huge, overscaled (artifacts) and will consume too much memory.
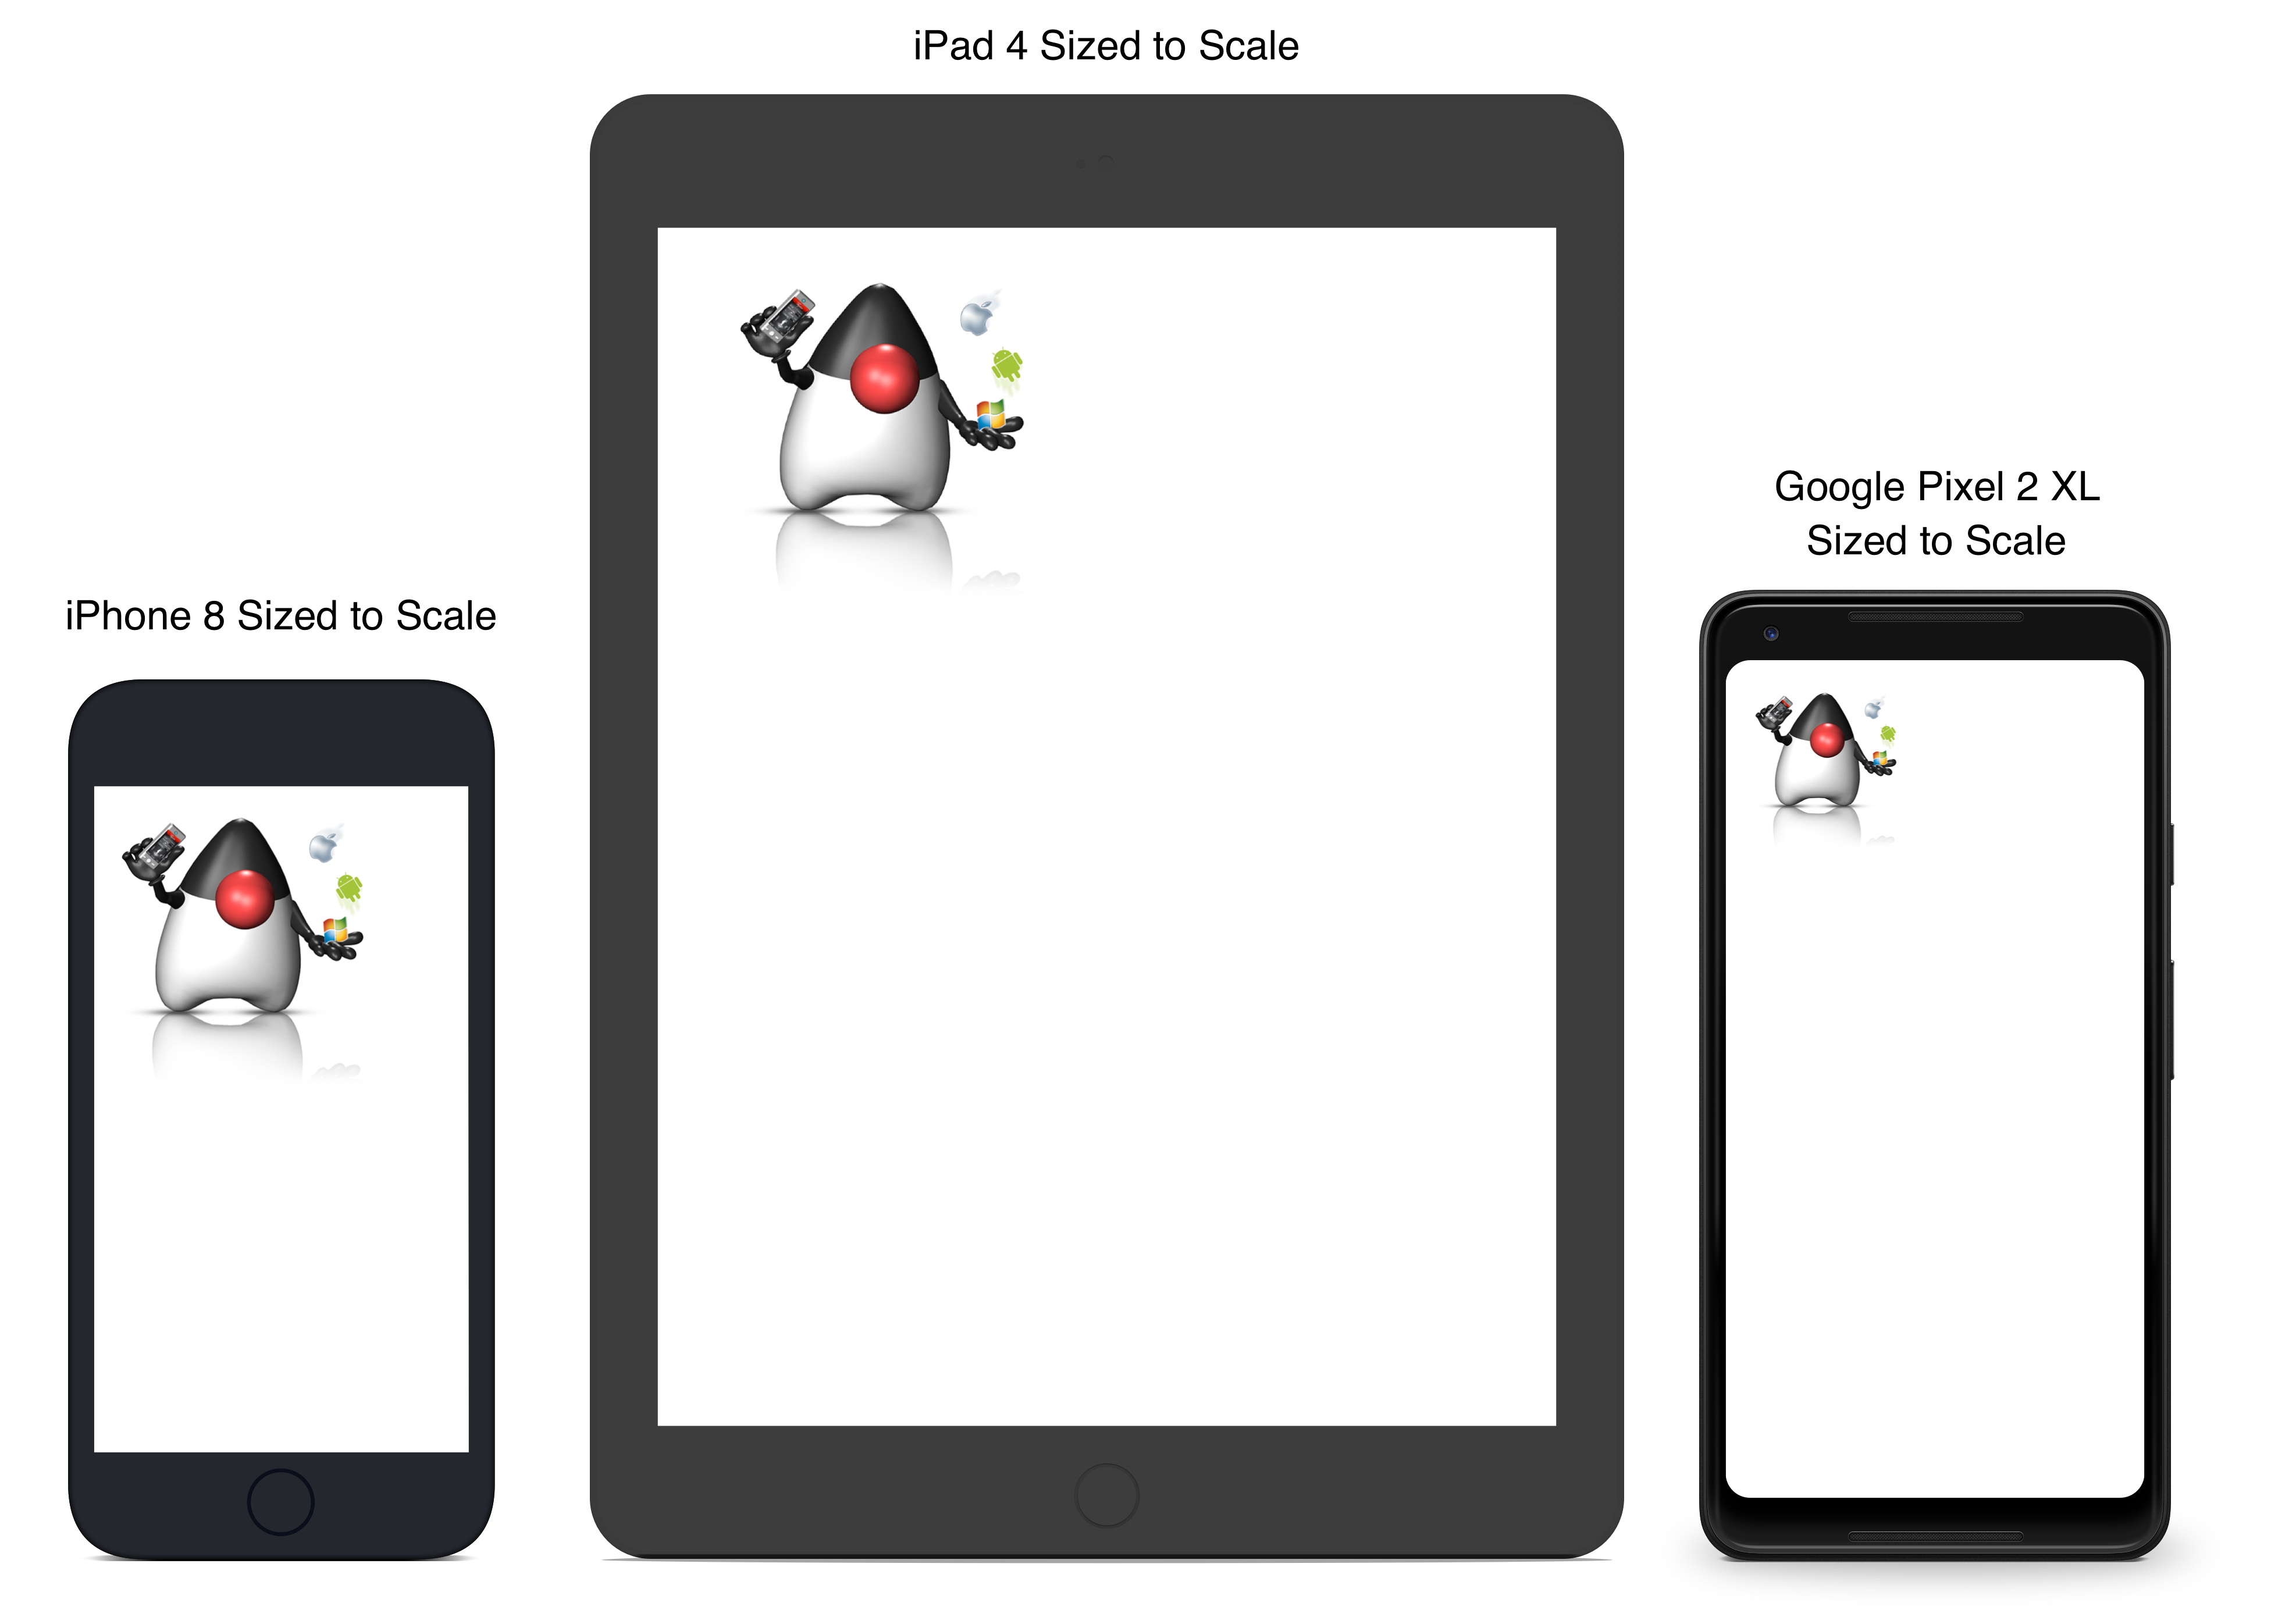
The exact same image will look different on each device, sometimes to a comical effect. One of the solutions for this problem is multi-images. All OS’s support the ability to define different images for various densities. Chapter 2 discusses multi-images later in detail.
This also highlights the need for working with measurements other than pixels. Codename One supports millimeters (or dips) as a unit of measurement. This is highly convenient and is a better representation of size when dealing with mobile devices.
However, there is a bigger conceptual issue involved. You need to build a UI that adapts to the wide differences in form factors. You might have fewer pixels on an iPad, but because of its physical size, you would expect the app to cram more information into that space so the app won’t feel like a blown-up phone application. Many strategies to address that, but one of the first steps is in the layout managers.
Chapter 2 discusses the layout managers in depth, but the core concept is that they decide where a UI element is placed based on generic logic. That way, the user interface can adapt automatically to the huge variance in display size and density.
Touch interface
The fact that mobile devices use a touch interface today isn’t news… However, the implications of that aren’t obvious to some developers.
UI elements need to be finger sized and spaced. Otherwise, you risk the “fat finger” effect. That means spacing should be in millimeters and not in pixels due to device density.
Scrolling poses another challenge in touch-based interfaces. In desktop applications, it’s common to nest scrollable items. For example, in touch interfaces, the scrolling gesture doesn’t allow such a nuance. Furthermore, scrolling on both the horizontal and vertical axis (side scrolling) can be inconvenient in touch-based interfaces.
Device fragmentation
Some developers single out this wide range of resolutions and densities as “device fragmentation.” While it does contribute to development complexity, it isn’t a challenging problem to overcome.
Densities aren’t the cause of device fragmentation. Device fragmentation is caused by many OS versions with different behaviors. This is clear on Android and relates to the slow rollout of Android vendor versions compared to Google rollout. A new release reaches only a small fraction of devices in its first year, and handsets several major versions behind stay in circulation long after their vendor stops shipping updates for them.
This makes QA difficult as the disparity between these versions is pretty big. It’s hard to get all device manufacturers aligned, so this problem will probably remain in the foreseeable future despite everything.
Performance
Besides the obvious need for performance and smooth animation within a mobile app, there are a couple of performance related issues that might not be intuitive to new developers: size and power.
App size
Apps are installed and managed through stores. This poses some restrictions about what an app can do. However, it also creates a huge opportunity. Stores manage automatic update and to some degree the marketing/monetization of the app.
A good mobile app is updated once a month and sometimes even once a week. Since the app downloads automatically from the store, this can be a huge benefit:
Existing users are reminded of the app and get new features instantly
New users notice the app featured on a “what’s new” list
If an app is big, it might not update over a cellular network connection. Google and Apple have restrictions on automatic updates over cellular networks to preserve battery life and data plans. A large app might negatively impact users perception of the app and trigger uninstalls for example, when a phone is low on available space.
Power drain
Desktop developers think about power usage within their apps. In mobile development, this is a crucial concept. Modern device OSes have tools that highlight misbehaving applications, and this can lead to bad reviews.
Code that loops forever while waiting for input will block the CPU from sleeping and drain the battery.
Worse. Mobile OSes kill applications that drain the battery. If the app is draining the battery and is minimized, (for example, during an incoming call) the app could be killed. This will impact app performance and usability.
Sandbox and permissions
Apps installed on the device are "sandboxed" to a specific area so they won’t harm the device or its functionality. The filesystem of mobile applications is restricted so one application can’t access the files of another application. Things that most developers take for granted on the desktop such as a "file picker" or accessing the image folder don’t work on devices!
This means that when your application works on a file, it belongs to your application. To share the file with a different application, you need to ask the operating system to do that for you.
Furthermore, some features require a "permission" prompt and sometimes require special flags in system files. Apps need to request permission to use sensitive capabilities, for example, Camera, Contacts etc.
Historically, Android developers declared required permissions for an app and the user was prompted with permissions during installation. Android 6 adopted the approach used by iOS of prompting the user for permission when accessing a feature.
This means that in runtime a user might revoke a permission. A good example for an Uber app is the location permission. If a user revokes that permission, the app might lose its location.
Installing Codename One
Codename One projects are built with Maven. Typical Maven targets such as package, clean and install work out of the box, but the Codename One integrations that ship with each IDE provide dedicated Run and Build actions for a smoother workflow.
To create a new Codename One project visit https://www.codenameone.com/initializr/ and generate a starter project, or run the Codename One Application Project Archetype (cn1app-archetype) directly on the command line:
mvn archetype:generate \
  -DarchetypeGroupId=com.codenameone \
  -DarchetypeArtifactId=cn1app-archetype \
  -DarchetypeVersion=LATEST \
  -DgroupId=YOUR_GROUP_ID \
  -DartifactId=YOUR_ARTIFACT_ID \
  -Dversion=1.0-SNAPSHOT \
  -DmainName=YOUR_MAIN_NAME \
  -DinteractiveMode=false
This command generates a project in the current directory. The folder name matches the artifactId value. For example, specifying -DartifactId=myapp produces a project inside a new myapp directory.
Import the generated Maven project into your preferred IDE and use the Codename One Run in Simulator task from the IDE toolbar or Run/Debug buttons:
IntelliJ IDEA: use File > Open on the project directory, then choose the Codename One Run in Simulator action from the toolbar or standard Run/Debug controls.
NetBeans: use File > Open Project, select the generated Maven project, and rely on the Codename One toolbar actions to run and debug the simulator.
VS Code: install the Java and Codename One extensions, open the folder, and trigger the Run in Simulator task from the command palette or the Run/Debug buttons.
Eclipse: use File > Import > Existing Maven Projects, then use the Codename One launch shortcuts provided by the plugin for simulator and build tasks.
Command line: invoke Maven goals directly whenever you need to integrate with CI/CD pipelines or scripting.
For deeper coverage of the Maven goals, project structure, and automation tasks, continue with Maven Project Workflow.
Important notes for new projects
Before you get to the code there are few important things you need to understand about Codename One applications.
App Name - This is the name of the app and the main class, it’s important to get this right as it’s hard to change this value later
Package Name - it’s crucial you get this value right. Besides the difficulty of changing this after the fact, once an app is submitted to iTunes/Google Play with a specific package name this can’t be changed! See the sidebar
Picking a Package Name.Theme - Codename One ships with various built-in themes; for simplicity recommend
Nativeas it’s a minimal starting point
Runtime
Once Maven is set up you can run the HelloWorld application by selecting the Codename One Run in Simulator task from the IDE run menu. The Codename One simulator launches and you can use its menus to control and inspect details related to the device. You can rotate it, determine its location in the world, monitor networking calls etc.
With the Skins menu you can download device skins to see how your app will look on different devices.
Scrollable flag in the Simulator menu to handle them more effectivelyUse your IDEs Debug button with the Run in Simulator task to launch the simulator under the debugger.
The source code of the hello world app
After clicking finish in the new project wizard you have a HelloWorld project with a few default settings. The following sections break the class down to small pieces and explain each piece starting with the enclosing class:
public class HelloWorld extends Lifecycle {                             // (1)

    @Override
    public void runApp() {                                              // (2)
        Form hi = new Form("Hi World", BoxLayout.y());                  // (3)
        Button helloButton = new Button("Hello World");
        hi.add(helloButton);
        helloButton.addActionListener(e -> hello());
        hi.getToolbar().addMaterialCommandToSideMenu("Hello Command",
                FontImage.MATERIAL_CHECK, 4, e -> hello());             // (4)
        hi.show();
    }

    private void hello() {
        Dialog.show("Hello Codename One", "Welcome to Codename One", "OK", null);
    }
}
This is the main class and the entry point to the app. It has no
mainmethod: the platform calls intoLifecycle, which calls you back.runApp()is where the app builds its first screen.Lifecyclecalls it fromstart(), so this is the one method a new project overrides.Formis the “top level” UI element in Codename One. Only one is shown at a time and everything on the screen is a child of it.BoxLayout.y()stacks the children from the top down, and a theme decides how they look.The
Toolbarcarries the title bar and the side menu. The generated project puts the same action in both places so there is an example of each.
The four platform callbacks the Application Lifecycle
Sidebar describes are already implemented for you by Lifecycle, which is why
the generated class carries none of them:
init(Object)sets the network thread count, installs the theme, turns on the globalToolbar, binds crash protection throughLog.bindCrashProtectionand registers a network error listener, in that order.start()callsrunApp()on a cold start. On a warm start it re-shows theFormthe user was looking at when the app was suspended, so returning to an app lands the user back where they were.stop()remembers thatForm, disposing aDialogfirst so the app doesn’t come back to a modal.destroy()does nothing by default.
Some complex ideas appear within this short snippet that this chapter addresses
later when talking about layout. The gist of it’s that you create and show a
Form, the top level UI element that takes over the whole screen. You add UI
elements to it, here a Button that opens a Dialog when tapped, and the
BoxLayout arranges them from top to bottom. The same action is attached to the
side menu through the Toolbar, so the starter shows both ways of triggering
one piece of code.
A few years ago Romain Guy (a senior Google Android engineer) was on stage at the Google IO conference. He asked for a show of hands of people who understand the Activity lifecycle (Activity is like a Codename One main class). He then proceeded to jokingly call the audience members who lifted their hands “liars” claiming that after all his years in Google he still doesn’t understand it…
Lifecycle seems simple on the surface but hides a lot of nuance. Android’s lifecycle is ridiculously complex. Codename One tries to simplify this and also make it portable. Sometimes complexity leaks out and the nuances can be difficult to deal with.
Explained an application has three states:
Foreground - it’s running and in the foreground which means the user can physically interact with the app
Suspended - the app isn’t in the foreground, it’s either paused or has a background process running
Not Running - the app was never launched, was killed or crashed
The lifecycle is the process of transitioning between these 3 states and the callbacks invoked when such a transition occurs. The first time you launch the app you start from a “Cold Start” (Not Running State) but on later launches the app is started from the "Warm Start" (Suspended State).
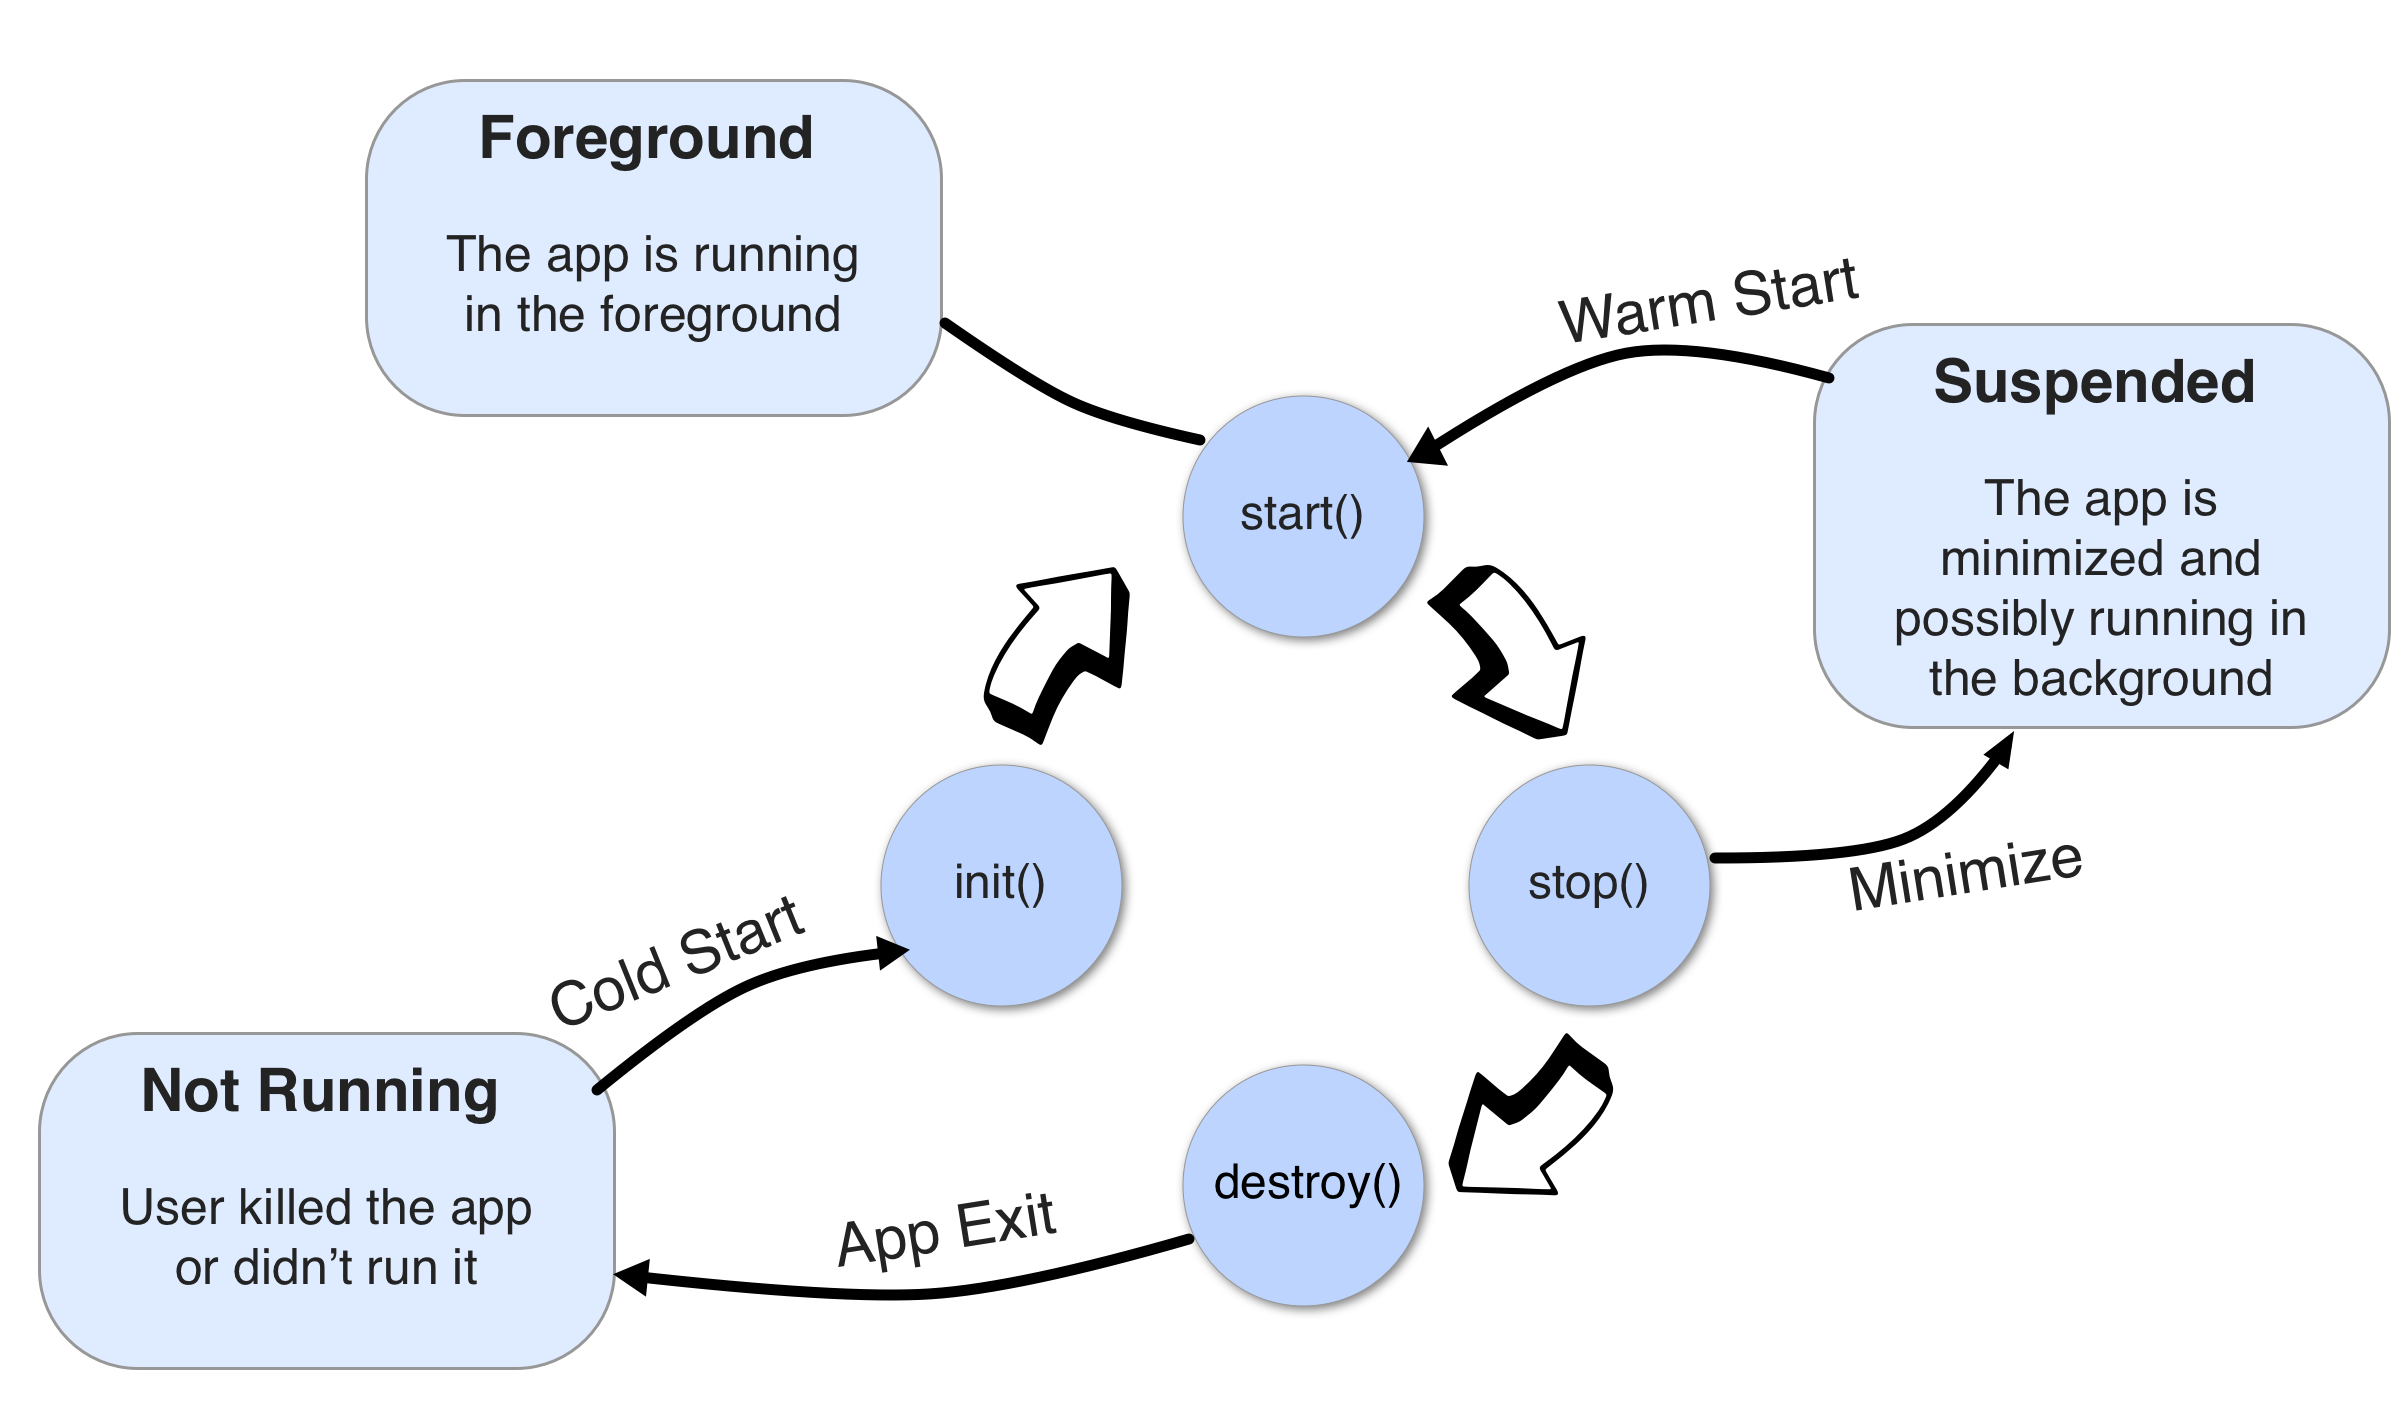
Codename One has four standard callback methods in the lifecycle API:
init(Object)- is invoked when the app is first launched from a Not Running state.start()- is invoked for two separate cases. Afterstart()is finished the app transitions to the Foreground state.Following
init(Object)in case of a cold start. Cold start refers to starting the app from a Not Running state.When the app is restored from Suspended state. In this case
init(Object)isn’t invoked
stop()- is invoked when the app is minimized for example, when switching to a different app. Afterstop()is finished the app transitions to the Suspended state.destroy()- is invoked when the app is destroyed for example, killed by a user in the task manager. Afterdestroy()is finished the app is no longer running hence it’s in the Not Running state.
destroy() is optional there is no guarantee that it will be invoked. It should be used only as a last resortOverride one when you need to run code at that point. What the super call
protects differs by callback: in init it’s the whole list above, in start
it’s the only thing that puts a Form on screen, and in stop it’s the record
of which Form to come back to. destroy is empty, so super there is
optional:
public class HelloWorld extends Lifecycle {
    private TextArea editor;

    @Override
    public void init(Object context) {
        super.init(context);                                            // (1)
        Log.p("app starting");
    }

    @Override
    public void stop() {
        saveDraft();                                                    // (2)
        super.stop();
    }

    @Override
    public void runApp() {
        editor = new TextArea(Preferences.get("draft", ""));            // (3)
        Form hi = new Form("Hi World", BoxLayout.y());
        hi.add(editor);
        hi.show();
    }

    private void saveDraft() {
        Preferences.set("draft", editor.getText());
    }
}
Without this none of the five things
initdoes happen, most visibly the theme, so the app comes up unstyled.Called as the app is suspended, which is the moment to persist anything the user would hate to lose.
The other half of that:
runAppputs the saved draft back, so the pair survives the app being killed while suspended.
That’s it. You should now have a general sense of the code. It’s time to run on the device.
Building and deploying on devices
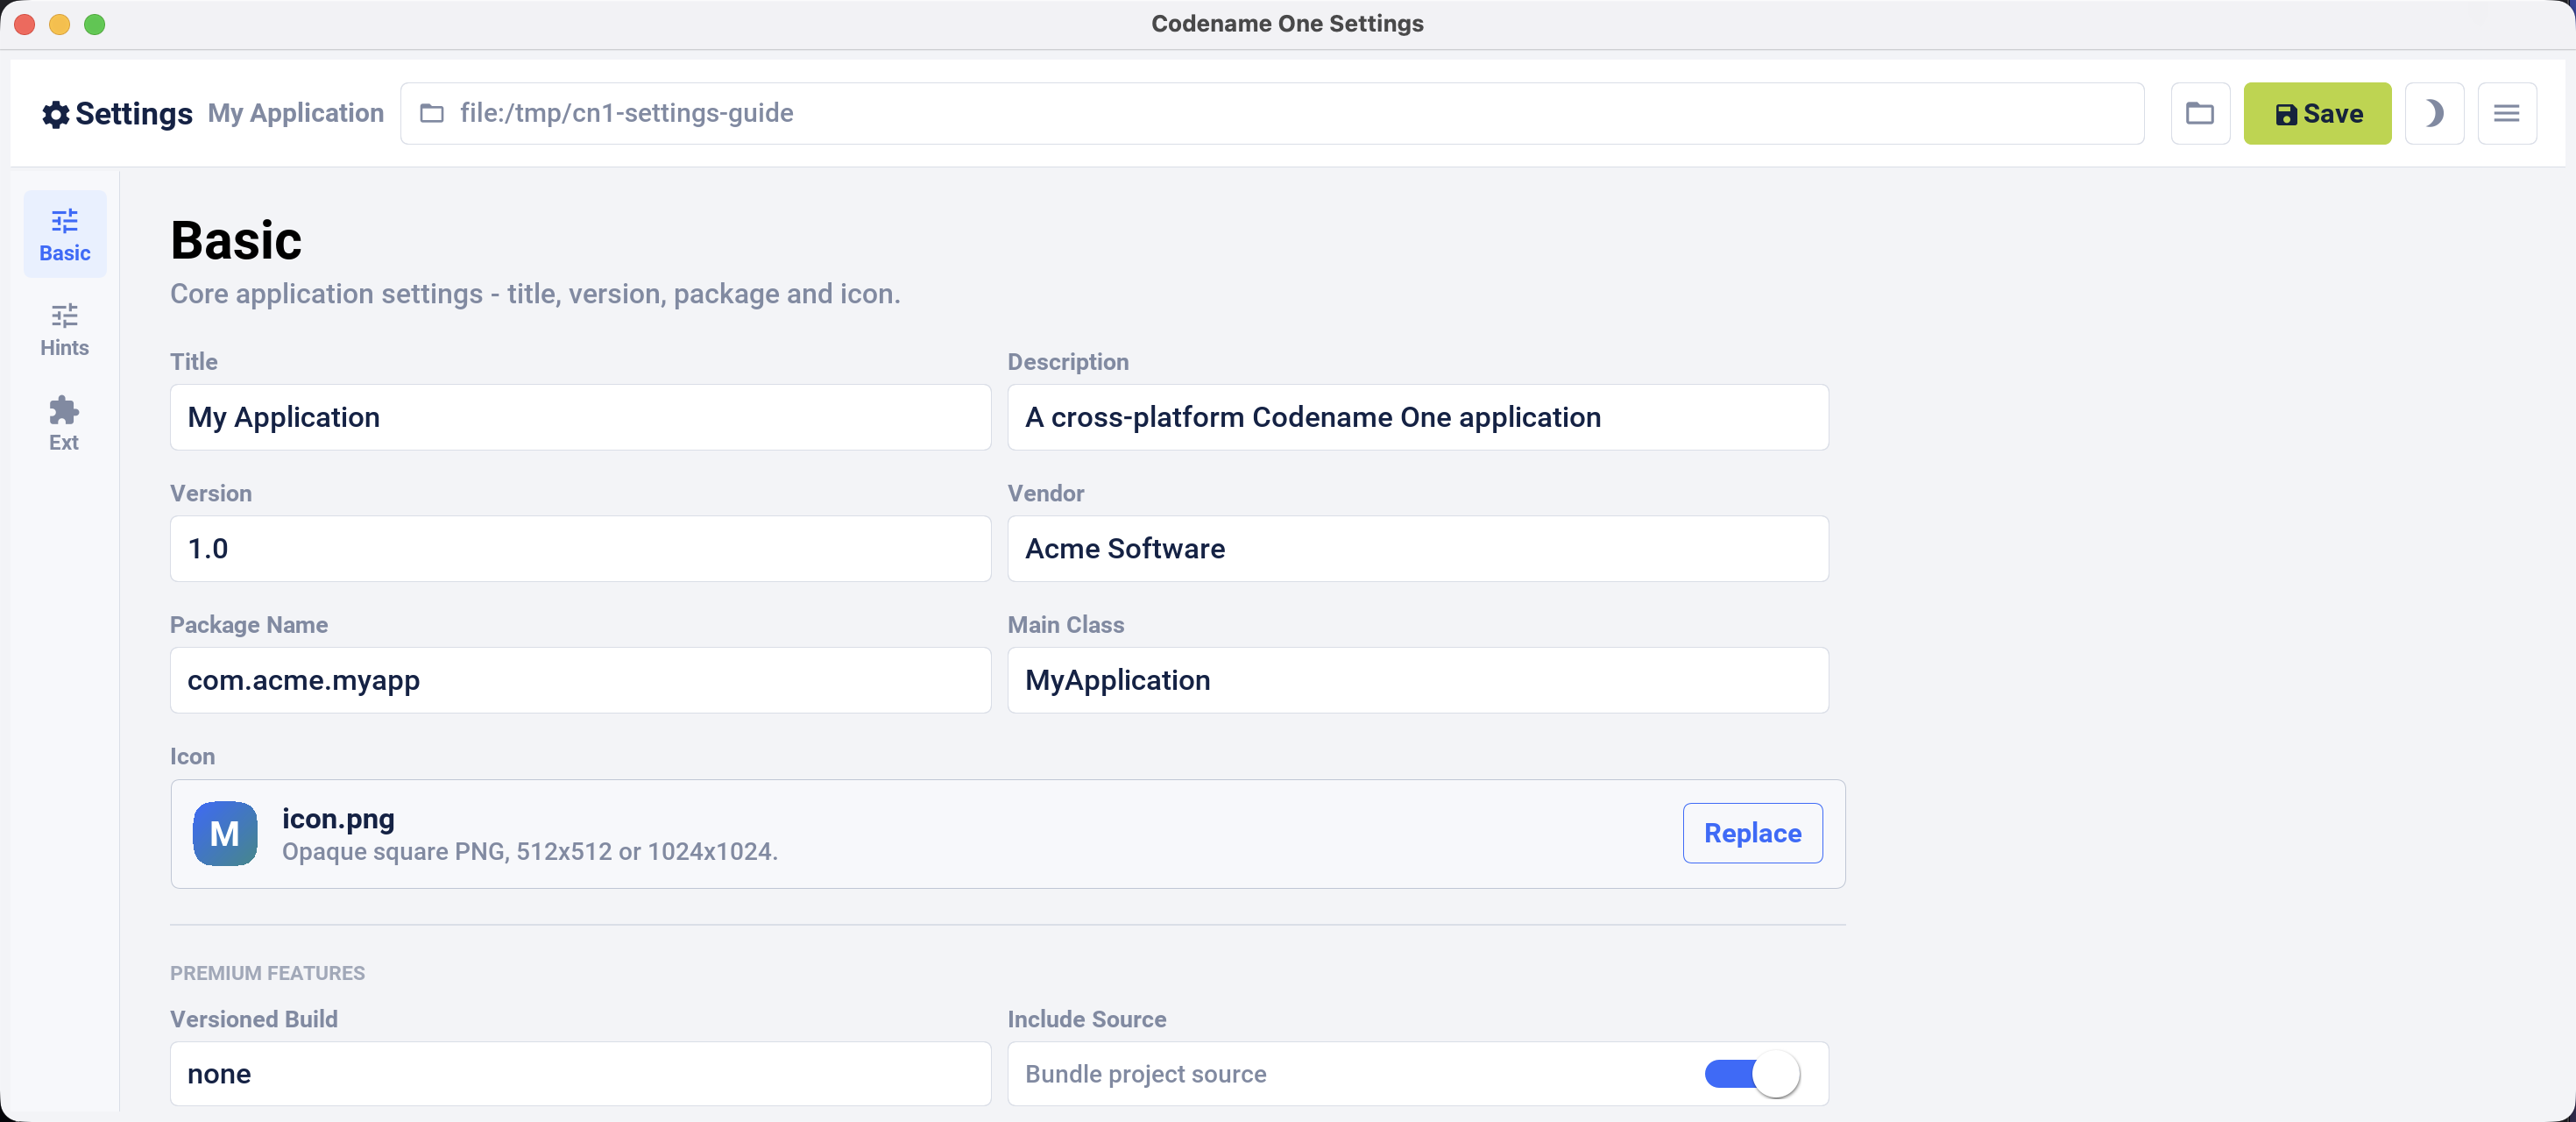
Use the standalone Codename One Settings editor to configure the application title, version, package, icon, build hints, and extensions. Launch it from the Maven project root:
mvn cn1:settings
Use the standalone Certificate Wizard for signing assets. Monitor Codename One Cloud builds and subscription information on the Codename One website.
Signing/Certificates
All the modern mobile platforms require signed applications but they all take radically different approaches when implementing it.
Signing is a process that marks your final application for the device with a special value. This value (signature) is a value that you can generate based on the content of the application and your certificate. Effectively it guarantees the app came from you. This blocks a 3rd party from signing their apps and posing as you to the App Store or to the user. It’s a crucial security layer.
A certificate is the tool you use for signing. Think of it as a mathematical rubber stamp that generates a different value each time. Unlike a rubber stamp a signature can’t be forged!
Signing on Android
Android uses a self-signed certificate approach. You can generate a certificate by describing who you’re and picking a password!
Anyone can do that. For example, once a certificate is published it can’t be replaced…
If this wasn’t the case someone else could push an “upgrade” to your app. Once an app is submitted with a certificate to Google Play this app can’t be updated with any other certificate.
With that in mind generating an Android certificate is trivial.
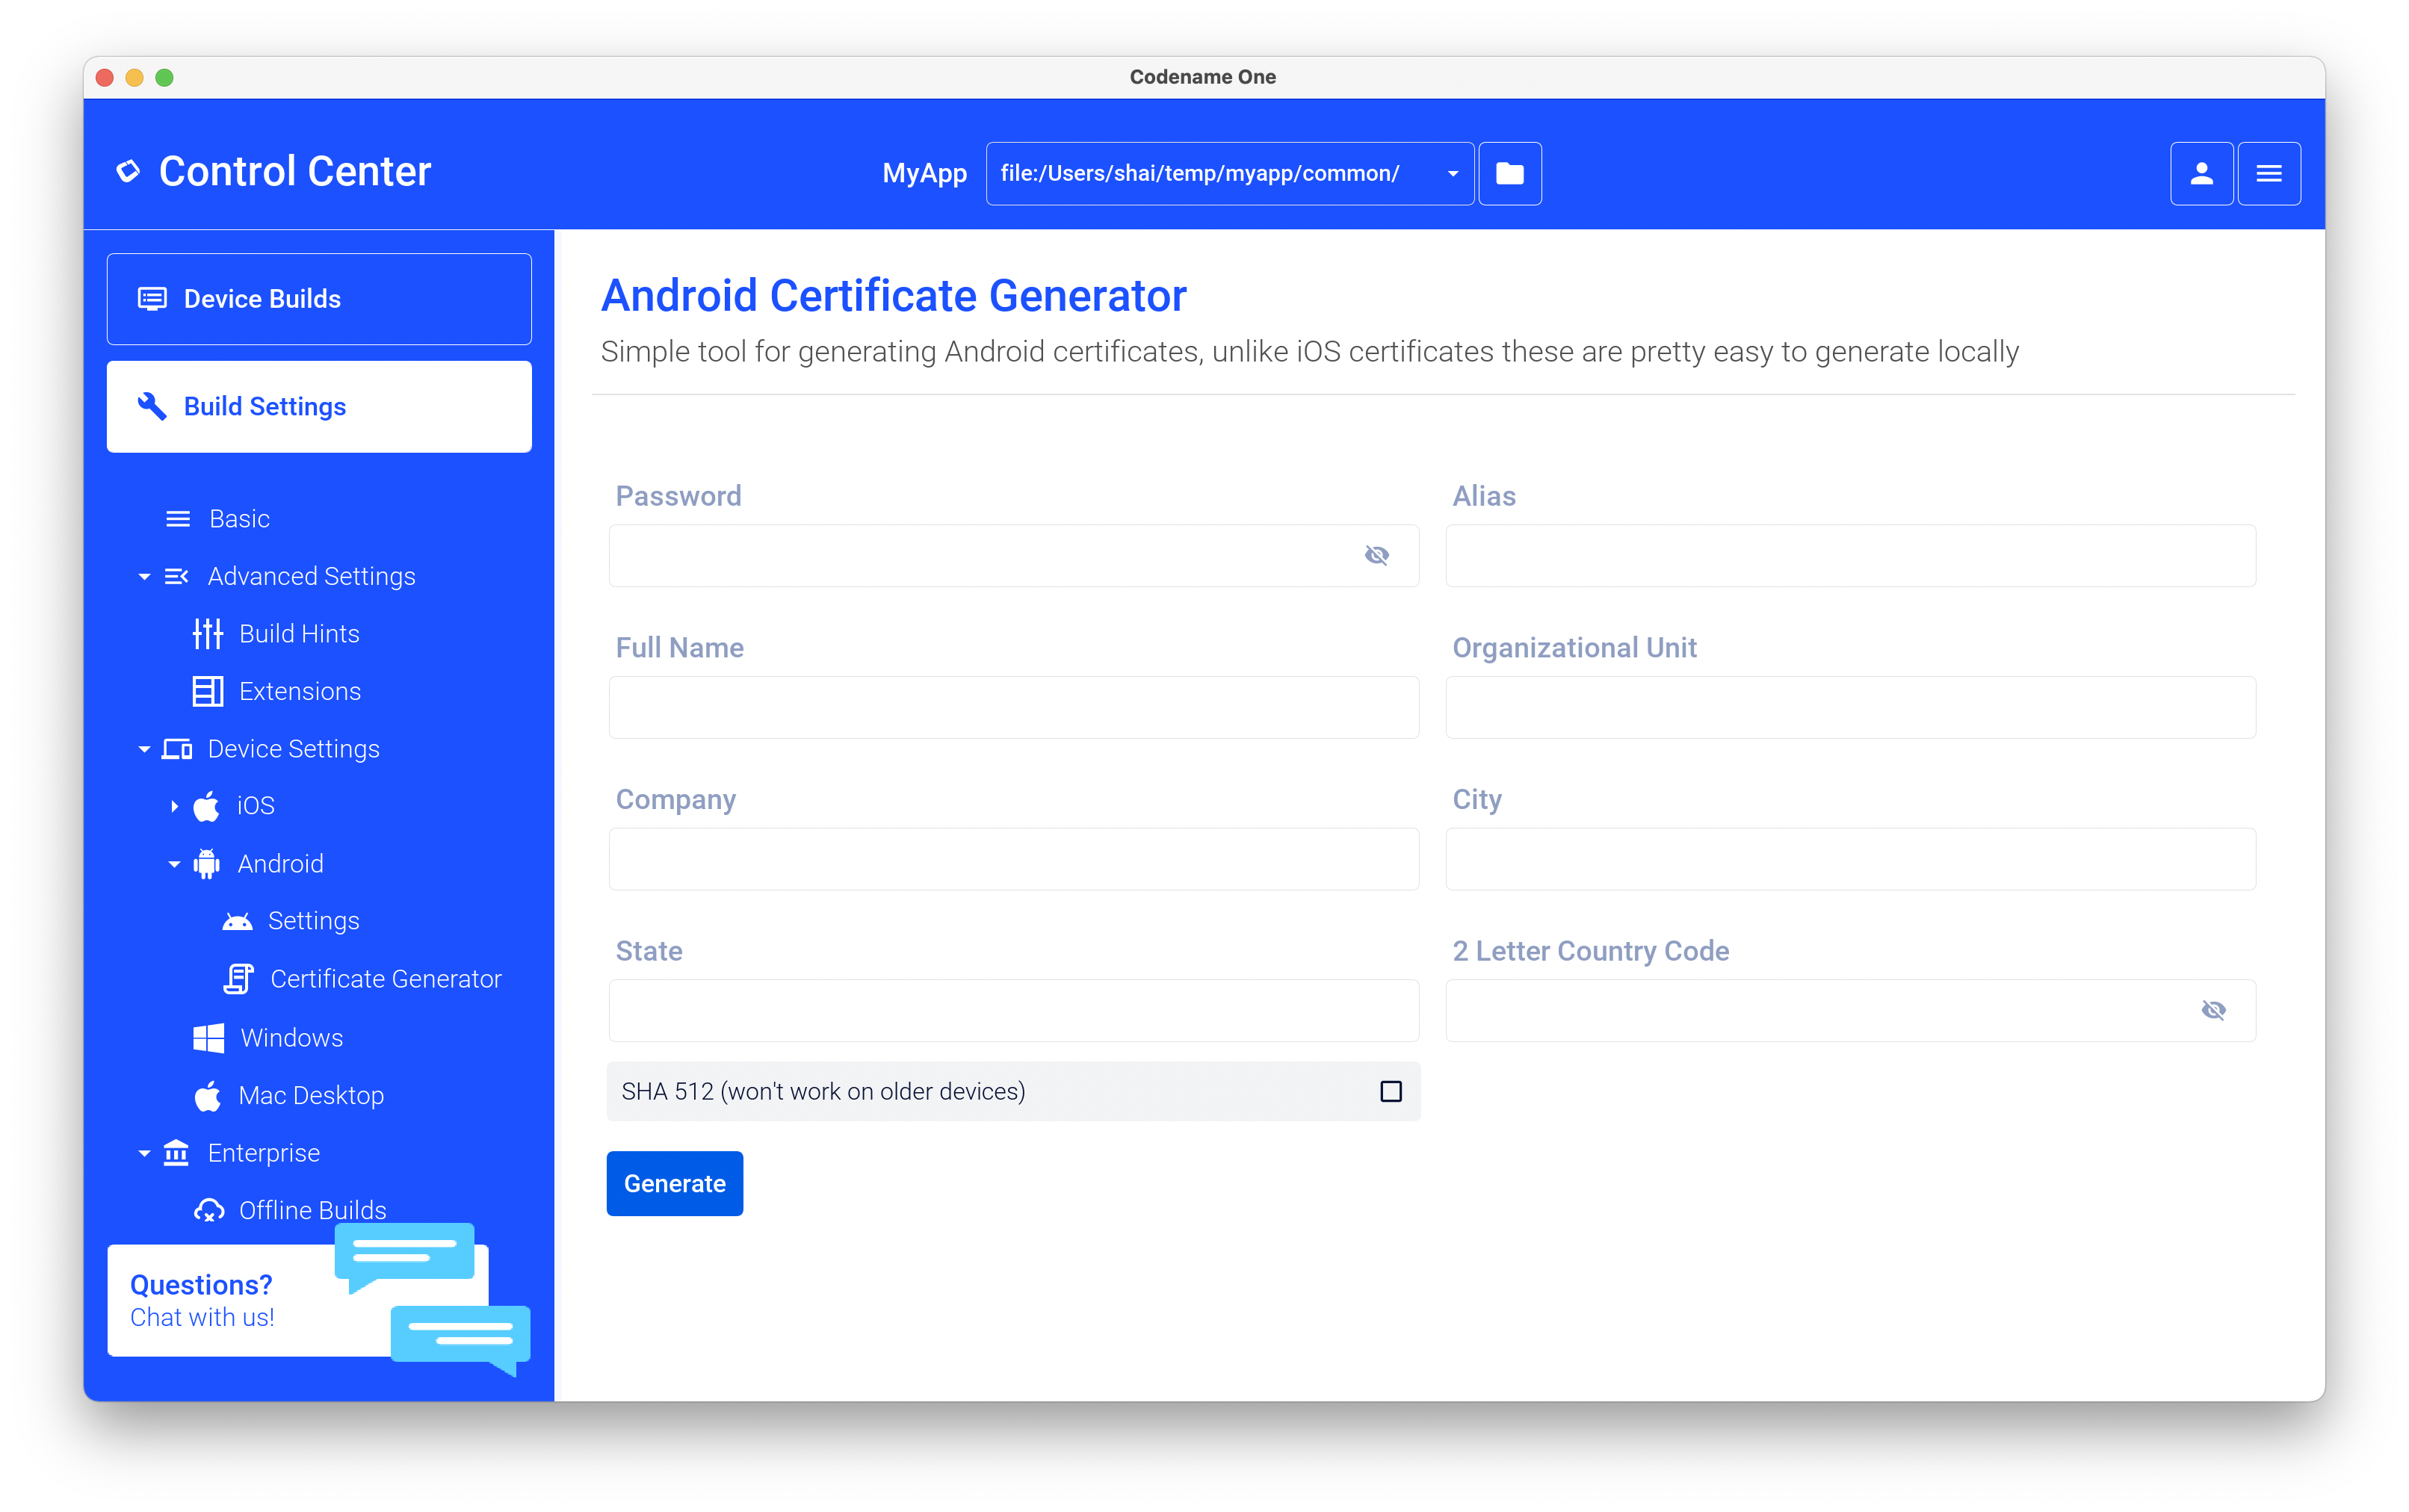
Keychain.ks in your home directorySigning and provisioning iOS
Code signing for iOS relies on Apple as the certificate authority. This is something that doesn’t exist on Android. iOS also requires provisioning as part of the certificate process and separates the process for development/release.
First, the good news:
Losing an iOS certificate is no big deal - in fact you revoke them often with no impact on shipping apps
Codename One has a wizard that hides most of the pain related to iOS signing
In iOS Apple issues the certificates for your applications. That way the certificate is trusted by Apple and is assigned to your Apple iOS developer account. One important caveat applies: You need an iOS Developer Account and Apple charges a 99USD Annual fee for that.
Apple also requires a “provisioning profile” which is a special file bound to your certificate and app. This file describes some details about the app to the iOS installation process. One of the details it includes during development is the list of permitted devices.
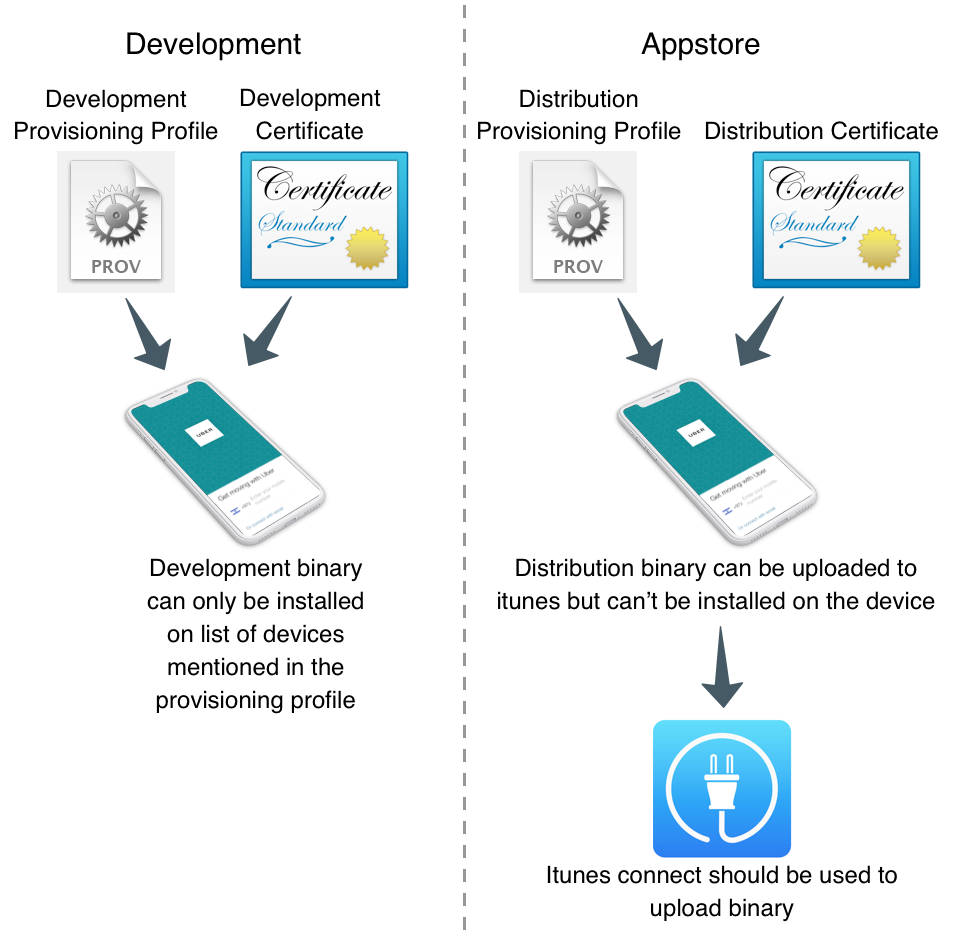
You need 4 files for signing. Two certificates and two provisioning profiles:
Production: The production certificate/provisioning pair is used for builds that are uploaded to iTunes
Development: The development certificate/provisioning is used to install on your development devices
The standalone Certificate Wizard can automatically create these files and configure the current Maven project.
Run the wizard from the project directory:
mvn cn1:certificatewizard
After storing an App Store Connect API key, click Auto Setup in the toolbar. The wizard reads the project package and display name, creates or reuses the Bundle ID with push enabled, creates/reuses development and App Store signing assets, and writes the debug/release signing settings back into codenameone_settings.properties.
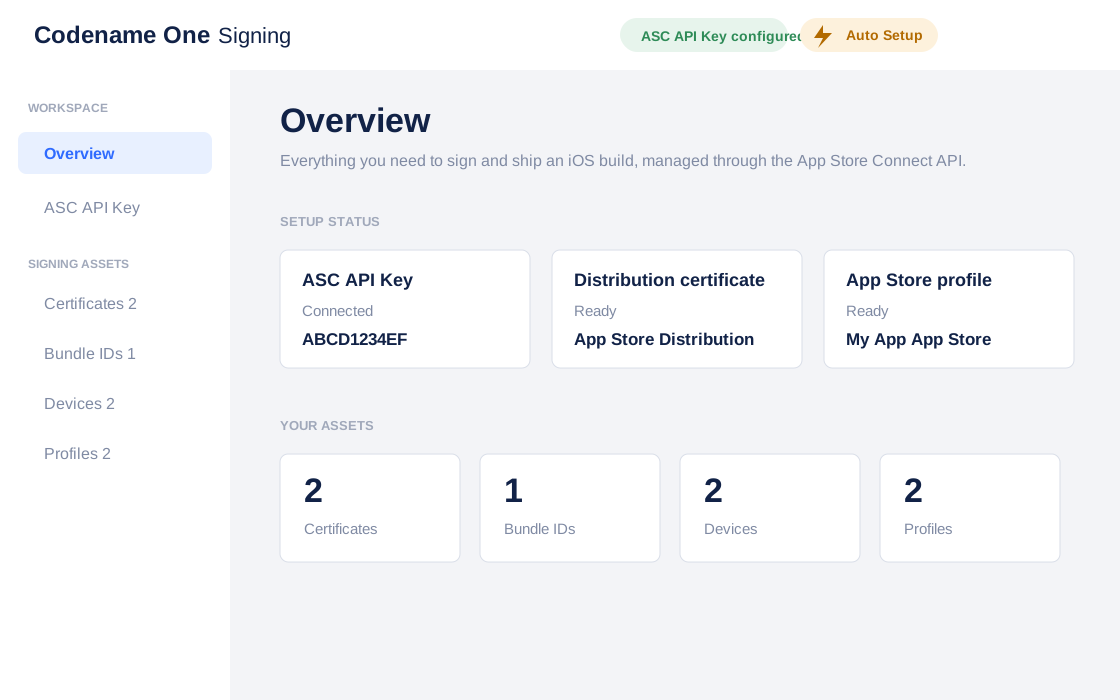
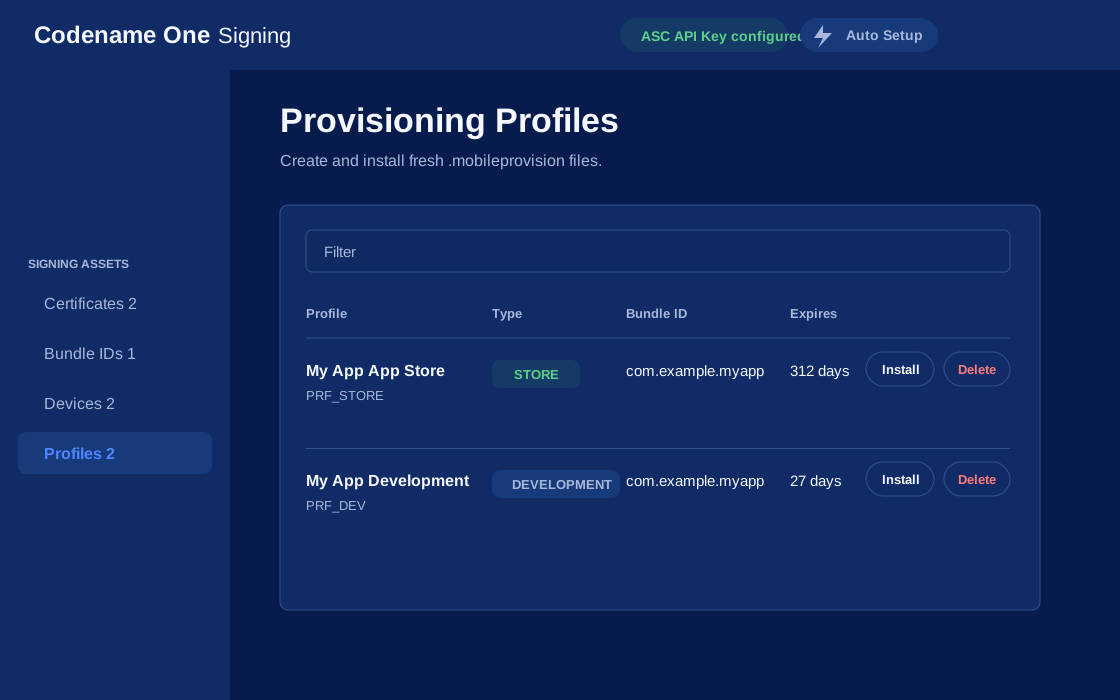
If you have more than one project you should use the same iOS P12 certificate files in all the projects and regenerate the provisioning. In this situation the Certificate Wizard asks you if you want to revoke the existing certificate which you shouldn’t revoke in such a case. You can update the provisioning profile in Apple’s iOS developer website.
One important aspect of provisioning on iOS is the device list in the provisioning step. Apple allows you to install the app on 100 devices during development. This blocks developers from skipping the App Store altogether. It’s important you list the correct UDID for the device in the list otherwise install will fail.
The UDID section of the signing chapter covers the reliable ways to read that value.
Build and install
Before you continue with the build you should sign up at https://www.codenameone.com/build-server.html where you can soon follow the progress of your builds. You need a Codename One account to build for the device.
Now that you have certificates, a device build is a single Maven goal. From the project’s root directory run mvn cn1:buildAndroid for Android, or mvn cn1:buildIos for an iOS debug build. Each one packages the app, sends it to the Codename One build servers and reports where the result lands.
mvn -pl common cn1:buildAndroid prints “Skipping execution for non-root project” and then reports success without building anything.Once you send a build you should see the results in the build server page:
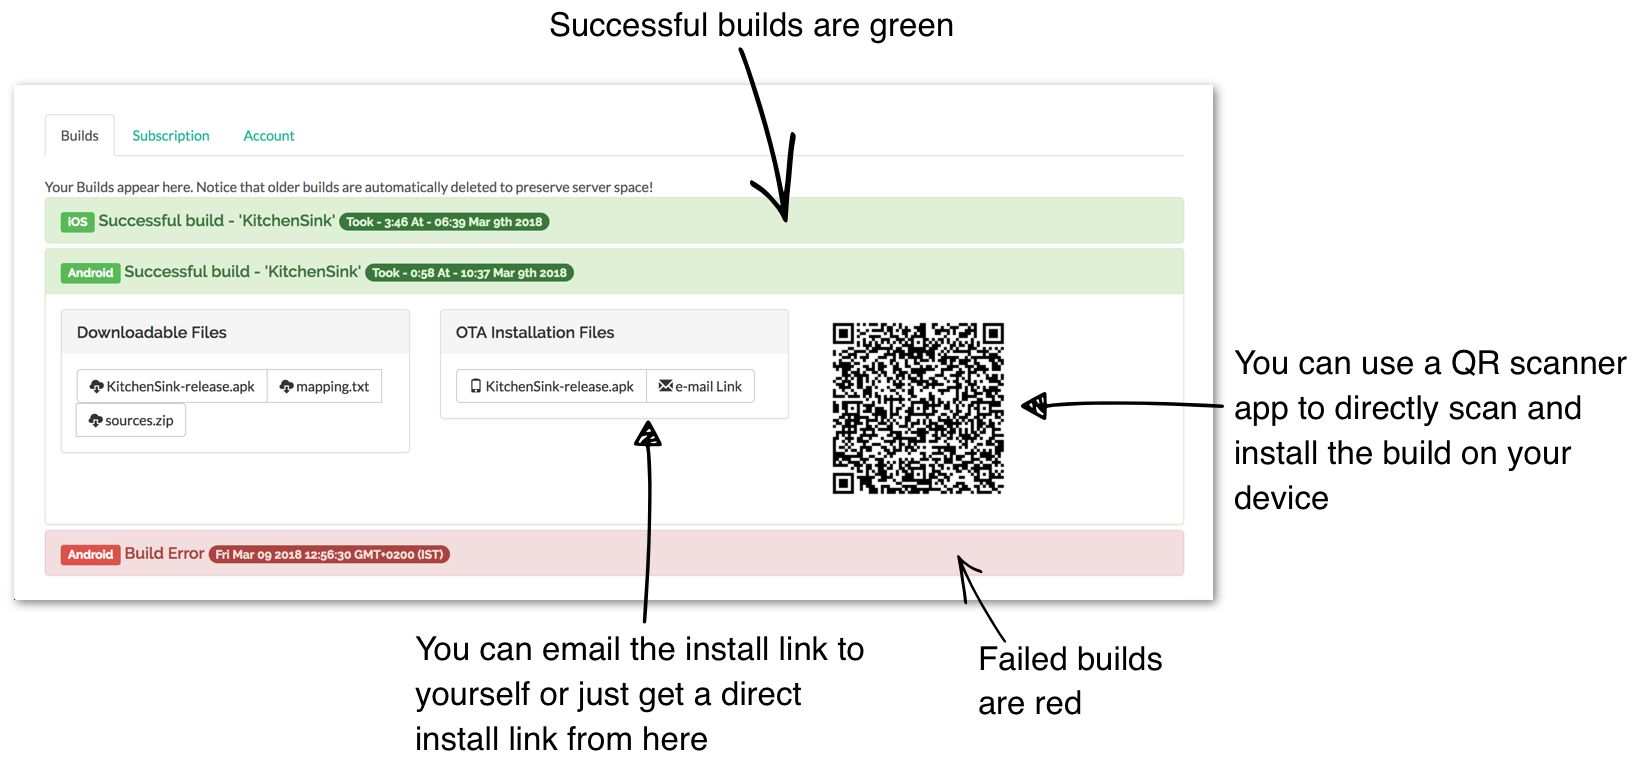
Once you go through those steps you should have the HelloWorld app running on your device. This process is non-trivial when starting so if you run into difficulties don’t despair and seek help at the discussion forum (https://www.codenameone.com/discussion-forum/) or stack overflow (https://stackoverflow.com/questions/tagged/codenameone). Once you go through signing and installation, it becomes easier.
You can also download the binaries to upload them to the appstores.
Kotlin
Codename One started before Kotlin became public. Kotlin has since shown itself as an interesting option for developers within the Android community. With that in mind, Codename One added support for Kotlin.
To use Kotlin with Codename One you can create a kotlin directory next to the java directory under the common/src/main directory. Kotlin code that resides there can work as usual and interact with the Java code.
Please notice the following:
Don’t use the project conversion tools or accept the warning that the project isn’t a Kotlin project. You do your own build process
Warnings and errors aren’t listed and builds that claim to have errors might pass
Hello Kotlin
Due to the way Kotlin works you can create a regular Java project and convert sources to Kotlin. You can mix Java and Kotlin code without a problem and Codename One would "work."
The Java source it converts from is the class shown in
the walkthrough above: a Lifecycle
subclass overriding runApp().
When you select that file and select the menu option Code → Convert Java file to Kotlin File you should get a familiar structure. The problem is that there are two bugs in the automatic conversion… That’s the code for Kotlin behaves differently from standard Java.
The first problem is that Kotlin classes are final unless declared otherwise so you need to add the open keyword before the class declaration.
This is essential as the build server will fail with weird errors related to instanceof.
finalThe second problem only bites if you override init(Object), which the
generated class doesn’t. Kotlin treats arguments as non-null by default, and the
context passed to init can be null, so an override has to accept it as
fun init(context: Any?) or it fails with an exception.
Once all that’s in place Kotlin should work. This should be possible for more JVM languages in the future.