The Game Builder is a visual level / map editor for the
com.codename1.gaming API. You lay out a game world — tiles,
characters, items, the camera — set per-object behavior values, preview it live, and
Build it into your project as a data file plus a small Java companion that the runtime
plays. It’s to games what the GUI builder is to forms.
This chapter covers the whole feature: the underlying model, the editor UI, building a level, defining game rules, the supported game types, and the Maven workflow.
How it fits together
A game built with this tool has three layers:
| Layer | Role | Who authors it |
|---|---|---|
Level data ( | A JSON description of the scene: grid, layers, placed elements + their properties, camera, lights. | The Game Builder (visual) |
Companion class ( | A thin | Generated once, then you edit the |
Gaming engine ( | Renders and runs the scene on the GPU, with pollable input, sound and optional Box2D physics. | The framework |
The key idea: the editor produces data, your companion adds rules, the engine runs
it. Because the level is data you can re-edit it any time without touching your code,
and your onUpdate logic is preserved across regeneration.
The level model — com.codename1.gaming.level
| Class | Purpose |
|---|---|
| The saveable level: |
| A placed thing: |
| A named band: |
| Resolve an |
| A turnkey |
| Board isometric math, fast single-tileset grids, and 3D lighting / terrain data. |
Loading and playing a level at runtime is three lines:
GameLevel level = GameLevel.load(
        // Flat resource namespace on the device -- "/Level1.game", not
        // "/games/Level1.game", which resolves to null there. This is the
        // path the editor's generated companion uses.
        Display.getInstance().getResourceAsStream(MyScene.class, "/Level1.game"));
// load() only parses the pack definitions. resolveArt() is what loads the
// images, sheets and meshes they name, and the 2D constructor realizes
// sprites immediately -- so resolve before constructing, or the scene is
// built from placeholders and stays that way.
AssetCatalog catalog = AssetCatalog.load(packsJson);
catalog.resolveArt();
GameSceneView view = new GameSceneView(level, catalog);
form.add(BorderLayout.CENTER, view);
form.show();
view.start();
Getting started
Create a scene from a Java 17 Codename One project:
mvn cn1:create-game-scene -DclassName=com.example.game.Level1 -Dmode=2d
-Dmode is 2d (default), 3d or board. This writes
common/src/main/resources/games/Level1.game (an empty level of that type) and
common/src/main/java/com/example/game/Level1.java (the GameSceneView companion).
Open the editor bound to the project — the same way cn1:guibuilder launches the GUI
builder:
mvn cn1:gamebuilder
The editor itself is delivered through Maven: the goal resolves the
com.codenameone:codenameone-gamebuilder artifact from the Codename One Maven repository (the same mechanism
that ships the Designer / CSS-compiler jar with the plugin), so there is no separate
install step. The cn1:gamebuilder goal only applies to Java 17 Codename One projects.
The editor at a glance
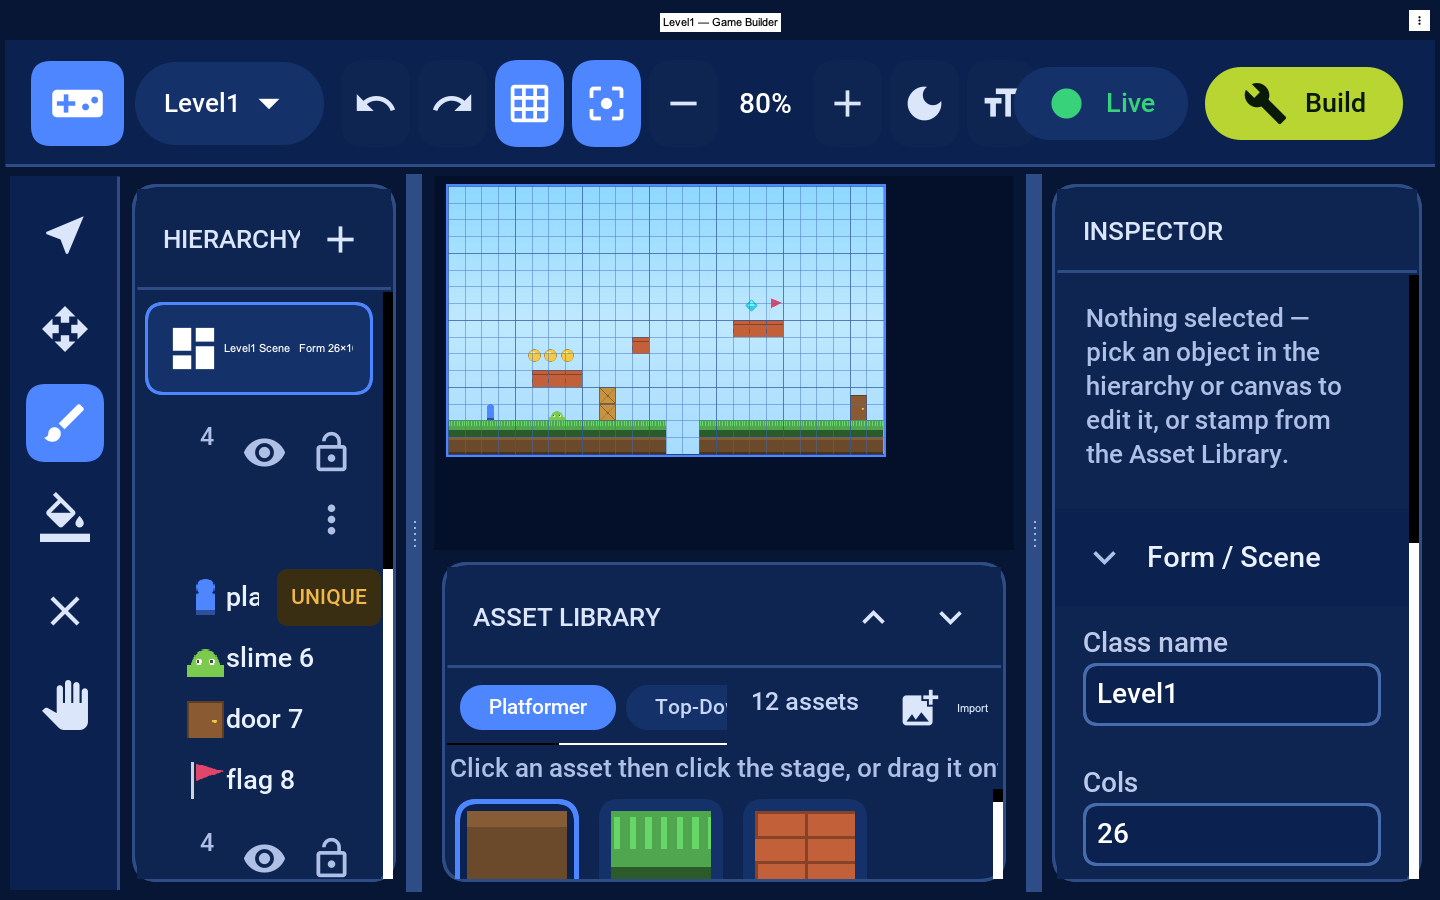
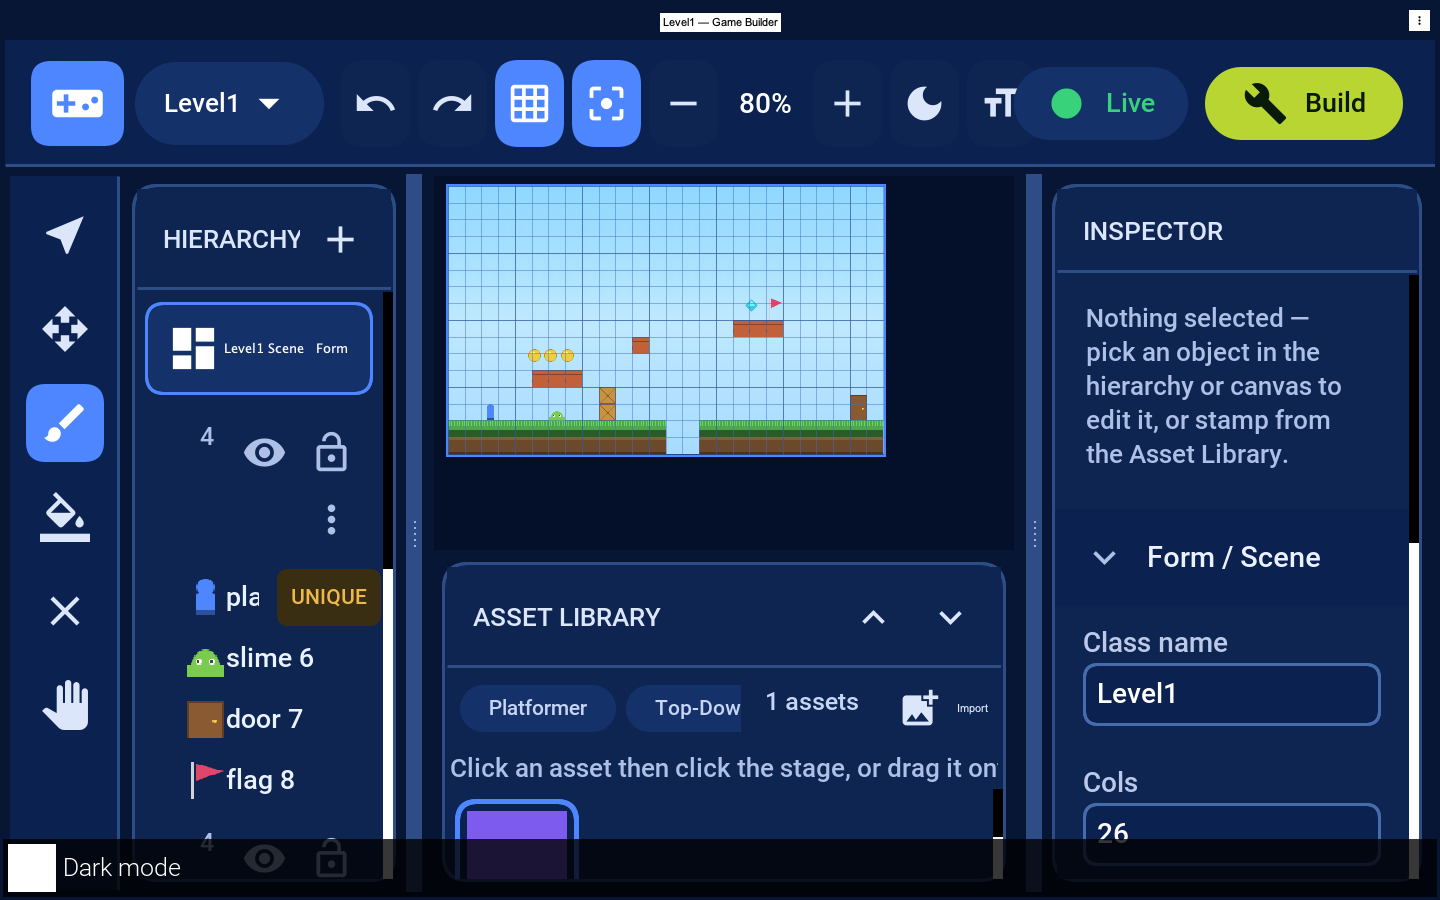
Top bar — the project / scene dropdown (switch scenes, rename, or start a new scene of any game type), undo / redo, the grid and snap toggles, zoom, a text-size toggle (Small / Medium / Large), the
</>button (opens the scene’s Java in your IDE), Live (play in place) and Build (save into the project).Tool rail (left) — Select, Move, Brush, Fill, Erase, Pan.
Resizable panels — drag the thin divider on the inner edge of the left panel or the inspector to resize it.
Hierarchy — the scene card plus the layers. Each layer shows its item count, a visibility eye (hides the layer), a lock (prevents edits) and a ⋮ menu to rename or delete it; drag a placed object onto another layer (or above/below a sibling) to move or reorder it. Placed objects nest under their layer, and unique objects (the player) carry a UNIQUE badge.
Canvas — the editable stage is the bright-bordered rectangle with the grid; painting only happens inside it.
Asset Library (center-bottom) — pick a pack tab, then click a thumbnail to select an asset. Selecting a tile asset switches to a tile layer; selecting an actor switches to an entity layer, so the brush always works on the next click. Import (top-right) brings in your own artwork as a new asset.
Inspector (right) — scene settings when nothing is selected, or the selected object’s properties.
Because it’s a desktop application, every command is also available from the native
menu bar (drawn by the OS), grouped by convention: File (New 2D / 3D / Board, Open
Scene, Save), Edit (Undo, Redo, Delete Selection), View (Toggle Grid / Snap, Zoom
In / Out, Show Generated Code), Tools (Select / Move / Brush / Fill / Erase / Pan),
Layer (Add Layer) and Game (Play / Stop). The standard accelerators work too — Cmd/Ctrl+Z undo, Cmd/Ctrl+S save, Cmd/Ctrl+R play, Cmd/Ctrl+= / Cmd/Ctrl+-
zoom. Every on-screen control also has a tooltip.
Building a level
Choose a game type — scene dropdown → New scene → 2D Platformer, 3D Map or Board (or scaffold with
-Dmode).Paint terrain — pick the Brush, click a tile in the Asset Library, then click/drag inside the stage. Fill flood-fills a region; Erase clears cells.
Place characters and items — click an actor asset and click on the stage to stamp it. With Snap on, actors land on grid cells. The Player is unique — stamping it again moves it.
Organize with layers — placed objects nest under their layer in the hierarchy, so you can always see which band each one is on. The eye hides a layer while you work (its name dims), the lock prevents edits to it, the chevron collapses its children, and + adds a layer. To move a selected object to a different layer (changing its draw order), use the Layer picker in the Inspector’s Transform section.
Undo / redo every change with the toolbar arrows.
Save with Build — it writes
Level1.gameand, the first time, the companionLevel1.java.
Defining game rules
Game rules live in two complementary places.
Data — set in the Inspector
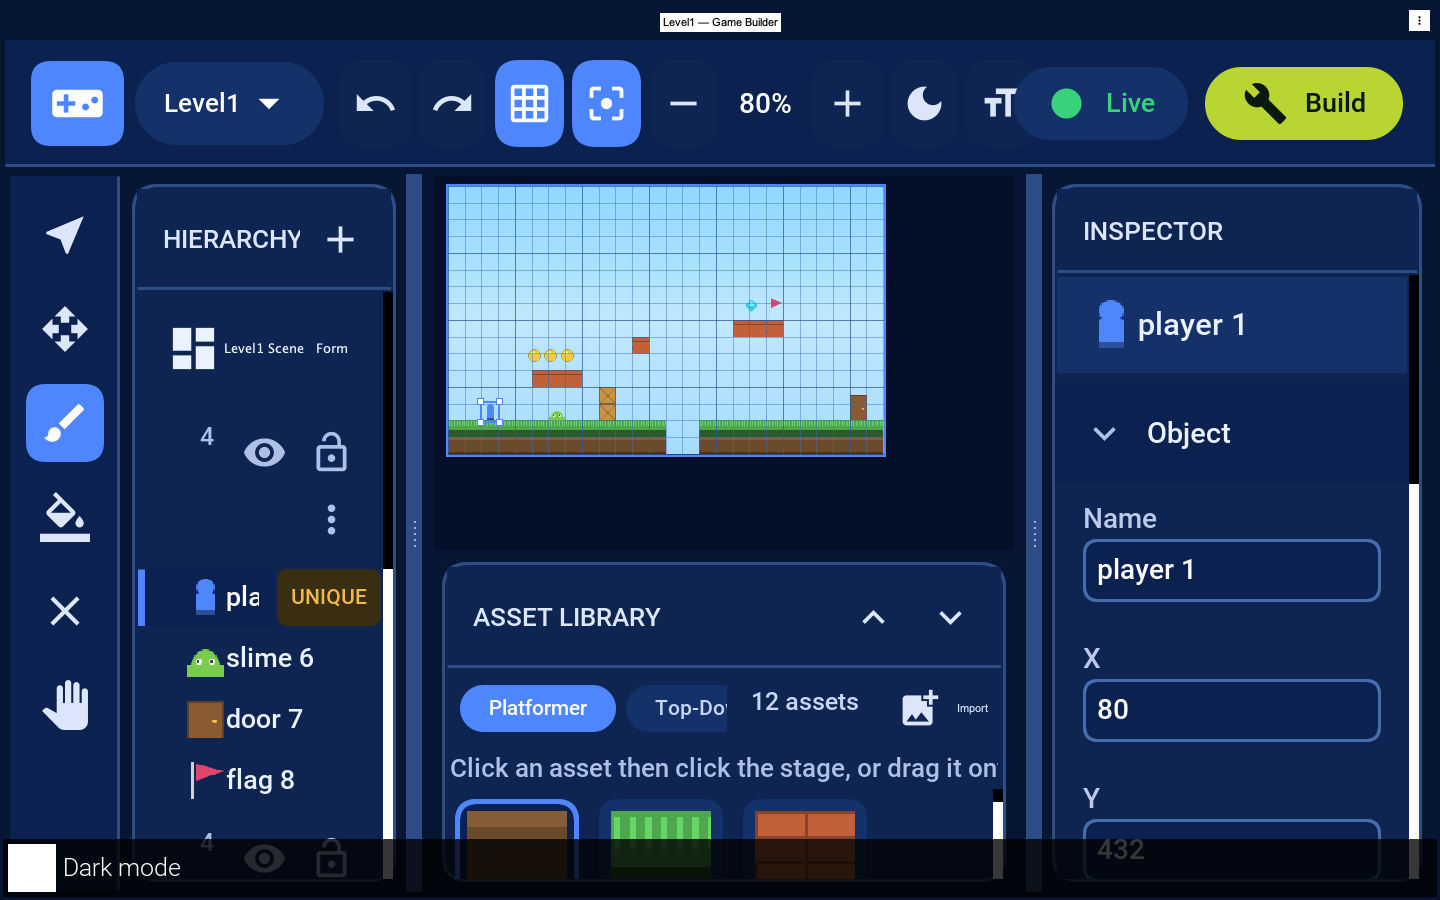
Select an object to edit its Transform (name, position, Layer dropdown) and its Behavior properties — the typed values that parameterize how it acts:
| Object | Behavior properties |
|---|---|
Player / Hero |
|
Coin / Gem |
|
Enemy (slime) |
|
Door / Goal |
|
Torch |
|
Card / Token / Dice |
|
These defaults come from the asset — the Inspector’s read-only Asset section shows
the id, kind, size and unique flag, and Edit asset defaults… lets you change an
asset’s default size and properties (for example, tune ground/coin). Use Add property… to
attach your own game metadata (hitPoints, value, …) to a single object, readable at
runtime via el.getInt(…) / el.getDouble(…). This is the player marks
which element the preview and arrow keys drive (otherwise a player/hero/spawn asset
is used).
Scene-wide rules are set in the Inspector when nothing is selected: gravity,
background theme, grid Cols / Rows / Tile size and the Mode. These are saved
into the .game file and are available at runtime on each GameElement.
Logic — written in the companion
The behavior values are data; the behavior itself is code you write in the generated
companion’s onUpdate(double dt). GameSceneView realizes every element into a sprite
whose getUserData() is the source GameElement, so you read the properties you set in
the editor:
@Override
protected void onUpdate(double dt) {
    // The generated companion switches the built-in arcade behaviour on, and
    // that already patrols enemies and collects pickups. A scene doing the
    // work itself calls setArcadeBehavior(false) in its constructor -- with
    // both running, the built-in patrol and the step below cancel out and
    // the slime stalls.
    GameInput in = getInput();
    Scene scene = getScene();
    // The editor names a stamped object after the asset's display name, so
    // the generated companion has a field like duke1 rather than "player".
    // Look the sprite up by asset id instead of assuming a field name.
    Sprite player = findByAsset("player");
    // Backwards, because collecting a coin removes it from the scene and a
    // forward loop would step over the next sprite.
    for (int i = scene.size() - 1; i >= 0; i--) {
        Sprite s = scene.get(i);
        // Tile sprites carry a Layer in their user data, not a GameElement, so
        // a plain cast fails on the first frame of any scene with painted
        // tiles. elementOf() answers null for those. It also matters that this
        // is not a cast: ParparVM does not check them, so on iOS a bad cast
        // reads the wrong object's fields instead of throwing.
        GameElement el = elementOf(s);
        if (el == null) continue;
        switch (el.getAssetId()) {
            case "player" -> {
                if (in.isGameKeyDown(Display.GAME_RIGHT)) s.setX(s.getX() + 200 * dt);
                // jump height, lives, gravity... all read from el.getInt(...)/getDouble(...)
            }
            // speed is pixels per second, so scale it by the frame delta --
            // otherwise the patrol runs at whatever rate the device renders at
            case "slime" -> s.setX(s.getX() + el.getDouble("speed", 60) * dt);
            case "coin"  -> {
                if (s.intersects(player)) {
                    addScore(el.getInt("value", 10));
                    scene.remove(s);   // consume it, or it scores again every frame
                }
            }
        }
    }
}
Win/lose conditions, scoring, enemy AI and level transitions (using a door’s target)
are all decided here. For rigid-body games use
com.codename1.gaming.physics inside onUpdate. In short: the editor decides the layout and the numbers; your companion
decides the behavior; the engine runs it.
Game types
The mode (chosen per scene) plus the asset pack determine how the same level model is realized:
| Mode | Realized as | Packs | Use for |
|---|---|---|---|
| `Sprite`s in pixel space, tile grids | Platformer, Top-Down RPG | platformers, shooters, top-down adventures |
|
| Board & Card | board games, strategy, card games |
|
| 3D Kit | 3D maps, arena / tycoon layouts |
Switch type from the scene dropdown’s New scene buttons or scaffold with
-Dmode=2d|3d|board. In 3D mode the Inspector also exposes the camera rig, lighting and
terrain; placed elements become meshes (import your own glTF via GltfLoader from the
companion’s buildModels hook).
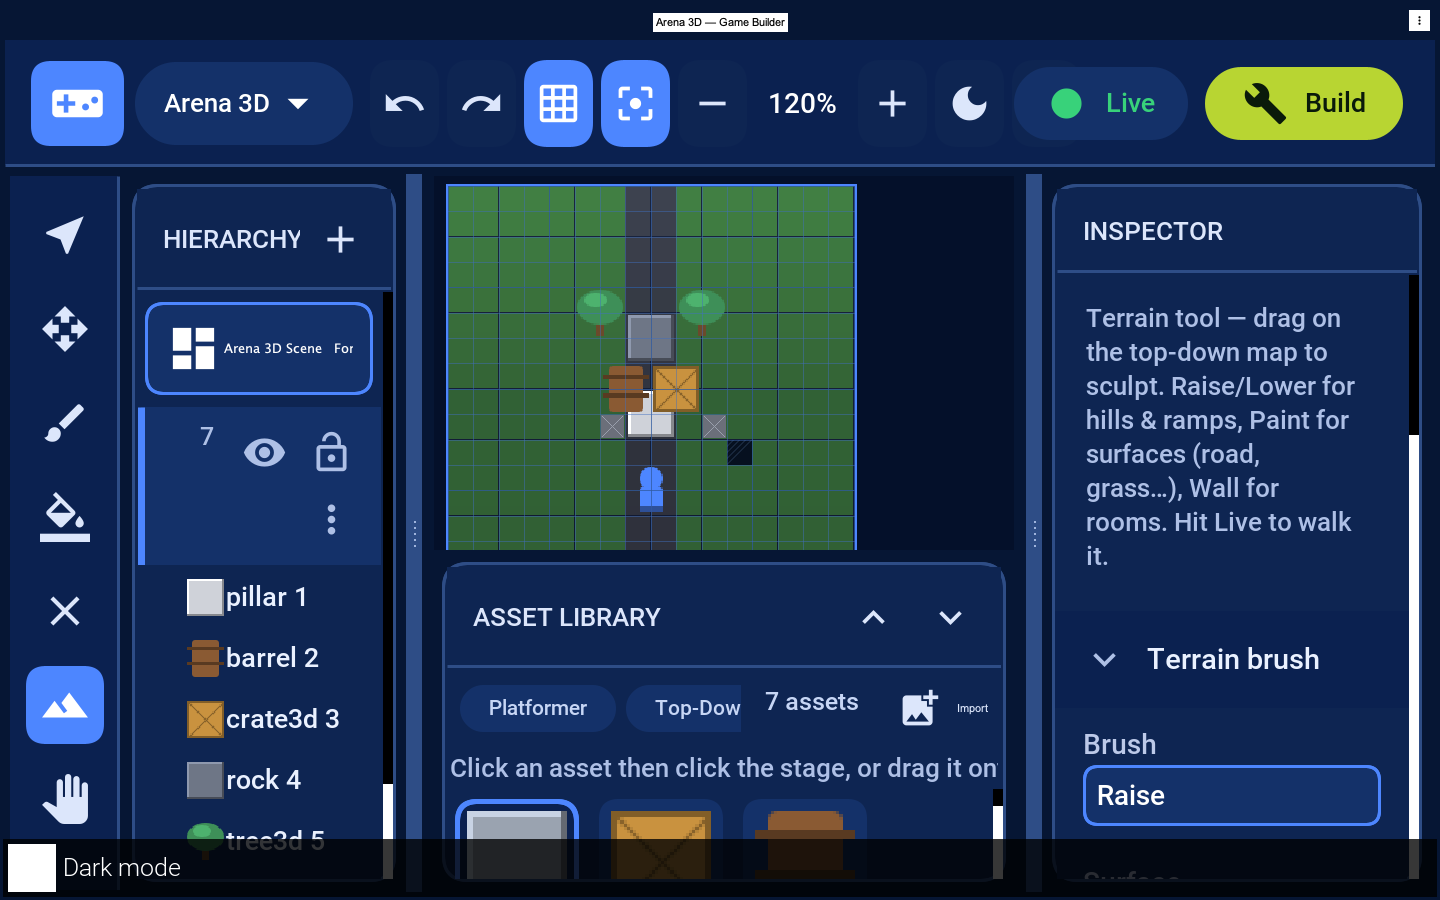
In 3D mode the board is edited top-down (placement, terrain and lighting), and the grid autofits the canvas so it stays usable at any size and zoom. Each placed element reads as a single object on the grid rather than a flat sprite filling the board.
Live preview
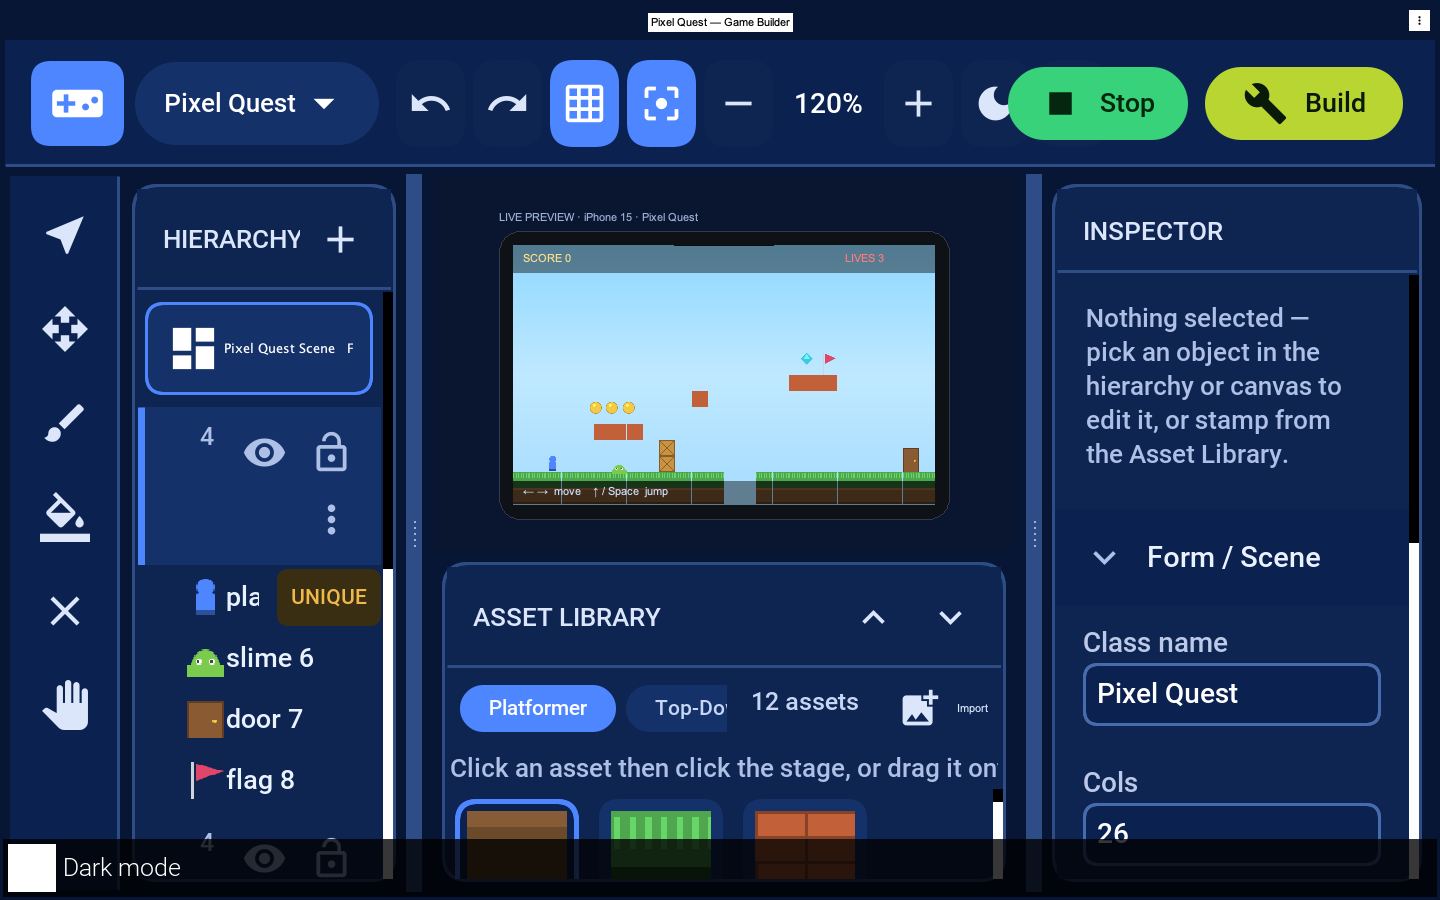
Press Live to play the level in place inside a device frame with a HUD. The preview ships default behaviors so common cases work without any code: in a 2D platformer the arrow keys move the player and Up / Space jumps (gravity and tile collision are simulated), coins/gems are collected for score, and enemies patrol and cost a life on contact. The on-screen hint shows the controls, and the SCORE / LIVES HUD is live. Press Stop to return to editing — playing never mutates the level.
For a 3D map the preview switches to a true perspective view — a receding ground grid with the placed meshes rendered as depth-sorted objects under an orbiting camera — so you see 3D gameplay rather than a flat top-down board:
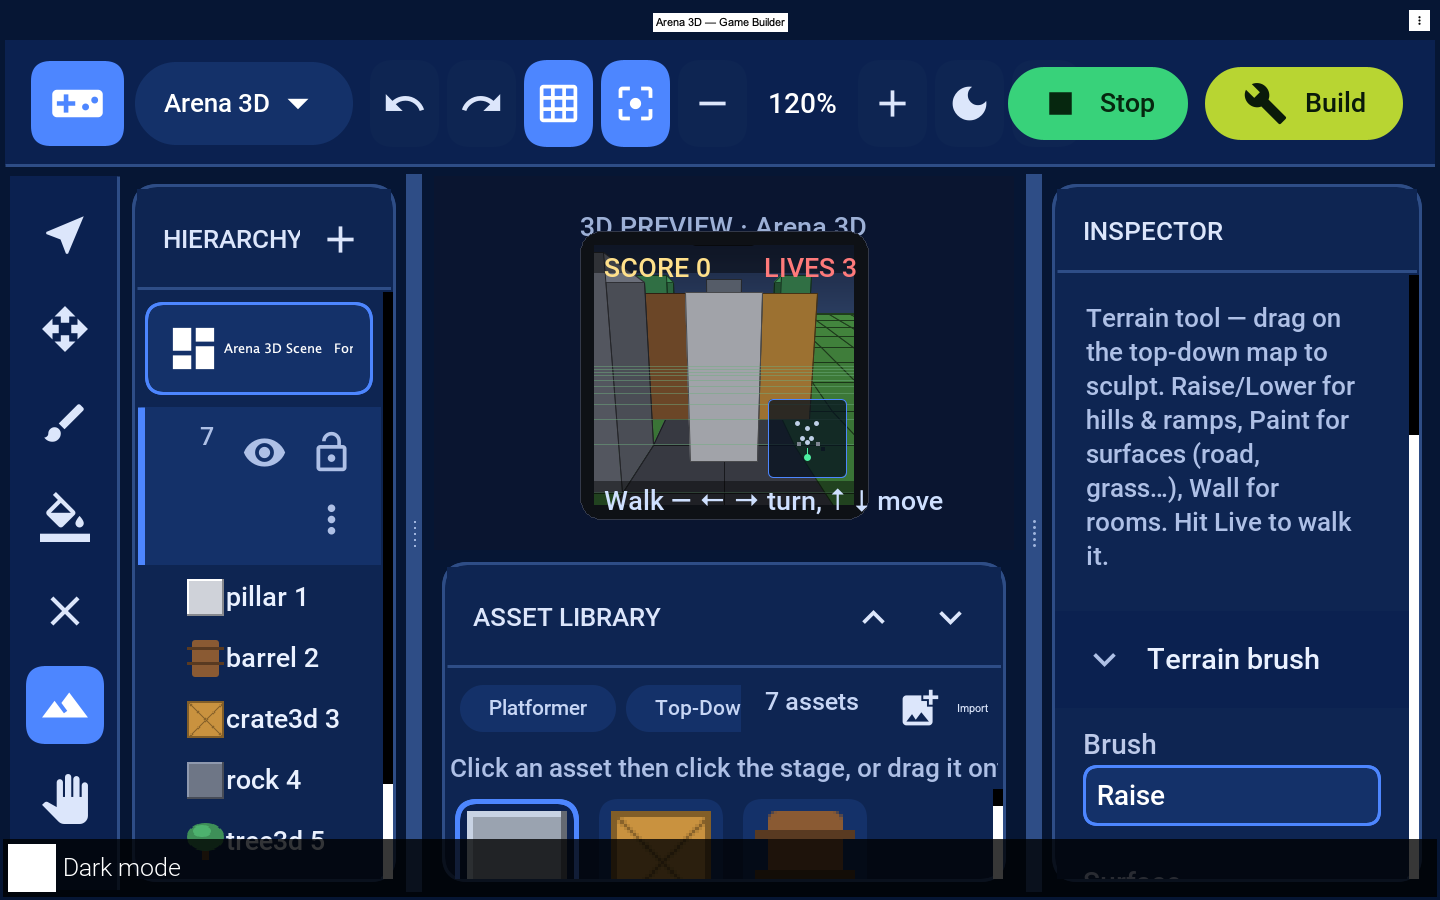
The in-editor preview is for quick iteration; for full-fidelity play on device, run the
companion in your app, where the scene is rendered by the GPU-accelerated
GameSceneView.
Build, save and run
Build writes the level to src/main/resources/games/<Scene>.game and (once) the
companion <Scene>.java. To show the scene in your app, instantiate the companion and
start() it:
Form game = new Form("Play", new BorderLayout());
// The generated scene takes the catalog as a constructor argument, and
// neither the scaffold nor the build produces one: it is yours to supply.
// Bundle the pack JSON your level references as an app resource and load
// it here. StarterPacks, which the editor uses, ships with the editor and
// is not on an application's classpath.
AssetCatalog catalog = AssetCatalog.load(
        Display.getInstance().getResourceAsStream(Level1.class, "/my-packs.json"));

// load() only parses the definitions. Nothing else loads the images,
// sprite sheets and meshes they name, so without this the scene renders
// placeholders and the sheets never animate.
catalog.resolveArt();
Level1 scene = new Level1(catalog);
game.add(BorderLayout.CENTER, scene);
game.show();
scene.start();
The level is plain data, so you can ship many .game files and load whichever level the
player selects.
Maven goals
| Goal | Purpose |
|---|---|
| Scaffold a |
| Launch the editor bound to the current project. |
Extending
Asset packs are JSON (
{"packs":[{"id","name","assets":[{"id","kind","w","h","color","unique","source","defaults"}]}]}) loaded byAssetCatalog.load. Add your own pack with real art.Asset art follows the SVG/Lottie approach: reference source art per asset and let the build translate it to code/raster; where no art is supplied the catalog draws a recognizable placeholder so a level always renders.
Behaviors can be factored into reusable helpers driven entirely from the property bag, keeping levels data-only.
Importing your own art
To bring in custom artwork, click Import in the Asset Library header and pick an image.
The image is added to a Custom pack as a new asset (a tile when a tile layer is
active, otherwise an actor), selected and ready to paint or stamp immediately. When the
editor is bound to a project, the picture is copied into
src/main/resources/games/assets/ and recorded in games/custompack.json, so it
survives reloading and ships with the project — the generated game resolves it through
the same AssetCatalog.