In my last post I demonstrated how to integrate a MySQL database into a Codename One app using Xataface as a web service layer. In this installment, I’m going to demonstrate how we can build an equivalent app using a Java web service layer.
Requirements
For this tutorial, I’ll be using NetBeans 8.1 and its bundled GlassFish 4.0 container. If you don’t already have a MySQL database set up, then I recommend you install XAMPP XAMPP, as it provides a double-clickable installer for Mac and Windows and an easy administration console.
The Database
The following setup instructions are identical to those in the previous post. They are included here for convenience:
For my database I’m going to use the Sakila sample database provided by MySQL. This database models a video rental store, including such aspects as customer information, staff info, film info, and actor info. The schema is as follows (schema taken from here):
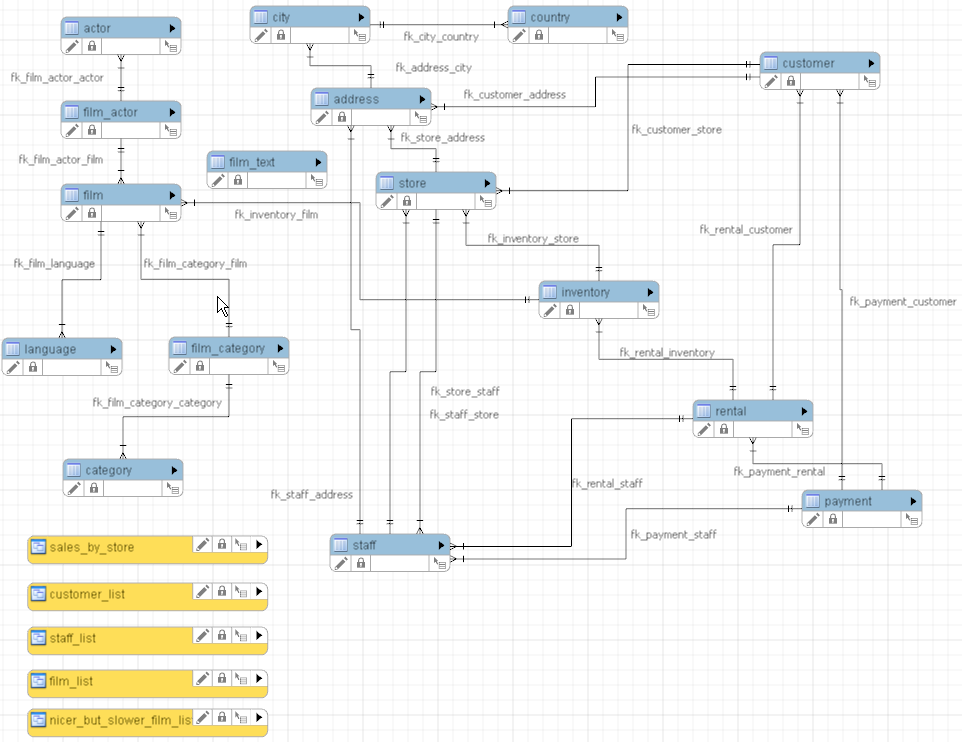
As you can see, this database includes much more than contact information, but our app will focus only on contact info. This is actually quite a typical scenario for a mobile app. I frequently create ad-hoc mobile apps that consume specific parts from the data source in order to help with testing of the main app. Mobile apps, in my experience, work quite well when they are focused on doing one task well, rather than doing a whole bunch of tasks as you would expect in a desktop application.
So in this case, you can imagine that the store owners might want an app to help keep track of the contacts in the system. That is the app we will build here.
Installing the Database
I’ll be using the mysql command-line client that is installed at /Applications/XAMPP/bin/mysql on my development machine. If yours is installed elsewhere then you’ll adjust your commands accordingly.
First, download the Sakila database from here. (Link obtained from this page in case the direct link becomes broken later for some reason).
When you extract the archive, you’ll find two SQL files:
- sakila-schema.sql – This contains the database schema.
- sakila-data.sql – This contains the sample data
We’ll install both into our database with the following commands.
$ mysql -u root -p < sakila-schema.sql
$ mysql -u root -p < sakila-data.sql
Once these have executed, you should be able to log into mysql and see see the tables listed:
$mysql -u root -p
USE sakila;
Database changed
SHOW TABLES;
+----------------------------+
| Tables_in_sakila           |
+----------------------------+
| actor                      |
| address                    |
| category                   |
| city                       |
| country                    |
| customer                   |
| customer_list              |
| film                       |
| film_actor                 |
| film_category              |
| film_list                  |
| film_text                  |
| inventory                  |
| language                   |
| nicer_but_slower_film_list |
| payment                    |
| rental                     |
| sales_by_film_category     |
| sales_by_store             |
| staff                      |
| staff_list                 |
| store                      |
+----------------------------+
22 rows in set (0.00 sec)
SELECT COUNT(*) FROM film;
+----------+
| COUNT(*) |
+----------+
| 1000     |
+----------+
1 row in set (0.02 sec)
SELECT COUNT(*) FROM film_text;
+----------+
| COUNT(*) |
+----------+
| 1000     |
+----------+
1 row in set (0.00 sec)
The Web Service
I’m going to use Netbeans and its handy wizards to generate the web service this time around. Before we begin, we’ll need to set up NetBeans to connect to our MySQL database.
Configuring Netbeans to use MySQL
Click on the “Services” tab, and right click on “Databases”:
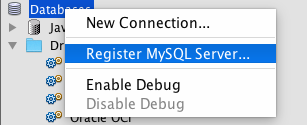
Select the “Register MySQL Server” option. This will bring up a setup dialog as follows. If you installed XAMPP, and are using the mysql server included with that, then your settings will look like mine. If not, you’ll need to customize them for your needs.
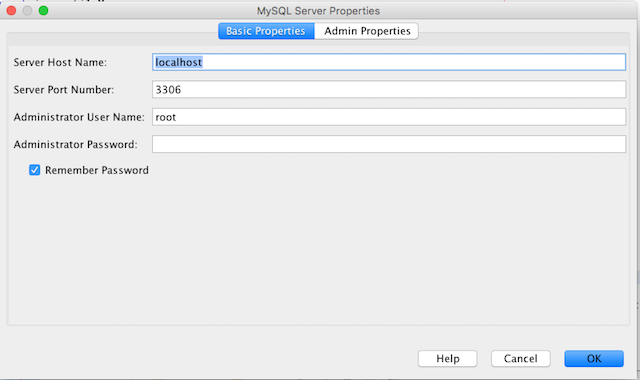
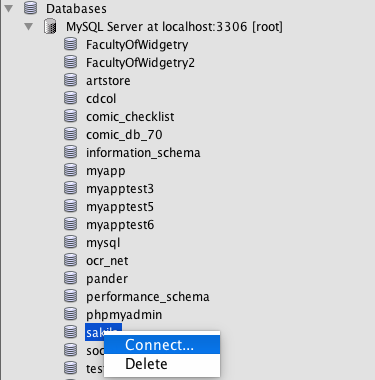
After you have completed your settings, and clicked “OK”, you should see a new node appear under the “Databases” node named “MySQL Server at localhost:3306”. Expand this node to see all of your databases revealed.
Right click on the “sakila” database, and select “Connect…” as shown below:
At this point we should have all of the groundwork covered to create our server project.
Creating the Web Service Project
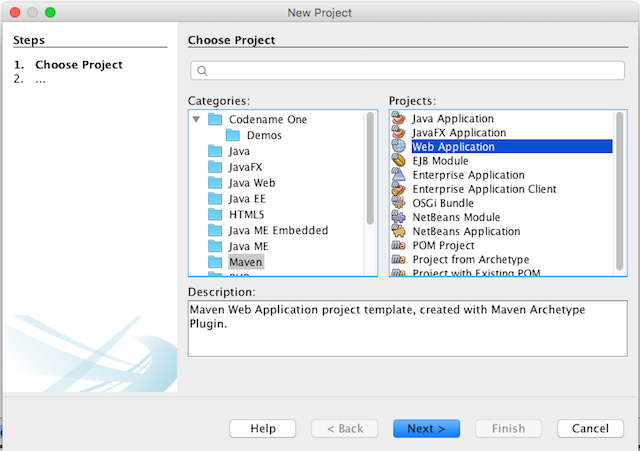
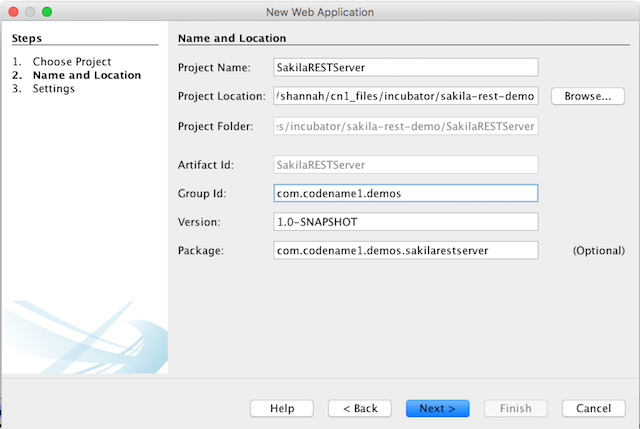
In Netbeans select “File” > “New Project…”, then in the new project wizard select “Maven” > “Web Application”.
| I’m using Maven for this tutorial because I prefer it, but you could also use an ANT-based project under “Java Web” > “Web Application” and it should work fine. |
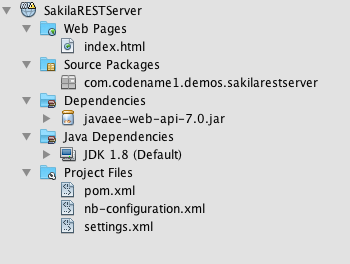
After completing the new project wizard, you should see the SakilaRESTServer project in the project navigator, as shown here.
Generating the Web Services
Currently the project is a generic web application without any web services or database access defined. Let’s add that now.
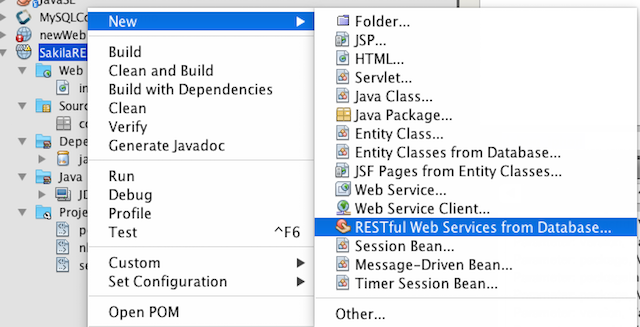
Right click on the “SakilaRESTServer” project in the project explorer, and select “New” > “RESTful Web Services from Database” as shown below:
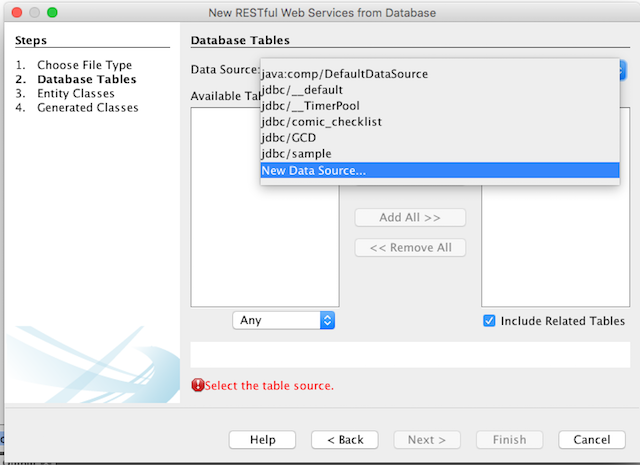
In the dialog that appears, in the Data Source select list, select “New Data Source…”.
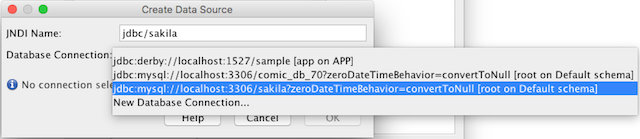
Enter “jdbc/sakila” as the JNDI name, and then select the JDBC connection string for the sakila database from the pull-down:
After clicking “OK”, you should see the “Available Tables” list populated as shown below.
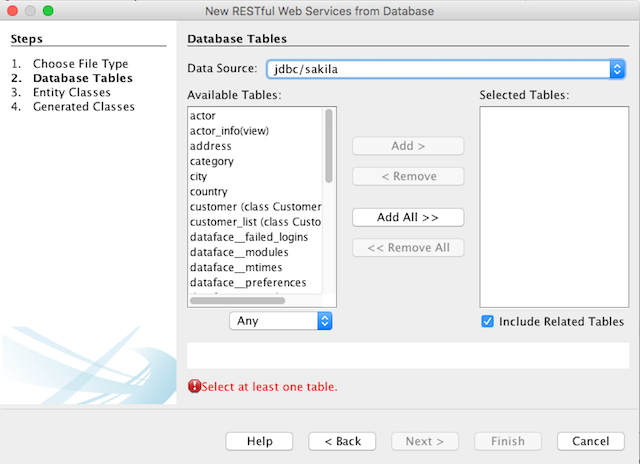
For this application, you should uncheck the “Include related tables” checkbox as we only want the “Customer” table, and the Customer_list view to be included. If you were to leave this checked, then all kinds of other information would be included by default in the REST responses which we don’t want.
Now add the “Customer” and “Customer_List” tables to the “Selected Tables” list and click “Next”.
The next page we’ll leave default:
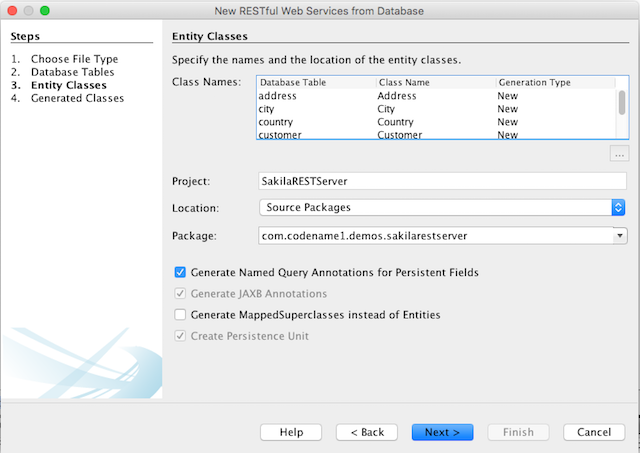
And same with the next page.
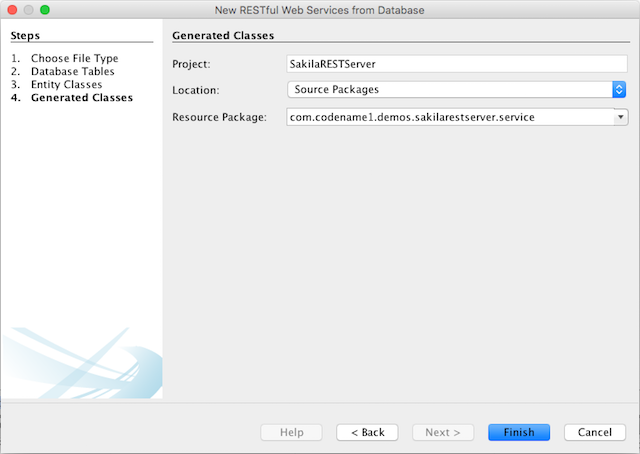
Finally, click the “Finish” button to let the magic begin.
Once the dust has settled, your project structure should look something like the following:
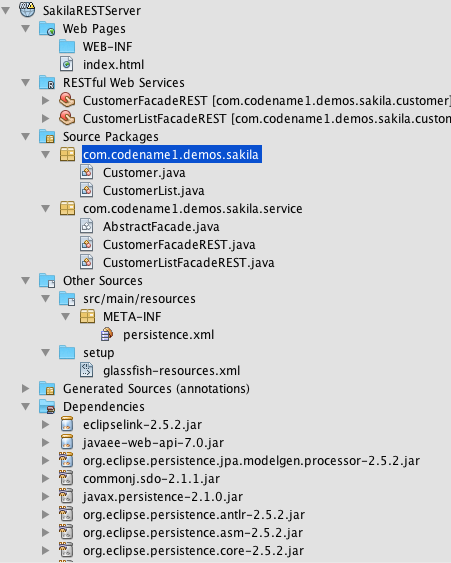
A few things to notice here:
- Entity classes for Customer and CustomerList have been generated in the com.codename1.demos.sakila package.
- Corresponding web service facades have been generated in the com.codename1.demos.sakila. These are the actual web services that will handle requests.
Take the time to browse through the entity classes and services to get a feel for what is going on. It should be reasonably straight forward.
Specify the ID field in CustomerList
Since Customer_List is a view, Netbeans doesn’t know which column is the “id”, so we’ll need to add that. If you open the CustomerList class, you’ll see a compile error because of this.
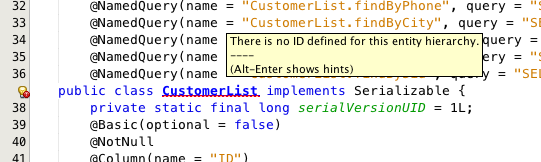
You’ll need to add the @Id annotation to the “ID” field declaration. Netbeans will assist you with this if you expant the little light bulb icon in the left column of the error line.
A Look at the Web Service Facades
At this point our web service is done, but before proceeding, let’s take a look at some of the source so that we get a sense of how the web service will work.
The CustomerFacade class looks like:
package com.codename1.demos.sakilarestserver.service;

// redacted imports


@Stateless
@Path("com.codename1.demos.sakilarestserver.customer") (1)
public class CustomerFacadeREST extends AbstractFacade<Customer> {
    @PersistenceContext(unitName = "com.codename1.demos_SakilaRESTServer_war_1.0-SNAPSHOTPU")
    private EntityManager em;

    public CustomerFacadeREST() {
        super(Customer.class);
    }

    @POST
    @Override
    @Consumes({"application/xml", "application/json"})
    public void create(Customer entity) { (2)
        super.create(entity);
    }

    @PUT
    @Path("{id}")
    @Consumes({"application/xml", "application/json"})
    public void edit(@PathParam("id") Short id, Customer entity) { (3)
        super.edit(entity);
    }

    @DELETE
    @Path("{id}")
    public void remove(@PathParam("id") Short id) { (4)
        super.remove(super.find(id));
    }

    @GET
    @Path("{id}")
    @Produces({"application/xml", "application/json"})
    public Customer find(@PathParam("id") Short id) { (5)
        return super.find(id);
    }

    @GET
    @Override
    @Produces({"application/xml", "application/json"})
    public List<Customer> findAll() { (6)
        return super.findAll();
    }

    @GET
    @Path("{from}/{to}")
    @Produces({"application/xml", "application/json"})
    public List<Customer> findRange(@PathParam("from") Integer from, @PathParam("to") Integer to) { (7)
        return super.findRange(new int[]{from, to});
    }

    @GET
    @Path("count")
    @Produces("text/plain")
    public String countREST() { (8)
        return String.valueOf(super.count());
    }

    @Override
    protected EntityManager getEntityManager() {
        return em;
    }

}| 1 | The relative URL to the web service. To access this web service, you would append this value to the end of the URL for the web app. In our case http://localhost:8080/SakilaRESTServer/com.codename1.demos.sakilarestserver.customer is the full URL to this webservice. |
| 2 | Endpoint to insert a new record into the customer table. This can be accessed by sending a POST request to the webservice URL with appropriate XML or JSON data. |
| 3 | Endpoint to update an existing record. This can be accessed by sending a PUT request to {webservice_url}/{customer_id} with the appropriate XML or JSON data. For example, if we wanted to update the customer with customer_id=10 we would send our PUT request to http://localhost:8080/SakilaRESTServer/com.codename1.demos.sakilarestserver.customer/10 |
| 4 | Endpoint to delete a record. This can be accessed by sending a DELETE request to {webservice_url}/{customer_id}. |
| 5 | Endpoint to find a record by ID. This can be accessed by sending a GET request to {webservice_url}/{customer_id}. By default the web service returns XML. You’ll need to add the header Accept: application/json to indicate that it should return JSON. |
| 6 | Endpoint to return a list of all records in the customer table. This can be accessed by sending a GET request to the webservice URL. As with other GET requests, you should use the Accept HTTP header to indicate whether you want the result in XML or JSON. |
| 7 | Endpoint to return a list of only rows in the specified range. Accessed with a GET request to {webservice_url}/{from}/{to}. E.g. to get only the first 3 records in the table, we would send a GET request to http://localhost:8080/SakilaRESTServer/com.codename1.demos.sakilarestserver.customer/0/2 |
| 8 | Endpoint to return the number of rows in the customer table. This can be accessed by sending a GET request to {webservice_url}/count. |
Full class can be seen here
Running/Testing the Project
In the project explorer, right click on the SakilaRESTServer project and select “Run”. This should automatically start the bundled GlassFish server, and deploy our app.
If all wend well, it should open your web browser to the index page which says “Hello World!”.
Next, we’ll test out the actual webservices.
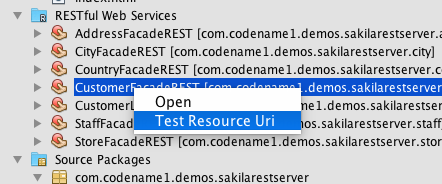
In the project explorer, uner the “RESTful Web Services” folder, you should see two web services listed. Right click on either of them and select “Test Resoure Uri” as shown here:
This should open up your web browser with an XML feed of all of the records in the customers table.
The Client App
I’m changing very little of the Client app from the Xataface client version shown in my previous post. Instead of the CN1Xataface library, which is designed to consume a Xataface-powered web-service, I’m using the GenericWebserviceClient.cn1lib which is designed to consume a generic web service, with APIs like the web service that we just created. This library should be applicable to a most of the APIs in production today.
The GenericWebserviceClient.cn1lib includes a RESTfulWebServiceClient class with the following main methods:
// Delete a record with id asynchronously
public void delete(String id, SuccessCallback<Boolean> callback);

// Create a new record with the given data asynchronously
public void create(Map data, SuccessCallback<Boolean> callback);

// Edit an existing record with given data asynchronously.
public void edit(String id, Map data, SuccessCallback<Boolean> callback);

// Count the number of records provided by the web service.
public void count(SuccessCallback<Integer> callback);

// Find records provided by the web service
public void find(Query query, SuccessCallback<RowSet> callback)
The Query class allows you to specify a find by record ID or on a range. It can be overridden to provide additional criteria to access other methods of a webservice API if they are required.
You can view the source of the RESTfulWebserviceClient class here.
The client App source is as follows (redacted for clarity):
package com.codename1.demos.sakila;

// redacted imports ...

import com.codename1.ws.RESTfulWebServiceClient;
import com.codename1.ws.RESTfulWebServiceClient.Query;
import com.codename1.ws.RESTfulWebServiceClient.RowSet;


/**
 * This file was generated by <a href="https://www.codenameone.com/">Codename One</a> for the purpose
 * of building native mobile applications using Java.
 */
public class SakilaDemo {

    // redacted member variables ...

    String customerEndpoint = "http://localhost:8080/SakilaRESTServer/webresources/com.codename1.demos.sakilarestserver.customer"; (1)

    // Database Connection Properties
    RESTfulWebServiceClient client;


    // redacted utility methods ...

    // Lifecycle Methods -------------------------------------------------------
    public void init(Object context) {
        theme = UIManager.initFirstTheme("/theme");

        // Enable Toolbar on all Forms by default
        Toolbar.setGlobalToolbar(true);

        // Pro only feature, uncomment if you have a pro subscription
        // Log.bindCrashProtection(true);

        client = new RESTfulWebServiceClient(customerEndpoint); (2)
    }

    public void start() {
        if(current != null){
            current.show();
            return;
        }
        Form hi = new Form("Contacts");
        hi.setLayout(new BorderLayout());

        hi.show();
        Display.getInstance().callSerially(()->{
            loadContacts(rowset->{ (3)

                hi.addComponent(BorderLayout.CENTER, createContactsList(hi, rowset));
            });
        });
    }

    public void stop() {
        // redacted ...
    }


    public void destroy() {
    }

    // Web Service Methods -----------------------------------------------------

    /**
     * Loads all of the contacts from the database asynchronously.  On complete
     * the callback will be called with the resulting rowset as a parameter, or
     * null if there was an error.
     * @param callback Callback to handle the received rowset.
     */
    private void loadContacts(SuccessCallback<RowSet> callback) { (4)
        Query q = new Query();  (5)
        client.find(q, callback);  (6)

    }

    /**
     * Convert a record from the "contact" table into a Contact object.
     * @param record A record from the "contact" table.
     * @return A Contact object
     */
    private static Contact createContact(Map m) {  (7)
        Result record = Result.fromContent(m);
        Contact c = new Contact();
        c.setFirstName(record.getAsString("firstName"));
        c.setFamilyName(record.getAsString("lastName"));
        c.setPrimaryEmail(record.getAsString("email"));
        return c;
    }

    /**
     * Convert a rowset (from the contact table) into an array of Contact
     * objects
     * @param rowset A rowset from the contact table.
     * @return An array of Contact records.
     */
    private static Contact[] rowsetToContactsArray(RowSet rowset) {  (8)
        List<Contact> lst = new ArrayList<Contact>();
        for (Map record : rowset) {
            lst.add(createContact(record));
        }
        return lst.toArray(new Contact[lst.size()]);
    }

    // View Factory Methods ----------------------------------------------------

    /**
     * Creates a list of contacts included in the specified rowset.
     * @param parentForm The parent form
     * @param rowset The rowset to encapsulate (from the "contact" table)
     * @return A container to be added to the form.
     */
    private Container createContactsList(Form parentForm, RowSet rowset) {
        Contact[] contacts = rowsetToContactsArray(rowset);

        // redacted image creation stuff...

        final Container contactsDemo = new Container(BoxLayout.y());
        contactsDemo.setScrollableY(true);

        for(Contact c : contacts) {
            Container row = createContactRow(c, contactsDemo);
            if (row != null) {
                contactsDemo.add(row);
            }
        }
        contactsDemo.revalidate();
        finishedLoading = true;

        RowSet[] lastSet = new RowSet[]{rowset};
        InfiniteScrollAdapter.createInfiniteScroll(contactsDemo, () -> {
            Query nextQuery = lastSet[0].getNextQuery();  (9)
            if (nextQuery.getSkip() > lastSet[0].getSkip()) {

                client.find(nextQuery, newResult -> { (10)
                    if (newResult == null) {
                        return;
                    }
                    List<Component> toAdd = new ArrayList<Component>();
                    for (Map row : newResult) {
                        Container cntRow = createContactRow(createContact(row), contactsDemo);
                        if (cntRow != null) {
                            toAdd.add(cntRow);
                        }
                    }
                    InfiniteScrollAdapter.addMoreComponents(contactsDemo, toAdd.toArray(new Component[toAdd.size()]), true);
                    lastSet[0] = newResult;
                    contactsDemo.revalidate();
                });
            }
        });

        return contactsDemo;
    }

    /**
     * Creates a single row for the contact list that encapsulates the provided
     * contact.
     * @param c The contact to represent with this row.
     * @param parent The parent container to which the row is to be added.  This method doesn't actually add the
     * row to the parent, but it does need to reference it for some of the listeners that are added to the row.  The caller
     * should add the resulting row to the parent after calling this method.
     * @return A container encapsulating the row, or null if the contact didn't have a name.
     */
    private Container createContactRow(Contact c, Container parent) {
        // redacted same 'ol same 'ol
    }

}| 1 | The end point for the web service. We got this directly from the @Path annotation of the CustomerFacadeREST class on the server. |
| 2 | Instantiate a client for the web service. Notice that we passed the URL to the endpoint in the constructor. |
| 3 | We call loadContacts() to asynchronously load the contacts inside the start() method. |
| 4 | The implementation of loadContacts() which simply wraps a call to RESTfulWebServiceClient.find(). |
| 5 | Create a new Query for the find request. By default a query is set to load the first 30 rows of the end point. |
| 6 | We use the find() method to asynchronously load records from our end point. |
| 7 | createContact() is a convenience method to convert our Maps of customer data received from the web service into Contact objects which our UIwas already set up to use. Note one difference from the Xataface version in the previous blog post is that the property names use camel-case instead of snake case. |
| 8 | rowsetToContactsArray converts an entire RowSet received from the web service into an array of Contact records. |
| 9 | We use the InfiniteScrollAdapter to progressively load more rows as required. RowSet includes a convenience getNextQuery() method to get query to produce the next page of results. |
| 10 | Finally we load the next page of results inside the InfiniteScrollAdapter using client.find(). |
See the full source here.
The Final Results
This app is effectively identical to the one from our previous post, so it will look the same.

Summary
This brief tutorial demonstrated how you can set up a web service facade in front of a MySQL database to be consumed by a Codename One app. It introduced the GenericWebServiceClient library as tool to help you consume web services of this kind. This library should be applicable to the vast majority of RESTful APIs in production today, and it is easily extendible so you can customize it to suit your specific needs if they aren’t met out of the box.
| This post completely ignored security concerns. The examples here produced web services that are effectively open to the world. In a future post I may cover security, but for now, I leave it to you to make sure that you secure your web services. |
Having demonstrated two different ways to develop essentially the same app, you may be wondering which approach is better. My response would be that it depends. Using Xataface in the back-end provides quite a bit of query flexibility in the client for free. However, the Java solution will perform better under load. Personally I use Xataface a lot for setting up administration tools and ad-hoc apps. If I plan to build a service that will scale to millions of users (thousands of requests per second), I will move towards the JVM.

2 Comments
thank you for this i hope you can make a video of it so we can understand more
Is this possible in eclipse? I’m trying to connect a Codename One application I have built in eclipse to an AWS RDS database I’ve built. Both Codename One and AWS are brand new to me, and I have no idea what I am doing.